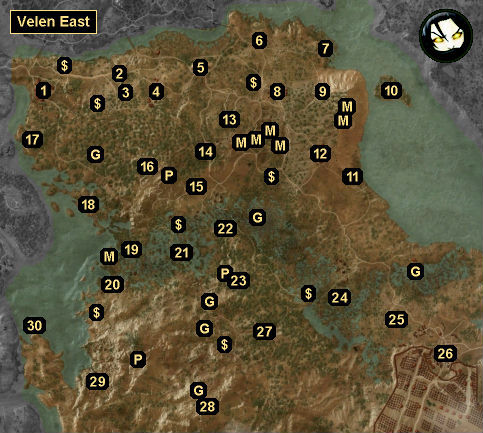
This guide is an overview of a certain location in the Witcher 3. The guide is composed of a map, map legend, and walkthrough of all the various points.
Overview
1 – Lindenvale
You’ll meet a few people in this town:
You’ll also find an armorer’s table and a grindstone in the village.
2 – Gert Borel
At this spot you’ll discover Gert Borel being attacked by a trio of ghouls. This encounter will trigger the quest Hazardous Goods.
3 – Abandoned Site (Trading Post)
If you defeat the renegades here, then the peasants will return, including an herbalist and a merchant. You’ll also earn 50 crowns and 120 xp.
4 – Lurtch
In Lurtch you’ll meet a man named Yontek, who will ask you to rescue Yagoda. This is a part of the quest Fool’s Gold.
5 – Hidden Treasure (Burned Village)
In a cellar in the village here, you’ll find a dead man. Looting the man will trigger the quest Out of the Frying Pan, Into the Fire.
6 – Hidden Treasure (Bandit Camp)
When you kill the deserters in this camp, one of them will drop a Letter. Looting the Letter will trigger the quest Hidden from the World.
7 – Grotto
Inside the cave system here, you’ll find two treasure chests. One of them will contain the diagram for  Enhanced Wolven Boots.
8 – Toderas
When you arrive at this village, you’ll find all of the villagers dead and seven “peasants” arguing about how to divide up the loot. If you stay out of the matter, then then peasants will attack themselves. Otherwise, they’ll attack you, and you’ll earn 10 xp for defeating them. You’ll also find an armorer’s table and a grindstone in the village.
9 – Cave System
You’ll discover two cave entrances here, both leading to the same cave system. Inside the caves, you’ll find two treasure chests. One will be random, and the other will have the diagram for  Enhanced Feline Boots.
10 – Hidden Treasure (Foggy Island)
You’ll encounter a pair of foglets on this island. After defeating them, if you turn on your witcher senses then you’ll detect some footprints. The footprints will start on the western side of the island at a corpse with a Scratched Key, they’ll pass by a dead man and a boat, and they’ll end up on the eastern side of the island at a third dead man next to a half-buried and locked chest. The Scratched Key will unlock the chest, and you’ll find some random loot inside.
Note: Also on the island, you’ll find a  Valuable Fossil next to the corpse with the key. It’s not really valuable or noteworthy. It’s just a junk item.
11 – Cave
Outside this cave you’ll find a snow hare plus several decomposed corpses. This is a reference to the Rabbit of Caerbannog from the movie Monty Python and the Holy Grail. The cave itself is involved in the quest The Truth Is in the Stars.
12 – Benek
You’ll meet two people of interest in Benek:
13 – Hog Hut Cave
This cave is involved in the quest Fool’s Gold. You’ll find the diagram for  Feline Steel Sword – Enhanced inside.
14 – Reardon Manor
The estate here is involved in the quest The Fall of the House of Reardon.
15 – Downwarren
You’ll find two things of interest on Downwarren: a merchant and a notice board. The notice board will give you the quest Contract: Swamp Thing.
16 – Dragonslayer’s Grotto
You’ll find some ruins in this grotto. In the front part of the ruins, you’ll have to deal with some level 7 wraiths, but you’ll find a few chests to loot. In the back part of the ruins, you’ll encounter a level 11 ekimmara (vampire), but you’ll find a chest containing the diagrams for  Griffin Armor,
  Griffin Boots,
  Griffin Gauntlets, and
  Griffin Trousers. To open up the back exit from the ruins, you’ll need the
  Magic Lamp from the quest An Invitation from Keira Metz.
17 – Hole in the Ground
The hole in the ground here will lead you to a cave. This cave is involved in the quest Contract: Mysterious Tracks.
18 – Ruins
You’ll encounter a level 27 earth elemental in these ruins, but if you can kill it (or run around it) then you’ll discover a chest containing the diagrams for  Superior Feline Armor,
  Superior Feline Boots,
  Superior Feline Gauntlets, and
  Superior Feline Trousers.
19 – Leslav
You might meet a peat farmer named Leslav here. He’s involved in the quest Contract: Swamp Thing.
20 – Cave Entrances
You’ll discover three cave entrances around here, including one where you’ll have to use  The Eye of Nehaleni (gained during the quest Wandering in the Dark) to detect it. All of the entrances will lead you to the same cave, which is involved in the quest Contract: Swamp Thing. Inside the cave, you’ll find a random treasure chest plus another chest containing the diagram for
  Ursine Silver Sword – Superior.
21 – Orphan Village
This village is heavily involved in the quest Ladies of the Wood.
22 – Ruined Tower
On the eastern side of these ruins, you’ll find the diagram for  Ursine Steel Sword – Superior.
23 – Ancient Oak
This giant tree is involved in the quest The Whispering Hillock.
24 – Hidden Treasure
After defeating the level 22 fiend here, you’ll find some corpses on the ground. One of them will have a Bandit’s Notes and a Bandit’s Key. The key will unlock a nearby gate, behind which you’ll discover three treasure chests. Inside one of the chests you’ll find a leveled version of the silver sword Azure Wrath. Inside another you’ll find the diagram for  Wolven Silver Sword – Mastercrafted.
25 – House of Respite
Near the entrance to this establishment, you’ll find a sign labeling it as an officer’s club for the Nilfgaardian army. It’ll indicate that you’ll need to be wearing “full regimental dress” to get inside. The guards at the entrance won’t talk to you, so you won’t be able to use Axii / Delusion on them. To get the guards to step aside, you’ll need to be wearing an Elegant Courtier’s Doublet or  Nilfgaardian Armor. You might still have the doublet from the quest Imperial Audience, but if not then you can buy it from Elihal in Novigrad. You can buy the
  Nilfgaardian Armor from the quartermaster at Crow’s Perch in Velen West.
Inside the establishment, you won’t find much of interest other than a few containers that you can loot when the Nilfgaardian soldiers aren’t looking. The establishment was probably meant for more but was left unfinished.
26 – Nilfgaardian Army Group “Center” Camp
You’ll find a few things of interest inside this camp:
27 – Cave
Inside this cave you’ll find the diagram for  Griffin Silver Sword – Enhanced.
28 – Destroyed Bastion / Guarded Treasure
After defeating the level 15 cyclops here, you’ll be able to loot three chests: two inside the ruins and one just to the southwest. Inside one of the chests you’ll find the diagrams for  Mastercrafted Ursine Armor,
  Mastercrafted Ursine Boots,
  Mastercrafted Ursine Gauntlets, and
  Mastercrafted Ursine Trousers.
29 – Bald Mountain Village
This village is involved in the ques Bald Mountain. If you attempt to visit it before triggering the quest, then you’ll encounter some level 24 foglets in the area.
You’ll only be able to reach the Place of Power (P) near the village after you’ve triggered the quest Bald Mountain.
30 – Island / Monster Nest (Drowners) / Chest
Inside the half-buried chest here, you’ll find the diagram for  Ursine Silver Sword – Mastercrafted.
G – Guarded Treasure
M – Monster Nest
P – Place of Power
$ – Treasure
