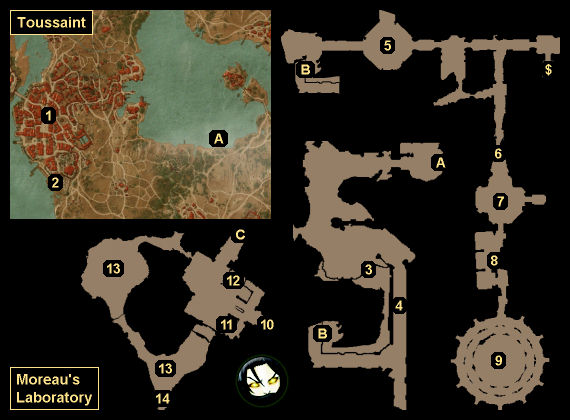
This guide is a walkthrough of a side quest in the Witcher 3: Blood and Wine DLC. The guide is composed of a map, map legend, and walkthrough to show readers exactly where to go and what to do to complete the quest.
Background
The first time you approach the notice board in Beauclair (#1), a street urchin will hand you a letter from either Triss or Yennefer depending on which one you romanced in the main game. Reading this letter will trigger the quest.
Note: If you tip the urchin, then you’ll gain the Generosity virtue for the quest There Can Be Only One.
Walkthrough
The letter will inform you that somebody named Professor Moreau once studied witcher mutations, but that his research was lost when he died. Triss / Yennefer will suggest that you dig up his grave and search for clues, which might lead you to his laboratory. To help you out, your paramour will include an  Old Map of Toussaint with the letter.
You’ll find Moreau’s grave just south of Beauclair — not in the main cemetery but in the less prestigious graveyard outside the city’s walls (#2). You’ll find about a dozen grave markers there. You’ll have to read them until you discover Moreau’s.
When you eventually read the epitaph on Moreau’s grave, you’ll see that it mentions Aelirenn (aka the White Rose of Shaerrawedd) and Dol Naev’de (aka the Valley of the Nine). Unfortunately, you’ll also discover that someone has already looted the grave. Worse, when you turn on your witcher senses and search the area, you’ll detect some tracks leading away to the east, but they’ll quickly disappear, and they won’t help you.
Note: You see lots of clues about the grave robber while you’re working through the quest, but you’ll never encounter her. The clues are all references to Lara Croft, Tomb Raider.
To find the laboratory, you’ll need to do a little research. If you examine the map you received with the letter, then you’ll automatically figure out where the Valley of the Nine is — in a flooded region east of Beauclair. When you head over there and search the area indicated by the quest marker, you’ll discover an underwater portal leading to a cave (Exit A). Going through the portal will earn you 50 xp.
Inside the cave, you’ll quickly come to a hallway filled with spike traps (#4). Thanks to some safe places in between the traps, you should be able to walk through them safely, provided that you proceed carefully. Or you can just drop down using a ledge (#3) and avoid the traps altogether.
Past the spike traps, you’ll enter a round chamber where you’ll get attacked by two level 35 panther guardians (#5). Defeating them will earn you 100 xp. Then as you continue on, you’ll find Professor Moreau’s Diary and a basic Crossbow on the ground (#6). The diary will give you some background information. The  Crossbow will give you a way to solve an upcoming puzzle, just in case you don’t have a crossbow of your own.
Next up, you’ll encounter another level 35 panther guardian (#7), and then you’ll come to a puzzle chamber with a locked door (#8). To open the door, you’ll need to shoot four protruding stones with your crossbow. If you don’t see the stones, then turn on your witcher senses to make them glow red.
Past the door, you’ll come to a large circular chamber (#9). A level 35 gargoyle will attack you there. Defeating it will earn you 100 xp, and you’ll find a  Gargoyle Paw on its corpse. As you explore the chamber, you’ll find a small pedestal that you can interact with. When you place the
  Gargoyle Paw on top of it, you’ll activate the portals in the chamber.
Your goal with the portals is to finally reach Moreau’s lab. You’ll need to take the right sequence of portals to do this. If you take the wrong portal, then you’ll return to where you started. If you take several wrong portals, then Geralt will tell you how to proceed — namely, that you should always go through the portal that the statue in the center of the room is staring at. That is, you should go through the eastern portal, then the northern portal on the second level (which you can reach by jumping down to the bottom level and then climbing back up to the second level), and then the northwestern portal on the top level (which again will require some climbing). If you go through the portals correctly, then you’ll end up in Moreau’s lab (#10), and you’ll earn 100 xp.
Inside the lab, you’ll find a megascope containing diary entries from Moreau (#11). If you interact with it, then you’ll learn that Moreau was trying to reverse the witcher mutations placed on his son Jerome, but that he was only able to strengthen them rather than remove them. You’ll only be able to see three of the diary entries at first, but if you pick up the two  Megascope Crystals in the lab (both located near the machinery, #12) then you’ll get to view all five. Viewing the three initial diary entries will advance the quest, but if you view all five then you’ll earn 100 xp.
The diary entries will also mention that Moreau used  Mutated Giant Centipede Albumen during his experiments. To find some for yourself, you’ll need to head into the caves attached to the lab, where you’ll encounter three level 35-36 pale widows (#13). They’re just like regular giant centipedes, so take some Superior Golden Oriole and then charge at them when they surface. After defeating the widows, you’ll discover three of their eggs nearby (#14). Inside each egg, you’ll find
  Mutated Giant Centipede Albumen. Looting one will earn you 100 xp.
Back in the lab, you’ll need to place the albumen in Moreau’s machinery (#12), into the device that looks like an iron maiden. You’ll then need to remove your weapons and armor and step inside. The machinery will work on you for a bit, and when you’re released, you’ll have a new mutations page, which you can reach from the character page (where your abilities are listed). The mutations page will allow you to unlock 12 mutations using your ability points and greater mutagens. You’ll only be able to have one of these mutations active at a time, but the more mutations you unlock, the more abilities you’ll be able to add (up to four), as long as they’re the same color as the mutation.
To exit the lab, you should head over to the inactive portal on the northern side (Exit C). To activate it, you’ll need to cast Aard on the crystal next to it. Then when you step through, you’ll end up in the water next to the entrance portal. Exiting the lab will complete the quest and earn you 200 xp.
