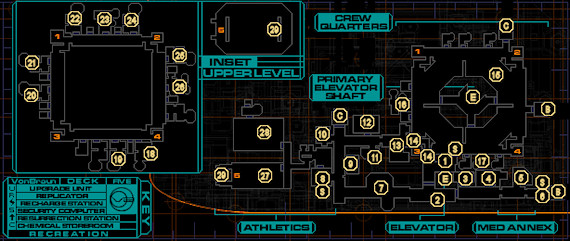
This guide is a walkthrough for a certain area aboard the Von Braun. You can see a map of the respective location and its points of interest, along with a map legend to identify each point. The points are in order and further explained in the “Walkthrough” section below.
Walkthrough
1 – Arrival
Upon exiting the elevator, you’ll spot a man through the window, but he’ll quickly run off when he realizes you’re not who he’s looking for you. How sad. Your consolation prize are some Anti-Personnel Shells on the bench. As you attempt to leave down the hall, a vent will crash to the floor and release several Annelid Grubs. Dispose of them with whatever deadly means you wish, then take the hallway left.
Heading forward, SHODAN will contact you and fill you in on your situation: some of the survivors on this deck had been attempting to send out a transmission to Earth by using a special Transmitter Tower in the Athletics area of Recreation Deck. Rather than beg for help, SHODAN wants to use it to shut down Xerxes for good. Finding the code to activate it (found hidden inside several Art Terminal displays around the deck) and giving SHODAN control will be your number one goal on Recreation, which also involves gaining access to Athletics and Crew Quarters here.
2 – Dead Power Cell & Corpse
You’ll come across a corpse on the floor here with a Dead Power Cell and a Game Cartridge for your MFD Game Player. You’ll need to use the Power Cell later, but for now you’ll have to get it charged up somehow.
3 – Infested Clinic
Yet more Annelid goop and a few Swarm Pods will greet you in here. Take out the Pods from a distance, then search the corpses for some Fragmentation Grenades, Anti-Personnel Bullets, and 46 Nanites. You can also grab the two Worm Clusters on the floor if you’ve got some Beakers on hand, as you’ll find a weapon to utilise them a bit later. Last, you can turn on the Incomplete Surgical Units if you want, but there’s several others in the area, so you may want to pick the less-infested room at (4).
4 – Ruined Clinic & Audio Log
When apes attack! Declare war on all primate-kind, starting with the lone Monkey in this clinic. You’ll find an Audio Log on top of one of the Surgical Units, and the corpse on the floor has an EMP Rifle, 6 AP Bullets, and some Worm Clusters to share with you.
5 – Storage Room
Prepare to be ambushed by a couple of Annelid Arachnids in this room. And you thought you’d seen the last of them… no such luck. Deal with them in the usual way, then get to looting: there’s some AP Bullets in the locked crate, and Rifled Slugs, Anti-Toxin and Psi Hypos in the other crates.
6 – Audio Log
Activate the Security Control Station on the wall and then remove the Audio Log from the floor if you haven’t grown tired of playing janitor yet.
7 – Lobby, Upgrade Units & Art Terminal
Some more vents will collapse as you enter the room, and several more Monkeys will attack, but also be on the lookout for patrolling Protocol Droids. Before rushing into the room, also take the time to smash the Security Camera on the right-hand side.
Aside from the full suite of Upgrade Units here, you’ll also find an Audio Log and Psi Hypo on the counter. There’s a few Standard Bullets in one of the nearby garbage cans as well. Next, check behind the counter for a safe, and either hack the keypad or use the code 12345… guess even in the future, people still aren’t very good with passwords. Inside there’s a paltry 10 Prisms and a Surgical Unit Activation Key. Last, cycle through the pictures on the Art Terminal behind the counter until you see part of the code you need, “10”. Not too useful yet, but hold on to it for now.
8 – Athletics Lounge
There isn’t too much for you to do in here just yet, and the door continuing to Athletics is locked until you’ve grabbed the Athletics Access Card. For now, grab the Audio Log from the desk, as well as the Juice and Soda if you need them.
9 – Replicator & Audio Log
In this small room, you’ll find some Juice, an Audio Log, a hackable security crate with 52 Nanites, and a Replicator. The Replicator offers up Soda, Anti-Toxin Hypos, Prisms and Anti-Personnel Bullets, and can be hacked for Rifled Slugs as well as a price drop.
10 – Bathroom
Watch out for a Security Camera on the right as you enter. There’s little of note in here, just a corpse with 17 Nanites and a near-useless Pistol. An Annelid Grub will emerge from the body and attack when you get close.
11 – Clinic
Another room, another Surgical Unit… there seem to be a lot of these on Recreation Deck, yet none that come pre-activated. Ah, well. You’ll find an Audio Log in here, but little else.
12 – Irradiated Clinic
Time to use some of the Anti-Radiation Hypos you’ve no doubt picked up, or the old Hazard Suit you found in Engineering if you’ve still got it. Inside, there’s a few more Surgical Units (you, uh, might want to use another one), a corpse with some AP Bullets, and two boxes of 21 and 19 Nanites on the floor.
13 – Maintenance Room & Audio Log
There’s two rooms at the end of this hallway, and you’ll spot an explosion on the right as you approach. On the left, there’s a small room with a desk and Security Control Station; search the desk for an Audio Log, with a warning to stay out of the Mall (don’t worry, you’ll go there shortly). In the other room, there are three Annelid Grubs waiting for you, along with a hackable crate containing a Medical Kit and some Standard Bullets.
14 – Door to Crew Quarters
You’ll need the Rec Crew Quarters Card from Recreation B in order to get through this door.
15 – Crew Quarters Main Floor
Crew Quarters begins with a tough fight. You’ll be assaulted by a Security Bot and Military Bot upon entering, and there’s Security Cameras in the northeast and southwest corner of the room just waiting to report you during the fight. When that’s all done, search the planter box on the southwest side for some Anti-Personnel Bullets, the southwest corner for an Audio Log and 20 Nanites on a corpse, some AP Bullets in the northwest planter box, and last, some more Anti-Personnel Bullets on a corpse near the southeast corner.
There are several apartments on each wall, though many are empty or inaccessible, so this guide will only document those of significance. Four elevators in each of the corners of the room will let you travel between the main floor and second floor (avoid using the northeast elevator, as it will fall and release a Swarm Pod. The fifth elevator in the middle of the room leads to Deck 6, but is initially inoperable. Once you’ve activated the Transmitter Tower at (29), the door will open for you.
16 – Audio Log
Step inside here and you’ll be attacked by some Annelid Grubs that crawl out of the corpse. There’s little in here except for an Audio Log in the desk detailing some power outages in Athletics.
17 – Corpse
A Grub Pod will burst open as you enter this apartment. Deal with the Annelids, then search the corpse here for an ExperTech(TM) Implant. There’s also a bottle of alcohol on the floor, if you really need it.
18 – Vent
This apartment has no loot inside it, but crawl through the ventilation shaft to find some loot. Avoid falling down the pit and destroy the two Grub Pods, then search the corpse for 3 Cyber Modules, a Shotgun, and some Standard Combat Armor.
19 – Corpse
Another apartment, another corpse. Annelid Grubs will slither out of the body as you enter the room. On the corpse, you’ll find Version 2 Modify Software and an Auto-Repair Unit.
20 – Hybrid Ambush
Two Hybrids will run out of this room and attack as you draw near. Dispose of them, then loot the desk inside for a Psi Booster, and the corpse for some Anti-Personnel Shells and a Large Beaker.
21 – Crying Ghost & Nanites
You’ll see a depressing vision as you enter. Not much else in this room save for 10 Nanites near the front door.
22 – Corpse
Check the corpse in this apartment for two Small Beakers.
23 – Corpse & Athletic Sector Access Card
The desk is empty, but you’ll find the Athletic Sector Access Card on the corpse surrounded by Vodka bottles, along with 20 Prisms. SHODAN will upload 10 Cyber Modules for your progress. Just one thing remains until visiting Athletics – the last piece of the code. Convenient that it’s right next door…
24 – Art Terminal
Sneak into this room very carefully in order to destroy the Swarm and Grub Pods before they can hatch. You’ll find 47 Nanties in the overturned desk, but more importantly, there’s the last piece of the Transmitter Tower code, “6]” on an Art Terminal. With all the pieces of the code at your disposal, it’s time to head to Athletics to set up the Transmitter Tower, though there’s still a few more apartments left to explore up here if you’d prefer.
25 – Cyborg Assassin Ambush
Some Annelid Grubs will attack as you enter, but they’re only there to draw you into the room, where a Cyborg Assassin awaits you. Dispose of all the threats inside, and you’ll find a Maintenance Tool on the corpse for surviving the attack.
26 – Locked Apartment
The code to this door, if you’ve been following along, was revealed back in Recreation C by an Audio Log; for reference, it’s 11111. This room is a treasure trove and contains a new alien weapon for you. First, check the corpses for 10 Cyber Modules and a Psi Booster, the desk for 20 Nanites, and the living room for some Heavy Combat Armor and another Crystal Shard. In the small closet, you’ll find some Incendiary Grenades and 20 Nanites on the shelf.
The real prize is the Unresearched Object. You’ll need Technetium (Tc) and Tellurium (Te) to research it, but in the end you’ll get the Viral Proliferator, a powerful weapon that uses Worms as ammo, which has both Anti-Annelid and Anti-Human fire modes. Overall, it’s pretty powerful, but the ammo is relatively rare and it requires a pretty big skill investment to use. Generally, like many of the specialised weapons available, it’s probably not worth lugging around.
27 – Basketball Court
Here’s your first encounter with the Rumber, a gigantic Annelid brute of muscle and teeth. Suffice is to say, these guys are fast, tough, and ugly. Your best bet is anything anti-personnel, or high-damage, like grenades, or Pyrokinesis. So long as you don’t let the big guy get close, he’ll go down without too much trouble.
Upon stepping into the court, the lights will fail. Great. Check the corpse for an Anti-Toxin Hypo, then climb through the vent on the right side of the room to reach the Swimming Pool (28). The Grav Shafts at the end of the Basketball Court, meanwhile, take you to the Transmitter Tower (29).
There’s an easter egg in this room as well. If you held on to the Basketball found all the way back at the beginning of the game, at the UNN Recruitment Center, toss it through one of the hoops and you’ll receive a rather unique Audio Log for your dedication (be sure to read the text version).
28 – Swimming Pool
On your way in through the vent from (27), you’ll hatch some Grub Pods both in the vent and just outside its exit. Dispose of the Annelid Grubs as you see fit. You’ll find 34 Nanites on the corpse in the pool. Check the back room for a Recharging Station, and a Crystal Shard in the desk, then in the very back room, insert a Charged Power Cell into the slot; the Dead Power Cell can be found way back at (2). This will restore the lights to Athletics, though there’s no reward or plot-related reason to do so.
When you’re done, head back out to the Basketball Court through the vent, and float up the Grav Shaft to (29).
29 – Transmitter Tower
Finally, after trials and tribulations, the Transmitter Tower. You’ll come under attack by a couple of Cyborg Assassins as you approach, so heal up after your encounter with the Rumbler at (27). One corpse holds a Fusion Cannon, an extremely powerful heavy weapon that runs, quite efficiently, on Prisms. The other corpse, meanwhile, holds the “Golf” game for your MDF Game Player.
Finally, the Tranismitter Tower. Approach it and enter the code you’ve constructed, 14106. SHODAN will push Xerxes’ control back some more, and eventually manages to take control of the ship herself. In exchange for ensuring SHODAN’s total control, you receive a relatively meagre 20 Cyber Modules, and orders to take the elevator in Crew Quarters to Deck 6. Gee, thanks. When you’re ready, go ahead and take the elevator at (15).
B – Transition to Command Sector B
E – Elevator
S – Security Control Stations


