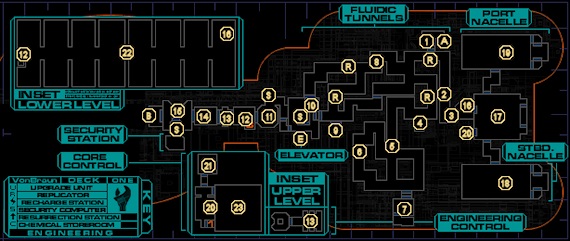
This guide is a walkthrough for a certain area aboard the Von Braun. You can see a map of the respective location and its points of interest, along with a map legend to identify each point. The points are in order and further explained in the “Walkthrough” section below.
Walkthrough
1 – Maintenance Room
This is where you’ll find yourself upon taking the Maintenance Hatch down from Deck 2. There’s some Vodka and an Anti-Radiation Hypo in the room with the ladder, and in the next room, search the desk for a Medical Hypo, 20 Nanites, an Audio Log and a copy of Swinekeeper. Dr. Polito will contact you and tell you about some “strange readings” she’s picking up… whatever that means.
2 – Corpse
You’ll find a corpse with 2 Cyber Modules on the other side of this door.
3 – Engine Core Door
If you approach this door, you’ll find that it’s been sealed due to the radiation leak, so you’re going to have to somehow stop that leak. Search the hackable crate on the floor for some AP Bullets and a Medical Hypo, and take the Cigarettes on the floor if you really want them.
4 – Storage Room
You’ll see a ghost as you approach this room. The storage room itself has some decent loot, including some Anti-Personnel Shells in a crate, a poor-quality Pistol on the floor, and 2 Cyber Modules on the corpse.
5 – Door
As you approach this door, you’ll be contacted by Dr. Polito, who will give you the code to Aux. Storage 4 for some supplies – 59004. How kind of her. Check just beyond the door for an Audio Log on the floor.
6 – Audio Log & Corpse
You’ll find an Audio Log on the floor at this location, and a corpse with an Anti-Radiation Hypo just a little ways down the hall.
7 – Aux. Storage 5 & Chemical Storeroom
Check the corpse outside the door here for 2 Cyber Modules and Version 1 Repair Software. You won’t get the code to the door for a while, though. Note that it’s possible to play this section of the game out of sequence if you know the codes in advance; while it’s not recommended, especially for first-time players, if you don’t mind doing so, then the keycode is 34760.
Inside, you’ll notice that Aux. Storage 5 is in fact a Chemical Storeroom (there’s a manifest log on one of the shelves listing all the chemicals in here, for easy reference). In addition to all the chemicals, there’s also a number of computer parts – the one you need, as mentioned in Delacroix’ Audio Log at (13), is #45M/dEX. Dr. Polito will give you 10 Cyber Modules when you find it.
Beyond that, you’ll find a Monkey in the back room, and 10 Nanites plus some Standard Bullets in the desk.
8 – Door
This door leads to another section of the irradiated corridors. Don’t stay too long. The corpse on your approach has 5 Nanites on it and a Wrench right next to it, if you misplaced yours.
9 – Aux. Storage 4
Polito will give you the code for the door when you reach (5), but if you want to skip that, it’s 59004 (or you can just hack it). Inside, Polito will tell you a bit about the creatures that have taken over the Von Braun. Search the crates for a Medical Hypo, Speed Booster, 10 Nanites, Anti-Radiation Hypo, and  Hazard Suit. The Hazard Suit will help shield you from radiation and toxins, but won’t provide any protection from physical attacks or bullets.
10 – Elevator Room, Replicator & Bio-Reconstruction Device
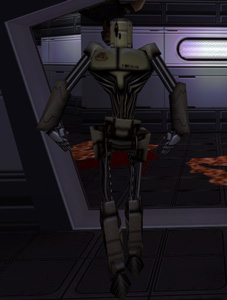
Thankfully, in this room you’ll be free from radiation, but not other threats. Be careful upon entering as there’s a Security Camera on the far wall, and more dangerously, a  Protocol Droid rigged to explode – shoot it from a distance, as it can kill you very quickly if it gets close. You’ll also start hearing that strange symphony of voices again… could these be the xenomorphs speaking to you via telepathy?
Use the Bio-Reconstruction Device to make sure your deaths are of the non-permanent variety, then search around for 15 Nanites on a corpse and an Audio Log on the floor. The Replicator will sell you Soda, Fragmentation Grenades, Psi Hypos and Medical Hypos; hack it for the privilege of buying AP Bullets as well.
Inside the central maintenance room, you’ll come under attack by a troublesome Monkey on the upper level. Dispose of it, then search the room for a Security Control Panel and some AP Bullets, as well as 2 Cyber Modules and 5 Nanites on a corpse.
11 – Xerxes Room
Another screen with Xerxes on it awaits you in this room, though be careful when entering as there’s a Hybrid and a Security Camera inside. Search one of the corpses on the ground for a Maintenance Tool, then proceed onwards.
12 – Maintenance Lift
Be careful entering this room, as there’s a Security Camera watching you as you come in. The lift on your left won’t operate until you’ve restored power to the Von Braun, so you’ll need to return later. For now, continue down the corridor, carefully.
13 – Grav Shafts & Engineering Control
Check the corpse for some Standard Bullets and a Pistol, then use the Grav Shafts here to reach Engineering Control – don’t fall down the hole in the centre of the room. Check the secured door for a Shotgun and an Audio Log. Seems like you need to find this Sanger in Cargo Bay 2 for the code. Take the Grav Shaft back down and proceed through the corridor.
Once you’ve got the code from Sanger – it’s 15061 – you’ll gain access. Try interacting with the Fluidics Control Console, however, and you’ll get an error. Check the Audio Log left behind on the floor and you’ll learn that Xerxes has cut off access; to regain it, you need to grab the manual hardware override #45m/dEx from Aux. Storage 5, keycode 34760, so backtrack all the way to (7) if you didn’t already grab the part. The corpse left behind in the room has some Anti-Personnel Bullets on it, should you want them.
Finally, once you’ve got the hardware override installed at Command Control, you’ll be able to use the Fluidics Control Console, which will also stop the radiation leaks on Deck 1. As you do, you’ll gain 10 Cyber Modules and Dr. Polito will instruct you on how to reactivate the power – the Port and Starboard Nacelles need to be brought online, and then finally the Engine Core itself. Whew! Head back to the Engine Core at (3) to finish up on Deck 1 for good.
14 – Laser Turret & Audio Log
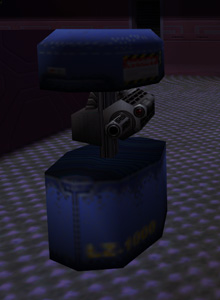
Be very careful proceeding through this next section. As you enter, you’ll come under fire from a  Laser Turret on the right side of the room – take cover and destroy it with a few pot shots. The bodies have 15 Nanites, some AP Bullets and a Psi Hypo on them. There’s also an Audio Log on the floor just near the door.
15 – Laser Turrets, Security Room & Upgrade Stations
This room can be very difficult if you’re not careful, or very easy if you’re smart. Inside, you’ll find a Security Camera, and two Laser Turrets, which can deal significant damage to you. Although you can try to brute-force your way through by ducking in and out of cover, this is a pretty slow way to proceed. Instead, it’s much easier to head to a nearby Security Control Station, marked (S) on the map above, and hack it to disasble the security system, including both the Laser Turrets and Security Camera. With them inoperable, you can destroy them with impunity.
When you’ve dealt with the defenses, check the corpse in the middle of the room for a Security Access Card, which works on the door to your left. Inside, you’ll find… yes, that’s right, some Upgrade Stations… though unfortunately, only for Psi and Weapon skills. Time to use your hard-earned Cyber Modules.
There’s some nice loot in the room as well. A Surgical Unit can be brought online if you have a spare Activation Key for it, and there’s some Light Combat Armor on a shelf. The corpse contains 15 Nanites, and the two lockers hold an Audio Log, 2 Cyber Modules and 15 Nanites. Finally, grab the Unresearched Object on the Surgical Unit and get researching – when it’s done, you’ll find that it’s an Annelid Healing Gland, which can be used to heal your wounds.
16 – Maintenance Lift & Replicator
Like its cousin at (12), the lift here won’t work until you’ve restored power. Once power’s back, it’ll head down to the Lower Level at (22). The Replicator is selling Cigarettes, Standard Bullets, Anti-Toxin and Psi Hypos, and can be hacked for Proximity Grenades.
17 – Engine Core Central
Finally, we’ve arrived! Fight off the Hybrid and Monkey lurking around, then check the right side of the room for an Audio Log on the floor, and the small control room opposite the way you came in for a corpse with 15 Nanites and a  Laser Rapier, a powerful melee weapon (more so against robots and cyborgs) that requires a high skill in both Agility and Energy Weapons. Exit through the door to the south.
18 – Starboard Nacelle
You’ll find a Security Camera as you approach the control room, so take it out; you might also be attacked by Hybrids on your way. Walk your way to the control room and use the large console on the left side of the room to activate the Starboard Nacelle. Grab the Audio Log from the desk, where Delacroix describes her encounter with a benevolent artificial intelligence, as well as the 10 Nanites on the corpse wedged in the door.
Before you head back to Engine Core Central, climb down to the lower level and walk through the door and into the Nacelle. Ooh, green and glowy. Inside, you’ll find a Monkey and a supply crate containing a Medical Kit, some Rifled Slugs, and an Unresearched Object; there’s also a Shotgun on the floor next to it. Finally, poke your way around to the southwest corner of the bottom level to find a corpse with 2 Cyber Modules. Thanks, buddy. Once that’s done, climb up the ladder and head to the Port Nacelle at (19).
19 – Port Nacelle
There’s little to be found here, despite the size of the room, so make your way to the control room, battling a Hybrid or two on the way. As before, activate the console on the wall to get the Port Nacelle online, then wrangle 8 Nanites from the clutches of a dead woman’s hand. Time to return to Engine Core Central at (17), and ride the lift up to Engine Core Control (20).
20 – Engine Core Control
Once both Nacelles are online, take the elevator in Engine Core Central (17) up to Engine Core Control, and activate the large computer terminal. Dr. Polito will give you 10 Cyber Modules and urge you to head to the elevator as soon as you can. Jeez, can’t we take a break for just a moment? A Hybrid will come into the room at this point, so defend yourself. At this point, you can run back to the elevator at (E) and ride up to Hydroponics on Deck 3, or take some time to continue exploring Deck 1… I recommend taking the Maintenance Lift at (16).
21 – Office
In here, you’ll find an Audio Log on the desk, a Psi Hypo and 10 Nanites in it, and some drinks on the shelf to the left.
22 – Lower Level
In this very spacious corridor, you’ll find some material rewards, and a new type of enemy. First, there’s a hackable crate for you near where the lift at (16) comes down, containing some AP Bullets, a PsiBoost(tm) Implant, and some Juice. Proceed forward and fight off a Hybrid, then loot the bodies for a Speed Booster, 12 Nanites and 2 Cyber Modules.
Around the next corner, prepare yourself for a Turret on the right – use the wall as cover and poke your gun out to blow it to smithereens. Continue forward and you’ll fight off another Hybrid, and at the end of the corridor you’ll encounter a  Cyborg Midwife. These horrifically modified women aren’t exactly in the mood for talk, though. They have powerful ranged weapons, but you can actually defeat them rather quickly if you get up close with a melee weapon like your Wrench or the Laser Rapier you found earlier. Once she’s down (she may have researchable
  Midwife Organ on her body), search the nearby corpse for some Standard Bullets, and head up the lift at (12).
At this point you’ve done just about everything there is to do on Engineering, so feel free to take the elevator to Hydroponics on Deck 3.
23 – Engine Core Override
This door will be locked and inaccessible until much, much later in the game. If you’re here for the first time, ignore it for now.
After you’ve been up to Deck 6, and used the Ops Override Access Card on Deck 4, you’ll need to return and enter the code given to you, 94834. Use the control console inside, and you’ll be instructed to head back to Deck 6 in order to leave the Von Braun in a shuttlecraft. Now’s a good time to finish up any loose ends – research, missing Cyber Modules, upgrades, weapons, etc. that you might need, as you won’t be returning.
Note: While it’s possible to enter the code early in the game, it is not recommended for first-time players, as it represents a major sequence break based on prior knowledge of the game; not only will you be missing much of the story, you’ll also be lacking many of the high-level skills and equipment needed to survive the end stages of the game. You’ve been warned!
A – Transition to MedSci
B – Transition to Engineering B
Engineering B holds two Cargo Bays, as well as a Shuttle Bay and Command Control. You’ll need to explore it in order to proceed through the game.
E – Elevator
You’ll be able to use this to travel around the Von Braun once you’ve restored power.
R – Radiation Hazard
Don’t stay too long nearby or you’ll end up losing quite a bit of health. Now’s the time to use the Anti-Radiation Hypos you found while exploring MedSci.
S – Security Control Stations
Use these to deactivate any alarms you may set off.


