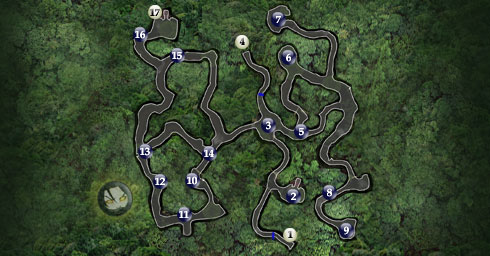
In this guide, you’ll find a walkthrough for the Dxun part of Star Wars: KOTOR II. To help you to navigate this area, a map, and legend are provided. There are more detailed notes for each point of the map legend in the walkthrough section.
Walkthrough
The first time here, you’ll be escorted to the Mandalorian Ruins once you make it to #3. Afterward, you’ll be able to come back and complete several quests in order to prove to Mandalore that you’re worthy of his help. Not every quest is necessary, only a few, but for experience it’s recommended that you explore the area and attempt all the quests.
1 – Exit
Exit to Jungle Landing (#6).
2 – Cache
You’ll need high-grade explosives to enter this small cache full of items. The only thing capable of doing the job is Thorium Charges, which you can find on Korriban, specifically Sith Academy (#4). Once inside, you’ll find a small room full of containers and items.
3 – Small Mandalorian Camp
When you first get to this area, the Mandalorians will attempt to take you to their leader, Mandalore. You can resist and begin battle but you’ll be overwhelmed and forced to go anyway, and then find yourself at Mandalorian Ruins (#1) facing Mandalore.
a) If you’ve faced Davrel at the Mandalorian Battle Circle:
He will attempt and regain his honor here. If you’ve heard about the Zakkeg from the Mandalorian Guard Captain inside the ruins, you can first refuse to fight him, then suggest to Davrel that honor can be gained by both of you joining to defeat the beast. He will run off and meet you just before #9, where he joins you to defeat the creature. After the battle, you’ll have his thanks and gain further honor with Mandalore. Your other option is to kill him when he challenges you.
4 – Exit
Exit to Mandalorian Ruins (#5).
5 – Cannok with Phase Piece #1
If you have the quest from Zuka at the Mandalorian Ruins to find the pieces to the phase pulse converter, defeat a cannok here and search its remains for the first piece: the phase pulse converter core. The other pieces are at #8 and #15.
6 – Boma Beast & New Force Power
When you approach the area, Kreia will teach you a new force power, Beast Trick, which works exactly like Mind Trick does, only on beasts. You can test it out on this boma beast.
7 – Kumas on a Ledge
If you have the quest from Xarga back at the Mandalorian Ruins, you’ll be searching for the missing Mandalorian Kumas. He’s here trapped on a ledge, with a nearby permacrete detonator device. Light Siders will likely want to release him by first killing the three young bomas just around the corner at the back. When accomplished, Kumas will come down, offer you gratitude and ask that you keep his secret. Dark Siders will probably want to let him rot for (DS Points), and for more points, press the button on the detonator to blow Kumas to smithereens.
8 – Cannok with Phase Piece #2
If you have the quest from Zuka at the Mandalorian Ruins to find the pieces to the phase pulse converter, defeat a cannok here and search its remains for the second piece: the phase pulse converter assembly. The other pieces are at #5 and #15.
9 – Zakkeg
Here is the beast the Mandalorian Guard Captain was speaking of back at the ruins. If you first joined with Davrel at #3 to kill the Zakkeg, you’ll have joined up just before this area. Attack the Zakkeg with all your might, and you’ll find a mediocre challenge if this is your first planet. A melee shield can help if you’re having difficulty. When it has fallen, search the remains for its ear, and when you report back to the Captain, you’ll have more honor with Mandalore. If you’re following the walkthrough, #10 is on the opposite part of the map.
10 – Kelborn, Battle Circle Champion
If you’ve been trying your hand in the Battle Circle at the Mandalorian Camp and winning, you’ll eventually come to a point where you need a sponsor. Teaming up with Kelborn here can get you that chance, since its him you’ll have to fight next. Whether or not you’ve completed any of the Battle Circle, you can still take on this quest and fight Kelborn later.
He’s searching for scouts from a recently landed ship and wants your help in securing the area from the threat. Agree to help and head to #11 for the first two. The next are at #12. When you accept the quest, Kelborn will be at #14.
11 – Two Scouts
Defeat these two patrolling scouts if you took on Kelborn’s quest above. Search their remains and head to #12 for the next, larger group.
12 – Group of Scouts & Animals
When you approach the area, and after accepting Kelborn’s quest at #11, you’ll find a group of scouts begin battle with the local beasts. Join in and kill the several hostile scouts, search their remains and continue to #13.
13 – Cannok with Lightsaber Emitter Fixture
By killing a cannok here and searching its remains, if you’ve yet to find the second piece required to make your lightsaber, this animal will have it: the lightsaber emitter fixture.
14 – Kelborn, After Quest
If you agreed to help Kelborn with his quest, he’ll now be standing here. Speak to him after you’ve picked off the two groups of scouts at #11 and #12 and you’ll gain more honor with Mandalore and a chance to fight Kelborn in the Battle Circle when you’re ready.
15 – Cannok with Phase Piece #3
If you have the quest from Zuka at the Mandalorian Ruins to find the pieces to the phase pulse converter, defeat a cannok here and search its remains for the third and final piece: the phase pulse converter power. The other pieces are at #5 and #8. You can return to Zuka at the Mandalorian Ruins after finding all three pieces for more honor with Mandalore, and more experience.
16 – Permacrete Detonator
This one is linked to the Mandalorian Cache ahead at #17. Press the button and watch the door blast open. The only consequence is that a herd of boma and other animals hear the explosion and attack. Once they’re taken care of, enter the cache at #17.
17 – Mandalorian Cache
This is the cache Mandalore was talking about if you asked him whether there was anything else you could do. Be careful when you enter, and if possible, take someone with a high demolitions skill like Bao-Dur and a Jedi with the stun droid line of powers.
As soon as you enter, you’re surrounded by damaged droids and a circle of deadly and devastating mines. Put the character you want dealing with them in solo mode and disarm, disable or run through them if unable. Next, either search the droid foreman for a datapad that allows you to give commands to them, or prepare for a rather large battle by turning on your energy shields and buffing the party. Attempt to activate a droid and “bash” it. The whole room will come alive as all the droids attack at once, also bogging down the framerate as well. Concentrate on mass affecting force powers if you have them, such as the stun droid line of powers or force lightning. Otherwise, use your best melee and ion attacks to take them down as quickly as possible.
When the battle is over, search every container along the perimeter of the room for a massive amount of items. There will be two containers that are impossible to open with security skill. Set a minor mine on them to get to their contents. When finished, you can now report back to the Mandalorian Ruins to receive your rewards, further fight in the Battle Circle and tell Mandalore you wish to go to Onderon.
