This guide will help you complete the Whistleblower mission in Shadowrun: Hong Kong.
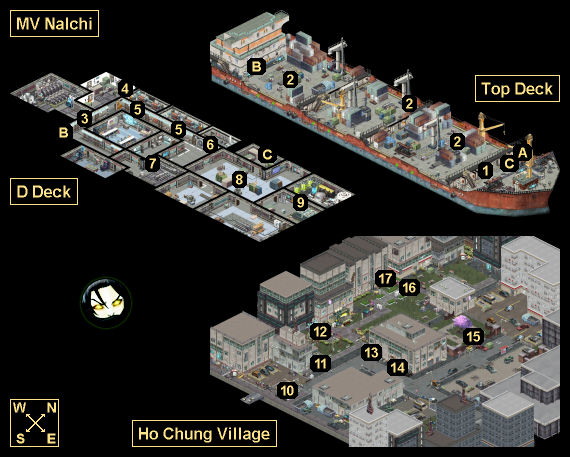
Whistleblower Map
Whistleblower Walkthrough
Background
The ride out to the Nalchi is nerve-wracking. Captain Jomo seems an expert pilot, but massive waves threaten to scuttle his small boat at every turn. Deep thunder rolls in the distance, and at the edge of your vision, lightning occasionally illuminates your target: the MV Nalchi.
Jomo pulls your small craft directly up to the bow of the Nalchi, where you’re least likely to be spotted. He throws a rope ladder up over the side, hustling you aboard before pulling away.
Time to get to work.
— Mission Midpoint —
The boat ride back to Hong Kong is tense. Even Captain Jomo’s jovial nature does little to lighten the mood. The deep storm swirls in the sky behind you, and although you’ve accomplished your mission, you wonder what is in store once you reach Ho Chung Village.
If Hwang is telling the truth, was Tigath ever willing to pay you, or have you been an expendable asset the whole time? What will Hwang offer to betray Tigath’s trust?
You’re certain these mysteries will be revealed, but how you’ll learn the answers could be deadly.
— Mission Complete (Worked with Hwang) —
Things didn’t add up — not by a long shot. Your employer was double-crossing you from the start, and after a lot of blood and cordite, you opted for a sane response: side with Tigath’s enemy, and make an ally of the Blue Heaven Seoulpa Ring.
Back to Heoi, and hopefully better work.
— Mission Complete (Worked with Tigath) —
The job is done. Right or wrong, you gave Tigath Wright the data he was looking for, and got paid for it — although admittedly, it was a pittance compared to what you were promised.
A job’s a job, though. Heoi — and further work — await.
— Mission Complete (Killed Everybody) —
It all comes down to one thing: at the end of the day, the only people you can really trust are yourself and your own team. Neither Tigath nor Hwang was on the up and up, and when push comes to shove, you’ll stand alone against any odds you please.
Back to Heoi, and hopefully better work.
Karma Points
- [1] Reach D Deck without setting off the alarm.
- [1] Kill Hwang and Tigath.
- [8] Return to Heoi.
Walkthrough
After completing four shadowrunner missions, you’ll receive a message on the mission computer entitled “Data Retrieval.” In it, Kindly Cheng will tell you that an employee of the Eastern Tiger Corporation named Tigath Wright wants you to steal his research, which involves “horrible experiments on living children.” The research data and samples are currently being transported on board the cargo ship MV Nalchi, so after accepting the mission, you’ll need to head to the end of the dock next to Cheng’s mahjong parlor and talk to a local pirate named Captain Jomo. He’ll transport you to the ship.
This is a combat mission, so bring along companions who are good in a fight. There are also a couple of Matrix sequences. They’re useful but optional, and you won’t find any paydata. Still, a decker is a good idea. You’ll find lots of healing supplies during the mission, so don’t worry about that.
You’ll start out on the Top Deck of the MV Nalchi, right next to a camera control panel (#1). Witch Decking 5, you’ll be able to hack into the panel and gain access to the Top Deck’s cameras, which will show you three groups of security guards. Each group will be near a security terminal (#2). Your goal is to make it past the security guards without them setting off the alarm. If you manage this, then you’ll earn a point of karma when you reach D Deck (Exit A).
The game’s engine doesn’t support sneaking very well. If you want to try it, then the easiest way is to manually initiate combat (by clicking on the holstered gun in the top-right corner of the screen), and move past the guards while in turn-based mode. However, this is sort of tedious, and it might involve a lot of saving and loading. Your other option is to kill the guards. You can do this and remain “stealthy” because attacking one group of guards won’t alert the other groups. So as long as you can kill a group without them reaching their security terminal and triggering the alarm, you’ll still get the karma point. If the alarm does go off, then all of the guards on the Top Deck will come gunning for you, and you’ll have a tougher time on D Deck as well.
When you reach D Deck, you should immediately head to a nearby electrical box (#4). With Intelligence 5, or with  Is0bel or
  Racter in your party, you’ll be able to use the box to hack into D Deck’s cameras, which will show you where the guards are. Next, if you didn’t set off the alarm on the Top Deck, then you should visit the diagnostic computer in the engine room (#3), and use it to send away the guards in the cargo bay (#8). This will give you a clear path to the research materials. If you set off the alarm on the Top Deck, then all of the guards in D Deck will be waiting for you in the cargo bay, and you’ll have to fight them.
Note: If you enter combat while on D Deck, then all of the guards on that deck will attack you, and reinforcements will arrive after seven (or ten) turns.
You’ll find the research materials — Experimental Data and Experimental Tissue Samples — in the storage room on the eastern side of D Deck (#9). You’ll also find some documentation about the Omega Sequence project they came from, which will reveal that the goal of the project is to stop aging.
After picking up the materials, you’ll automatically call Tigath to let him know that the job is done. However, instead of paying you, he’ll inform you that there’s been a “complication” — he’s being followed by Seoulpas (Korean organized crime) — and he’ll ask you to meet him in Ho Chung Village. You’ll have to agree to this.
Right after your call with Tigath, you’ll get a call from Hwang Jae-Min, a member of the Blue Heaven Seoulpa Ring. He’ll try to convince you that Tigath has been lying to you — that he’s a spy for Tir Tairngire (one of the elven nations) and not an Eastern Tiger researcher at all — and that you should work with Blue Heaven instead. Your answer to Hwang won’t lock you into anything, so you can answer him however you like.
After completing both calls, you’ll need to escape from the cargo ship (via Exits C and A). Captain Jomo will sail you back to the mainland, and from there you’ll take the MTR to Ho Chung Village.
You’ll begin in Ho Chung Village at the MTR station (#10). As you explore your surroundings, you’ll find a few people willing to talk to you:
- Stall vendor (#11). With Strength 6 or a 100 nuyen bribe, he’ll tell that he saw some mercenaries with “nasty expressions,” and that they were foreigners (Tigath’s team).
- Street doc (#12). He’ll tell you that he saw a “gangster type” with a Korean crew (Hwang and his team).
- Arms dealer (#14). With the Socialite etiquette or a 250 nuyen bribe, he’ll tell you that he saw some Tsunami mercenaries (Tigath’s team again). One of your companions will then inform you that Tsunami mercenaries are well-geared and expensive.
If you have a decker with you, then you can skip the interviews and head straight for the LTG access point (#13). It will allow you to enter the Matrix. On the western side of the network, you’ll find a Traffic Camera Data Storage node. Hacking into it will reveal Tigath talking with his Tsunami mercenaries. He’ll call his mission “a matter of national security for Tir Tairgire,” pretty much verifying what Hwang told you.
Your next step will depend on what you said to Hwang on board the Nalchi:
- If you agreed to work with Hwang, then you’ll need to meet up with him in the village (#15). If you decide that you don’t like him after all, then he and his team will attack you. But if you agree to continue working with him, then he’ll meet up with you when you confront Tigath (#16). Regardless of what you might have said earlier in the mission, at this point you’ll be able to side with Hwang or Tigath — or go against both of them (either at the same time or after working with one to defeat the other) and keep the research materials for yourself.
- If you didn’t agree to work with Hwang, then you’ll need to meet up with Tigath in the village (#16). When you do, Hwang will show up and demand the research materials. This will allow you to side with Hwang or Tigath — or go against both of them (either at the same time or after working with one to defeat the other) and keep the research materials for yourself.
Tigath’s team is the much tougher of the two, as it’ll have eight Tsunami mercenaries in it, while Hwang’s team will only contain three riggers (with drones) and a sniper. If you fight the teams one at a time, then you shouldn’t have too much trouble with them, even though you’ll be outnumbered. Fighting both teams at once is a little more complicated. We’d recommend immediately sprinting away to the east. The two teams will fight each other as well as you, and if they don’t see you, then they’ll take each other out, and you’ll only need to pick off the survivors.
Optionally, you can also use a nearby utility grid control box (#17) to jack into the Matrix. This will allow you to overload the sparking wires to the north (where Tigath’s team is) and south (where Hwang’s team is), and potentially electrify some of your enemies. Just be careful since your decker will be exposed during this time. Electrified enemies will take 20 HP and 1 AP damage.
Depending on whom you support, there are three possible outcomes for the mission:
- You can give the research materials to Hwang. He’ll pay you 1300 nuyen. Tigath will drop the unique shotgun
 Sandblaster when he dies (although it will appear at the corpse of his enforcer).
- You can give the research materials to Tigath. He’ll pay you 1000 nuyen. Hwang will drop the unique SMG
 Wild One when he dies.
- You can keep the research materials for yourself. Kindly Cheng will pay you 1600 nuyen for them. You’ll also earn a karma point, and you’ll find either the unique shotgun Sandblaster or the unique SMG Wild One when you loot the corpses (whichever named NPC you kill first will drop his gun; the other one won’t).
Note: Wild One is an upgrade for Gobbet. It’s also the more expensive of the two guns, so if you don’t care about either one of them, then that’s the one you should target. Whichever gun you don’t get in this mission, you’ll be able to buy it during The Extraction.
To complete the mission, you’ll just need to enter the MTR station (#10) and return to Heoi. When you arrive, you’ll earn 8 karma points, and you’ll receive your payment from the mission computer. You can also earn 200 nuyen (or a level 1 program worth at most that amount) by selling the metadata for the mission to Maximum Law.
Mission Overview
1 – Camera Control Panel
2 – Security Terminals
3 – Engine Room
If you triggered the alarm on the Top Deck, then this room will be locked, and you won’t be able to enter it. Inside, you’ll find a diagnostic computer, which will allow you to fake an alarm on C Deck and draw away the guards in the cargo bay (#8).
4 – Electrical Box
With Intelligence 5, or with Is0bel or Racter in your party, then you’ll be able to use this box to hack into D Deck’s cameras.
5 – Berthing Compartments
If you triggered the alarm on the Top Deck, then these rooms will be locked, and you won’t be able to enter them. Inside, you’ll find a  Force 2 Fire Elemental Fetish and a
  Phosphorus Grenade.
6 – Bathroom
Inside this bathroom, you’ll find an  Advanced Medkit.
7 – Fire Suppression Controls
These controls will delay reinforcements trying to reach D Deck by three turns, but they’ll also trigger an alarm, causing everybody on D Deck to turn hostile. So don’t use the controls unless you’ve already entered combat.
Next to the controls, you’ll find an Advanced Medkit.
8 – Cargo Bay
Inside this bay, you’ll find an Advanced Medkit.
9 – Storage Room
Inside this storage room, you’ll find Experimental Data and Experimental Tissue Samples, plus some documentation describing the Omega Sequence project they came from.
10 – MTR Station
11 – Stall Vendor
This merchant won’t sell you anything.
12 – Street Doc
This merchant will sell you basic healing supplies.
13 – LTG Access Point
14 – Arms Dealer
This merchant will sell you basic weapons.
15 – Hwang
Hwang will only appear here if you agreed to work with him while on board the Nalchi.
16 – Tigath
17 – Utility Grid Control
Exits
- Embarkation point.
- One-way exit from the Top Deck to D Deck.
- One-way exit from D Deck to the Top Deck.