This guide will help you complete The Tigers’ Den mission in the Shadows of Hong Kong bonus campaign for Shadowrun: Hong Kong.
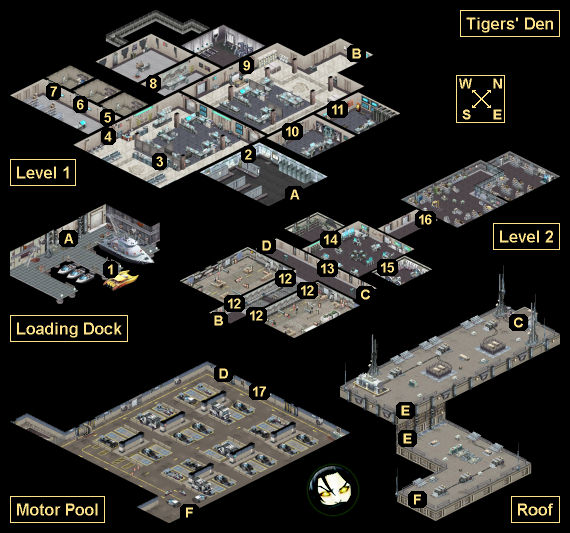
The Tigers’ Den Map
The Tigers’ Den Walkthrough
Background
The Drunken Mistake screams over Kowloon Bay, cutting through grey weather and greyer waters. Around you, grim faces watch the skyline ahead as Jomo steers you toward Krait’s headquarters: The Tigers’ Den. Qiu and Lam have assured you that if everything goes to plan, the run should be relatively low-risk. Ample experience tells you that plans often go astray, and that low-risk shadowruns rarely stay that way. But you also know that the reward for this run outweighs the risk. The incriminating data from the Den’s evidence room should be more than enough to bury Krait, expose her client, and cement your position with Kindly Cheng forever. Jomo cuts the engines, and the Drunken Mistake drifts toward the station’s loading dock. It’s go time.
— Mission Midpoint (Motor Pool Route) —
The sound of gunfire echoes through the halls behind you. You press forward, a sea of blood and corpses in your wake. So far, so good — now all that you need to contend with is a police station overflowing with SDU officers, all of whom want you dead. The motor pool seems like the best way out — plenty of cover, and a straight exit to the docks where Jomo is waiting to extract you.
Qiu is deathly silent as you descend toward the motor pool, her eyes narrowed to slits. As the door swings open and you step out into the light, you steel yourself for whatever comes next.
— Mission Midpoint (Roof Route) —
The sound of gunfire echoes through the halls behind you. You press forward, a sea of blood and corpses in your wake. So far, so good — now all that you need to contend with is a police station overflowing with SDU officers, all of whom want you dead. The roof seems the most likely way to get out quickly — with luck you’ll be able to dodge the police and take a fire escape down to the docks, where Jomo is waiting to extract you.
Qiu is deathly silent as you ascend toward the roof, her eyes narrowed to slits. As the door swings open and you step out into the light, you steel yourself for whatever comes next.
— Mission Complete —
The Drunken Mistake’s turbocharged motors churn through the open water, leaving a trail of frothy sea behind you. The Aberdeen docks quickly recede into the distance, and Jomo powers you steadily deeper into international waters.
In the back of the boat, Qiu stands alone, one hand cupped over her ear, shouting into her commlink. You can’t make out what she’s saying over the roar of the Drunken Mistake’s engines, but from the expression on her face, it isn’t going well.
Jomo throttles down the engines, nervously staring into the water just beyond the speedboat’s hull. You soon discover why: sea mines. With careful precision, the pirate steers the nimble craft around them, aided only by his skill and a handful of Indonesian curses.
As Jomo pilots you through the minefield, a jagged shape in the distance begins to grow larger. It’s huge — a slab-like ship surrounded by a number of smaller vessels. Grinning, the pirate steers you straight ahead to join them.
Karma Points
Walkthrough
Your goal in this mission is to infiltrate the headquarters of the Special Duties Unit (SDU) — called the Tigers’ Den — and look for incriminating evidence against Chief Inspector Krait. This undertaking was introduced during the mission The Impound Lot, and it’s summarized in the message “Tigers’ Den Infiltration — Recap,” which you can find on the mission computer in the Safeboat.
In the first part of the mission, you’ll be able to talk your way past SDU officers, but at the end you’ll have to fight at least one major battle. You’ll have an easier time blending in if  Gaichu isn’t with you. You’ll find one vent, and you can make multiple Matrix runs, so a rigger and a decker can be helpful.
You’ll begin the mission at the Loading Dock (#1). To enter the headquarters, you’ll just need to talk to Constable Cheung next to the entrance (Exit A). She’ll give you Visitor Passes and open the door for you. She’ll also advise you to meet with Sergeant Sheng at the front desk (#3) and tell him that you need to meet with Mia upstairs to go over some paperwork. Supposedly, this will cause him to upgrade your passes. Then Cheung will take an extended lunch break and leave you to your business.
Your default Visitor Passes will allow you to move around safely in Level 1. You’ll meet a few officers and prisoners on this level, so it’s worthwhile to talk to everybody. See the annotations below for what this can gain you. When you’re eventually ready to head up to Level 2, you’ll need to use the elevator (Exit B). There are three ways to gain access to it:
- You can convince the desk sergeant (#3) to boost your Visitor Passes into Upgraded Visitor Passes.
- You can jack into the Matrix (#11) and hack the Communications Hub node. This will also boost your Visitor Passes into Upgraded Visitor Passes.
- You can attack the officers in Level 1. The guard next to the elevator will drop a Level 1 Security Pass when she dies.
Both the Upgraded Visitor Passes and Level 1 Security Pass will allow you to use the elevator.
Level 2
When you reach Level 2, the only thing you’ll be able to do is head straight for the command center (#13). When you open the door, you’ll get stopped by a deputy chief inspector. If you didn’t set off the alarm on Level 1, then he’ll open the locked door behind him. Otherwise, he’ll recognize you as intruders, and everybody in the room will attack you. You’ll then find a Level 3 Access Pass on the deputy’s corpse, and it will get you through the locked door. Past the door, you’ll come to the evidence room.
Inside the evidence room (#16), you’ll find a few items to pick up, including over 1000 nuyen, but when you check the terminal in the back of the room and enter the password “Project Zeta” (written on the files next to it) or “Krait,” you’ll discover that the terminal is completely empty of files, which means that somebody must have known you were coming.
You’ll decide to leave the building immediately, but as you’re making your way out of the evidence room, you’ll run into Lam and  Qiu. Soon enough, Lam will reveal that he’s been working with Krait all along, and that he’s the one who set up the trap that you’re in now. He’ll then call in three mages, including Wallace Koo, who will ensnare you in a magical prison. But then Qiu will reveal that she’s really a mage, and she’ll break you free.
Qiu will proceed to fry Lam, taking him out of action, and she’ll hit the mages with Chain Lightning, which will deal significant damage to them as well. Then she’ll join your party for the remainder of the mission. All you’ll have to do is finish off the mages, which shouldn’t take long. Before leaving, you’ll need to grab Lam’s PDA from his body.
Command Center Battle
When you return to the command center (#13), you’ll discover that its entrance door is now closed and locked. When you check the terminal in the center of the room, you’ll be able to get the door back open, but at the same time enemy SDU officers will begin attacking you, and a countdown timer will start, giving you a total of six turns to clear out of the command center before its doors close again, locking you inside. You’ll need to get your entire team out of the command center before the timer expires. If anyone is still inside, then you’ll fail the mission and have to load your game.
Note: The countdown timer will make it look like you only have five turns to work with, but you’ll still be able to move when it reaches zero, meaning you’ll have six turns.
You can rush out of the command center right away if you want, but there are three good reasons to stay: the Matrix (you’ll now find an access point for it nearby), the armory (#15), and the infirmary (#15). The Matrix will give you ways to make the command center battle easier, while the armory and infirmary can provide you with lots of useful gear.
If you enter the Matrix, then you’ll find yourself in a hub room surrounded by three exits leading to node rooms. Here’s where the exits will take you:
- West. In this direction, you’ll be able to hack the Armory Access and Medical Access nodes, which will allow you to enter the armory (#14) and infirmary (#15). See the annotations below for what you can find inside. If you picked up the PDA Door Signal from the server room on Level 1 (#11), then these nodes won’t do anything new for you, and you should avoid visiting them.
- Northwest. In this direction, you’ll find the Training Course Control Overrides node. If you hack it, then you’ll be able to make the turrets and grenade launchers in the training rooms (#12) much more useful. In particular, you’ll be able to switch the turrets to use lethal ammunition, and cause the grenade launchers to eject their Smoke Grenades so you can supply them with better ordinance (assuming you have some spare grenades with you). Just be aware that you’ll still have to use the terminals in the training rooms to turn on the turrets and launchers, and you’ll have to load the launchers manually.
- Northeast. In this direction, you’ll find the Secure Floor Camera node and the Motor Pool Charging System node. The former will allow you to see through the cameras on Level 2. The latter will give you the Motor Pool Charging System Password (PowerfulLynx), which will allow you to blow up police vehicles if you decide to escape through the Motor Pool.
You’ll only encounter Watcher IC in the hub room, but you’ll face Watcher IC and White IC in the node rooms, so even if you’re good at Matrix runs, you’ll probably use up a turn or more per node room. So only go to the nodes that you really want to hack, so you can escape from the command center as quickly as possible.
When the fight starts up, it’ll just be your team against three SDU troops. But from there, more and more SDU troops will arrive, until you’re facing over a dozen of them. So take advantage of the slow start to send your decker into the Matrix, and have a couple of your other characters start looting the armory and infirmary, assuming you care about the loot there. Your decker should make a beeline for the Training Course Overrides (to the northwest), and then perhaps head for the Secure Floor Camera and Motor Pool Charging System nodes (to the northeast).
Note: If you didn’t acquire the PDA Door Signal on Level 1 (#11), and if you really want to clean out the armory and infirmary, then you should go to their nodes first (to give yourself time to loot the rooms), and go to the Training Course Overrides afterwards. Then only go for the camera and charging system nodes if you have time.
Once your decker has overridden the turrets, you should send your 2-3 best combat characters into one of the training rooms (#12) and interact with the terminal there to turn on its turrets. Your combat characters will probably draw most of the fire from the SDU troops, meaning you can leave weaker characters in the command center to protect your decker. Then when your decker is done, move your remaining characters into the other training room and have them turn on the turrets there as well.
Note: We didn’t find much use for the grenade launchers. They use your grenades and decide where to shoot them, and they don’t mind hitting your team with friendly fire. It’s safer to use grenades manually.
Escape
After the battle, you’ll have to decide which route to use to escape from the building. You’ll have at most two choices for this:
- Roof (Exit C). If you learned the Roof Access Code (9304) while in Level 1 (#7), then you’ll be able to flee to the Roof. While there, you’ll have to fight your way through two levels separated by a ladder (Exit E), but the battles should not be very difficult. Then you’ll just need to climb down to the Loading Dock (Exit F). If you take this route, then you’ll earn the achievement The Promised Land.
- Motor Pool (Exit D). You’ll find lots of parked vehicles in the Motor Pool, with SDU troopers camped out near the entrance and exit waiting to ambush you. The SDU will also get regular reinforcements (including a wave right behind you right away), so it’s best not to hang around. If you learned the Motor Pool Charging System Password (PowerfulLynx) in the Matrix (#13), or if you have Drone Control 6, or if you have
 Racter in your party, then you’ll be able to activate the charging system (#17), which will allow you to blow up the police vehicles at will (by clicking on the hand icon over the vehicle; you don’t need to be nearby) and damage any SDU troopers who are in the area. Or you can ignore the troopers and vehicles, and simply run to the exit (Exit F). Going through the exit will take you back to the Loading Dock.
Note: If you blow up a vehicle, then you’ll earn the achievement Like a Powder Keg.
When you return to the Loading Dock, you’ll automatically talk to Captain Jomo and sail away in his motor boat. But before you go very far, you’ll realize that if the SDU knew about your operation at their headquarters, then they probably know about the Impound Lot as well, making it a dangerous place to return to. Luckily, Captain Jomo will know of an alternate destination, and he’ll sail you to his base of operations, the Benteng. When you arrive, you’ll earn 10 karma points for completing the mission.
Mission Overview
1 – Captain Jomo
2 – Locker Room
Inside this room, you’ll find a Crumpled Note, a tampered Evidence Bag, and 17 nuyen. The Evidence Bag will allow you to talk your way past the lockup guard (#4).
3 – Desk Sergeant
When you talk to the desk sergeant here, you’ll realize that he’s not the sergeant that Cheung mentioned earlier. Still, if you ask him to upgrade your passes and tell him about Mia, and if you have Charisma 6 or the Security etiquette, then he’ll transform your Visitor Passes into Upgraded Visitor Passes, which will allow you to use the elevator (Exit B).
4 – Lockup Door / Lockup Guard Au-Yeung
Next to the locked door here, you’ll meet a guard named Isabella Au-Yeung. If you show her the Evidence Bag from the locker room (#2), or have the Security etiquette, or have Charisma 6 and pay her a 100 nuyen bribe, then she’ll open the door for you.
Note: If you start with the Charisma option but refuse to pay the bribe, and then try the Security option, then you’ll need to have the Corporate etiquette as well, or else Au-Yeung will raise the alarm, and all of the SDU officers on Level 1 will turn hostile. But by following this path, you can force Au-Yeung to pay you 100 nuyen to make up for her demanding a bribe from you.
5 – Holding Cell: Raul Cobbs
Cobbs will tell you that he was arrested because of a “misunderstanding,” and he’ll hire you to steal the data stick containing the evidence against him — only he’ll insist that you not look at it before bringing it to him. You’ll find Raul Cobbs’ Data Stick in a nearby office (#10). If you deliver the data stick to him unviewed, then he’ll pay you 1000 nuyen as promised, or you can increase the amount to 1500 if you have the Shadowrunner etiquette.
But if you view the data stick first, then you’ll see that the Cobbs is responsible for all sorts of horrific blood sports. This will give you two options. If you leave the data stick in the office, then you won’t get a reward, but presumably Cobbs will later get convicted for his crimes. If you deliver the data stick to Cobbs anyway, then you’ll get the same payment (1000 or 1500 nuyen) as for not viewing the evidence first.
6 – Holding Cell: Nobu Tashiro
Tashiro will try to convince you to give up your Visitor Passes, but your dialogue options won’t allow you to do this, even if for some reason you wanted to.
7 – Holding Cell: Rowyn Shoremaker
Shoremaker will be thoroughly high on drugs, and he’ll tell you that he knows “what lies above.” If you have the Gang etiquette, then you’ll recognize that he wants more drugs. If you proceed to give him  Cram, Flash or
  Jazz, then he’ll name you a Friend of the Sky People, and he’ll give you the Roof Access Code (9304), which you might want to use when escaping the building.
Note: The drug you give to the prisoner will need to be in the inventory of your main character.
Another Note: You can get Cram and Jazz in the interrogation room (#8).
8 – Interrogation Room
When you open the door to this room, you’ll see a constable beating up a drug dealer. If you try to intervene, then the constable will set off the alarm, and all of the SDU officers in Level 1 will turn hostile. The only way to save the dealer without turning everybody against you is to send a drone through the vent in the gym (#9).
When the drone enters the interrogation room, the constable will spot it and attack — but he won’t set off the alarm, at least not yet. The constable won’t do anything during round 1 of the fight, but starting in round 2, he’ll try to fire his gun. If he succeeds, then he’ll also set off the alarm. So you’ll need to kill the constable before that happens. Combat drones (including Koschei) might be able to finish off the constable in two rounds if they hit him every time. To give yourself a better chance, save your drone’s AP attacks for round 2, to prevent the constable from attacking until round 3. Unfortunately, the constable will also set off the alarm if you send your team into the interrogation room to help out, so your drone will need to do the job on its own.
After killing the constable, when you talk to the drug dealer, he’ll appreciate the rescue, and he’ll give you his Briefcase Code (9315). Inside the briefcase, you’ll find Cram, Jazz and  Tokko. If you have the Gang etiquette, then be sure to keep either the Cram or the Jazz with you, as you might be able to use it with a prisoner (#7).
9 – Gym
10 – Office
If you search the bookshelf in this office, then you’ll find 71 nuyen. If Raul Cobbs (#5) asked you to steal the evidence against him, then you’ll also find Raul Cobbs’ Data Stick.
11 – Server Room
Inside this room, you’ll meet a data analyst. When you introduce yourself as a computer tech, she’ll give you access to her terminal, but she’ll want to stay and watch you work. You’ll need Charisma 7, Decking 7, or  Is0bel in your party to get her to leave. If you sided with Qian Ya during the main campaign, then pulling random parts out of the analyst’s terminal will also work.
With the analyst out of the way, you’ll be able to access the Matrix from her terminal. Inside, you’ll find three nodes that you can hack:
- Communications Hub. This will transform your Visitor Passes into Upgraded Visitor Passes, which will allow you to use the elevator (Exit B).
- Mail Archive. This will give you a PDA Door Signal, which will get you into the armory (#14) and infirmary (#15) on Level 2.
- First Floor Cameras. This will let you see through the Level 1 cameras.
12 – Training Rooms
The doors to these two rooms will start out locked. They’ll only open when you’re trying to escape from the building. Inside, you’ll find turrets, grenade launchers, and an  Advanced Medkit. To make the turrets and launchers useful, you’ll need to hack the Training Course Control Overrides in the Matrix (#13).
13 – Command Center
14 – Armory
The armory will start out locked. To enter it, you’ll need to hack a node in the Matrix (#11, #13) that will give you PDA access. Even with access, you’ll only be able to enter the room during the command center battle.
Inside the armory, you’ll find several items that you can loot: an  Ares HVAR, three
  Ares Voltaic Grenades, two
  HE Phosphorus Grenades, a
  Panther Assault Cannon, two
  Remington 990s, and three
  Renraku Flashbang Grenades.
15 – Infirmary
The infirmary will start out locked. To enter it, you’ll need to hack a node in the Matrix (#11, #13) that will give you PDA access. Even with access, you’ll only be able to enter the room during the command center battle.
Inside the infirmary, you’ll find four things that you can loot: two  DocWagon Gold Trauma Kits and two
  Exclusive Medkits (which are better than Premium Medkits).
16 – Evidence Room
Inside this room, you’ll find several items to loot, including an Advanced Medkit, Cram, Tokko, and 1118 nuyen.
17 – Charging System
Exits
- Dock entrance.
- Elevator from Level 1 to Level 2.
- Roof access. You’ll need the Roof Access Code (9304), learned while on Level 1 (#7), to use this exit.
- Motor Pool access.
- Ladder.
- Exit to the Loading Dock.