This guide will help you complete The Sinking Ship, Gobbet’s companion mission in Shadowrun: Hong Kong.
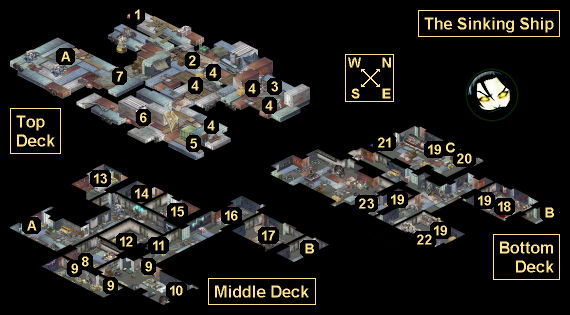
The Sinking Ship Map
The Sinking Ship Walkthrough
Background
Hung Hom Bay. Captain Jomo’s converted speedboat chops through the rough water like a cleaver through chicken bones, launching you skyward with every wave that it hits. Your destination: The Sinking Ship, Gobbet’s former home.
The ork pirate laughs and opens the throttle. Wind and rain lash your face as the floating amalgamation of shipping containers grows larger. You can see that it’s stacked at least three containers deep, an inelegant brick of corrugated weathering steel. An assortment of pontoons, buoys, and other floatation devices have been lashed to the base of the raft to prevent it from tipping.
You don’t know what’s happening here, or why Gobbet felt the need to go face it alone… but one way or another, you’re about to find out.
— Mission Complete (Scuttled Ship) —
You slide down the Sinking Ship’s irregular access ladder and pile back into Captain Jomo’s speedboat with seconds to spare. Gobbet and Is0bel come crashing down behind you, skidding and sliding across the deck of the pirate vessel. Jomo opens the throttle on the little boat’s engine, and an instant later, you’re flying. The speedboat puts on speed, taking you away from the Sinking Ship and the nightmare that you left on board.
A series of explosions rocks the enormous raft. Even from this distance, the concussion shakes you like a rag doll; Gobbet is nearly thrown overboard, but Is0bel catches her in a flying tackle and pins her to the deck.
With a final, sickening crack, the Sinking Ship’s back breaks. As it recedes into the distance, you watch the sundered halves of the patchwork raft slip beneath the waves.
— Mission Complete (Killed Rat King, Mutiny Failed) —
Captain Jomo’s speedboat carries you away from the smoldering ruin of the Sinking Ship. Gobbet and Is0bel stare at the patchwork raft in silence; Gobbet’s former home is now a floating mausoleum, home only to the dead and dying. Is0bel takes Gobbet’s hand, and together, they turn away.
Heoi grows closer. You’re going home.
— Mission Complete (Killed Rat King, Mutiny Succeeded) —
Captain Jomo’s speedboat carries you away from the Sinking Ship, now liberated from the tyranny of the Rat King once and for all. The Shiny Object rests with Malvina’s bones at the bottom of Hung Hom Bay.
Gobbet stares back at the raft as it recedes into the distance. Her expression is at once happy and sad. Is0bel takes her hand, and together, they turn away.
Heoi grows closer. You’re going home.
Karma Points
- [1] Warn Cadmus about the mutiny or scuttling charges (#21).
- [8] Return to Heoi.
Walkthrough
After gaining enough trust with  Gobbet (after about five shadowrunner missions), she’ll suddenly disappear from the Safeboat, and
  Is0bel will tell you that she went charging off to help some “friends in trouble.” Based on your earlier conversations with Gobbet, you’ll decide that she must have gone to the Sinking Ship to help Cadmus and Malvina.
Note: You won’t be able to use Gobbet in a mission again until you’ve completed this mission, so if Gobbet is one of your preferred companions, then you should complete this mission ASAP. Otherwise, there isn’t any time limit for this mission (or any other mission), so you can complete it whenever you want.
To start the mission, you’ll need to head down to the docks to the south of the mahjong parlor and talk to Captain Jomo. If you tell him that you need a favor, then he’ll agree to take you to the Sinking Ship. You’ll only be able to take Is0bel with you, making your team selection pretty easy.
Captain Jomo will drop you off on the northwestern corner of the Sinking Ship’s Top Deck (#1). As you begin exploring, you’ll quickly meet Kara Leung and Patrick Lo (#2), and you’ll get attacked by five devil rats. Kara and Patrick will help you out in the battle, but they won’t do much damage, leaving the heavy lifting to you and Is0bel. This is a good place to use Is0bel’s Mini-Grenade Launcher. After defeating the rats, your new friends will tell you about the rat problem on the ship, and they’ll agree to escort you to the hatch leading down to the Middle Deck (Exit A).
On your way to the hatch, you’ll come across a malfunctioning “anti-boarding system” — that is, a pool of electrified water (#7). You won’t be allowed to cross this trap. Instead, you’ll need to fix it. There are three ways to do this:
- With Intelligence 6, you can jury-rig a repair on the pump next to the trap.
- With Strength 5, you can turn the rusted crank wheel to the southeast (#6).
- Otherwise, you’ll need to talk to the ship-dwellers to the northeast (#3). They’ll tell you to search for a Replacement Fuse in the nearby trash piles (#4), which will suddenly become interactable. You’ll randomly find the fuse in one of the five piles. The others will either contain nothing or spawn a devil rat for you to kill. You’ll then need to use the fuse with the pump next to the trap.
With the water drained from the trap, you’ll be able to cross it, but doing so will cause another wave of five devil rats to attack you. After defeating them, you’ll need to use the nearby hatch (Exit A) to descend to the Middle Deck. But be aware: this is a one-way trip, so make sure you’ve looted the grenades on the Top Deck (#5) before leaving.
When you reach the Middle Deck, Kara and Patrick will rush off ahead of you. You’re not required to chase after them, but you might as well. When you catch up to the pair (#16), Gobbet will burst out of a nearby vent and warn you that they’re leading you into a trap. She’ll then open fire on them, starting a battle. The fight will end when either Kara or Patrick dies, so focus your attacks on one or the other.
After the battle, the enemy survivor will claim that they were just following “its” orders, where “it” is some creature that has taken over Malvina’s body. You’ll then be given a choice of killing the survivor or not. This won’t make any difference in the mission, so choose whichever option seems best to you.
At this point, Gobbet will join you. She’ll point out that the nearby doors lead to a trap (#17). If you ignore her warning and walk into the trap, then you’ll die and have to load your game. So don’t do that. Gobbet will also inform you that everything about the ship is “wrong,” and that she’s planning to sink it by setting off several scuttling charges, including some on the Bottom Deck that she hasn’t been able to get to yet because of the trap. So you’ll decide to seek out Cadmus, who might know how to disable the trap.
You’ll find Cadmus in the quarantine area (#10), but to get to him, you’ll have to figure out how to open the quarantine doors (#9). There are four ways to do this:
- You can convince Lees (#8) to open the doors. You’ll get a dialogue option for this with Charisma 5 (right away) or with Intelligence 5 (after asking her what the rules have ever done for her).
- You can kill Lees. If you threaten her, then she’ll attack you, and when she dies the doors will open.
- You can overload the nearby power outlet (#11) by cutting the red wire. You’ll only get one guess for which wire to cut, and there aren’t any clues. If you choose the wrong wire, then you’ll get zapped for 10 HP damage.
- You can disarm the door locks by using a Maintenance Datapad on the power outlet. You’ll get the datapad from Mercurio (#12), if you talk to him before opening the doors.
When you talk to Cadmus (#10), you’ll discover that he’s in the quarantine room because he was bitten by a devil rat and is now dying of VITAS (Virally-Induced Toxic Allergy Syndrome). He’ll tell you that Malvina has transformed into a Rat King through use of the Shiny Object that Gobbet found previously, but that a mutiny might be able to stop her if you can convince enough people to join you. You’ll then have to make a (dialogue) choice about whether you want to stage a mutiny or scuttle the ship, but this decision won’t lock you into anything. You’ll still be able to change your mind later. Finally, Cadmus won’t know how to disarm the trap that Kara and Patrick were leading you to, but he’ll tell you that Yasmin should know.
You’ll find Yasmin nearby (#14). She’ll give you instructions for disarming the trap, which you’ll automatically follow when you interact with the mechanism in the trap room (#17). With the trap shut down, you’ll be able to cross its room to reach the hatch leading to the Bottom Deck (Exit B). But be aware: you won’t be able to return after descending, so if you’re planning to stage a mutiny, you should convince people to join you before leaving (see the Mutiny Option below for how to do this).
When you reach the Bottom Level, you should immediately save your game. When you move forward and spot the bodies from the trap (#18), you’ll start another conversation about how to complete the mission. As before, this (dialogue) decision won’t lock you into anything, but the sequence can be buggy, and depending on what you say, the scuttling charges (#19) might break, preventing you from scuttling the ship — and maybe even breaking the entire mission. To play it safe, you should say that you’re supporting the mutiny, even if you’re not. The scuttling charges should always work that way.
Mutiny Option
To complete this option, you’ll need to begin while you’re on the Middle Deck, and convince a few people to join your cause. These people will fight on the upper decks while you’re fighting the Rat King on the Bottom Deck, so they won’t help you in your battle. They’ll just affect the ending of the mission. If you recruit enough people, then the mutiny will succeed and the ship will remain a haven. If you don’t, then everyone aboard the ship other than your team will end up dead.
There are five people you can talk to about joining the mutiny. You’ll need to talk to them before dropping down to the Bottom Deck. For your side to win, you’ll need to convince at least three of the people to join you. The potential mutineers are listed below:
- Ivan Fu (#13). You’ll need Biotech 4 or the Shadowrunner etiquette to convince him. Note: Ivan can also tell you about his missing weapon. See his annotation below.
- Lees (#8). She’ll never join you. If you press her, then she’ll attack you.
- Mercurio (#12). With 500 nuyen, Strength 5, or the Socialite etiquette, he’ll join you right away. Otherwise, you’ll just need to tell him that your backup plan is sinking the ship.
- Sparrow (#15). She’ll start out wounded. To talk to her at all, you’ll need to heal her. You can do this with Biotech 6, any type of healing item in your inventory, any type of healing spell equipped, or Gobbet in your party. If you fail to stabilize Sparrow during your first conversation with her, then she’ll die. To actually recruit Sparrow, you’ll need to give her a healing item, either from your inventory or from Gobbet’s or Is0bel’s.
- Yasmin (#14). She’ll always join you.
After recruiting mutineers (or not), you’ll need to descend to the Bottom Deck and interact with the relay switch box there (#21). Pulling its alarm lever twice will warn Cadmus to start the mutiny, and earn you a karma point. You then need to enter the Rat King’s lair (#23) and confront what remains of Malvina.
The Rat King will start out by talking to you, but you won’t be able to reason with it. Anything you say will lead to a fight. On the first turn, the Rat King will charge at you and ignore cover. Take this opportunity to lay into it with your best attacks. Once you’ve reduced the Rat King to under half of its health, several things will happen: your turn will end; the Rat King will retreat to its desk and put down the Shiny Object (aka the Keystone), and it will put up a shield that will protect it from damage; and three demon rats will spawn in the back of the room. Demon rats are about the same as devil rats, except they’ll also spit venom at you.
When your turn starts, send Gobbet to take the Shiny Object. When she picks it up, she’ll feel its power, and she’ll ask you to protect her while she takes control of the demon rats. This will take two turns. So kill any rats attacking Gobbet, but try to leave the other rats alive, as they’ll soon be your allies.
Meanwhile, the Rat King will regenerate for two turns, and then it’ll drop its shield and start attacking you again. It’ll probably focus on Gobbet, either because she’s closest or because she has the Shiny Object. The Rat King won’t be able to shield itself anymore, so focus your attacks on it, and once Gobbet takes control of the Shiny Object, send the rats at it as well. With up to six versus one, the Rat King shouldn’t last very long. When it dies, you’ll automatically return to Heoi.
Scuttling Option
For this option, you’ll need to descend to the Bottom Deck and arm the four scuttling charges there (#19). If nothing happens when you interact with the charges, then you’ll need to load your game (or start the mission over if necessary) and say that you support the mutiny even if you don’t. As long as you support the mutiny at the body pile (#18), you should be okay. Then when you interact with one of the charges, a conversation will start up where Gobbet will ask you if you’re switching to her plan. No matter how you answer her, the charges should all work.
After arming the scuttling charges, you’ll need to head to the relay switch box (#21) and pull its lever once to warn everybody to evacuate the ship. This will earn you a point of karma.
Finally, you’ll need to enter the Matrix (#20) and hack two nodes: Take Control of Power Grid (to the north) and Route Power to Charges (to the east). You’ll have to hack them in that order, but you should clear the way to the Route Power node before hacking the Take Control node. That’s because when you hack the Take Control node, the Rat King will appear in the real world and attack your other two characters, but the battle in the real world will only take place when you’re fighting in the Matrix — so if you don’t fight in the Matrix at all, then you won’t have to worry about the Rat King.
When the Rat King attacks you, it’ll have four devil rats with it. You won’t be able to kill the Rat King — it’ll just summon a shield if you do too much damage — so take down the rats as necessary until your decker is done in the Matrix. When your decker returns, you’ll just need to flee the Sinking Ship through an escape hatch (Exit C). The scuttling charges will then detonate, taking the Rat King and the Shiny Object to the bottom of the bay, and you’ll automatically return to Heoi.
Conclusion
When you return to Heoi, you’ll earn 8 karma points for completing the mission. But you won’t receive any nuyen, and you won’t be able to sell metadata about the mission to Maximum Law. However, when you talk to Gobbet you’ll learn that Rat rewarded her with a gift: a  Magic Marble, which will appear in her inventory during missions.
Mission Overview
1 – Starting Point
2 – Kara and Patrick
3 – Ship-Dwellers
4 – Trash Piles
5 – Worn Box
Inside this box, you’ll find an  HE Phosphorus Grenade and a
  Knight Errant Flashbang Grenade.
6 – Rusted Crank Wheel
7 – Anti-Boarding System
8 – Lees
9 – Locked Quarantine Doors
10 – Cadmus
11 – Power Outlet
12 – Mercurio
13 – Ivan Fu
If you pass a Melee Weapons 5 check while talking with Ivan, then he’ll tell you how one of Cadmus’ mutineers stole his blade, and he’ll allow you to keep it should you stumble across it. You’ll find the blade, a  Serrated Machete, on the Bottom Deck in the pile of corpses near the entrance (#18).
14 – Yasmin
15 – Sparrow
16 – Gobbet
17 – Trap
18 – Body Pile
19 – Scuttling Charges
20 – Matrix Jack Point
You’ll only be allowed to interact with this access point after arming the four scuttling charges (#19).
21 – Relay Switch Box
22 – Box
Inside the box here, you’ll find a  Shamanic Salve (II).
23 – Rat King’s Lair
Exits
- One-way hatch from the Top Deck to the Middle Deck.
- One-way hatch from the Middle Deck to the Bottom Deck.
- Escape hatch.