This guide will help you complete the Tai Po mission in the Shadows of Hong Kong bonus campaign for Shadowrun: Hong Kong.
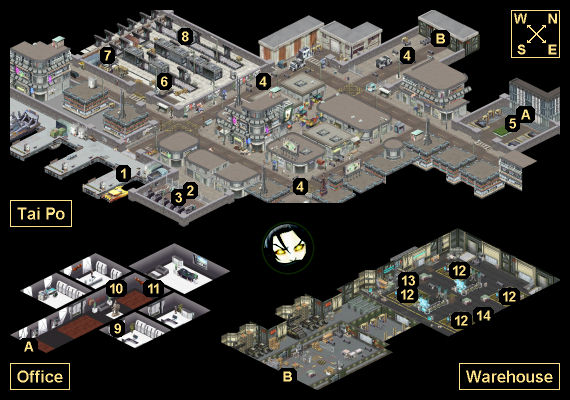
Tai Po Map
Tai Po Walkthrough
Background
You watch the Benteng drift slowly out of view as the Drunken Mistake bobs turbulently on dark, choppy waves. Angry rain dimples the water’s surface and obscures the world around you in a haze. Before long, the warehouses appear on the horizon — great grey silhouettes looming just beyond the docks.
Krait and her people are guarding a warehouse here. You don’t know what you’re going to find inside, but this is the last lead that you have to follow. If the conspiracy within the SDU is going to be stopped, it has to happen tonight, in that warehouse.
Qiu sits nearby, her fingers pressing into her temples — a sign of her distress, no doubt. But despite her evident discomfort, she still looks present and alert.
Tai Po — once a small fishing village, now encrusted with cheap industrial warehouses — grows ever closer. Water whips down from the sky as you bump up against the docks. You’ve arrived.
— Mission Complete (Burned Warehouse, Qiu Died) —
The fire-wreathed warehouse burns at your back — the last of Ares and its legacy, soon to be nothing but a mound of embers. You return to Jomo and the Drunken Mistake. The pirate revs his engine and takes to the sea.
Your mind is a blur, thoughts crashing through it like the Mistake crashes through the waves. Senior Inspector Qiu is gone, her body left to burn in the warehouse. Your opportunity to flee back to your old life is gone, having died with Qiu. Then Jomo’s voice cuts through the din of your mind. You don’t hear him at first, so he repeats himself — Duncan has left. Word travels fast in the shadows, and he’s finished with you.
So. He’s gone, too.
The Drunken Mistake speeds away from the Tai Po harbor, carrying you back toward the Benteng. It seems Kindly Cheng was right. You and your team have a long sea voyage ahead of you.
— Mission Complete (Burned Warehouse, Qiu Survived)—
The fire-wreathed warehouse burns at your back — the last of Ares and its legacy, soon to be nothing but a mound of embers. You return to Jomo and the Drunken Mistake. The pirate revs his engine and tears out of the harbor ahead of the medevac transport you called in for Qiu.
Your mind is a blur, thoughts crashing through it like the Mistake crashes through the waves. You know the inspector will live, but your opportunity to flee back to your old life has now left the table, gone from the moment you torched the warehouse. Just like Duncan — but this time for good, from the sound of things. His words echo in the back of your mind, their anger leaving little room for reconciliation.
The Drunken Mistake speeds away from the Tai Po harbor, carrying you back toward the Benteng. If there’s anything you gleaned from Kindly Cheng, it’s that you and your team have a long sea voyage ahead of you.
— Mission Complete (Gave Warehouse to Mitsuhama)—
Qiu and Duncan wait by your side for the Mitsuhama sub-orbital transport, Duncan looking more and more impatient as the seconds tick by.
The rest of your group is absent. No, they’re not your group anymore. Your time working for Kindly Cheng is done, the other runners now just memories — part of a history to leave behind with Hong Kong.
The transport arrives and quickly launches you into the sky. Below, a small fleet of aircraft descend like vultures on the Tai Po warehouse. Mitsuhama reclamations teams come flooding in to seize the advanced technology inside. Ares’ conspiracy has failed, its secrets laid bare. What happens from here will be in the Executive Council’s hands. Qiu fades into and out of consciousness as your transport’s VTOL engines carry the craft away, out of the shadows and into a different life.
Karma Points
Walkthrough
This is the mission where you’ll finally get to confront Chief Inspector Krait. Senior Inspector  Qiu will join you for it. There is one spot where a decker or rigger is important, but otherwise you’ll just need to kill enemies quickly. So load up on healing supplies, and then talk to Captain Jomo so he can take you to Tai Po.
You’ll begin at the docks in the southern part of the city (#1). Your goal in the first part of the mission is to reach the SDU warehouse without alerting Krait to your presence. Unlike the mission Whistleblower, where you had to prevent enemies from reaching a terminal and setting off an alarm, in this mission there’s just a timer. If any battle takes more than three turns, then Krait will hear about it, which will make the final battle in the warehouse a little more difficult. If you turn off the power in the city (#3), then you’ll increase the timer to six turns. You’ll also get an extra turn if you manually start combat and attack first.
Note: When the timer starts up, it’ll show you two (or five) turns, but you’ll get to move when the timer reaches 0, which means you’ll get three (or six) turns.
There are two places you should visit on your way to the warehouse:
- Office. If you gain access to the files in the executive office (#11), then you’ll learn that Ares plans to dispose of Krait after they’ve taken over the HKPF. This might give you an extra way to deal with Krait at the end of the game.
- Train yard. You’ll find a Prototype Combat Control Module in one of the train cars (#8). It’ll make the final Warehouse battle much easier.
When you enter the Warehouse (Exit B), you’ll immediately get attacked by five SDU troops, even if Krait didn’t know you were coming. After winning the battle, you’ll notice an armory on the western side of the room, complete with four spider tanks. All of the gear will feature the Ares logo, so you’ll suddenly realize what Ares has been up to — they’ve been making Mitsuhama look bad so they can take over the HKPF.
Qiu will recommend that you clear out the warehouse so you can use it as evidence against Ares, but before she can say too much, she’ll collapse, and she won’t be able to continue. So you’ll have to finish off the Warehouse on your own.
Inside the next Warehouse room, you’ll find four spider tank charging stations (#12) as well as some medical supplies (#13, #14). But be careful. When you move too far into the room, the door behind you will close and lock, and the final battle will start up. This battle will proceed in three waves:
- Wave 1. You’ll get attacked by four SDU troops and two spider tanks. If Krait knew you were coming, then you’ll face three additional SDU troops.
- Wave 2. You’ll get attacked by seven SDU troops and two spider tanks. This wave can start up while you’re still dealing with the first wave.
- Wave 3. You’ll get attacked by five SDU troops and Krait. This wave won’t start until you’ve finished off the first two waves.
If you picked up the Prototype Combat Control Module from the train yard (#8), then you’ll be able to use it in one of the charging stations (#12), provided a spider tank is in the room with you. You’ll get two options. With Decking 7 or Drone Control 7, or with  Is0bel or
  Racter in your party, you can take control of a
  spider tank. This will take three turns, during which time the tank will attack you. Otherwise, you can overload a spider tank and blow it up immediately. You can only use the control module once, so for best results you should take control of one of the spider tanks in the first wave, and try to keep it alive for the entire battle.
Note: If you use the Prototype Combat Control Module during the first wave, then you’ll hack / blow up the tank on the eastern side. So avoid that tank and target the other tank while the timer is running down.
Otherwise, try to keep your team under heavy cover on the southern side of the room (since the enemy waves will appear from the east, west and north), and try to kill the tanks and shock troopers first. Also, since this is the final battle in the campaign, don’t be afraid to use up whatever remaining grenades and healing supplies you have. Then just target one enemy at a time, and take them down before moving on to the next.
When Krait shows up at the start of the third wave, you’ll have two options:
- If you found the evidence in the Office (#11), and if you learned that Krait “just wants to get paid” when examining Lam’s PDA before the mission, and if you have Intelligence 6 and the Shadowrunner etiquette, then you’ll be able to convince Krait to leave without fighting. She’ll take her men with her, and she’ll open up the exit door for you so you can leave, too.
Note: This option never worked for us. The script causing Krait and her men to leave always failed, leaving us in a state where we couldn’t interact with anything, including the exit door. We’re not aware of any sort of workaround.
- Otherwise, you’ll have to kill Krait and her troops, but you’ll find Krait’s Security Card on her corpse, which will allow you to exit from the room.
On your way back to Qiu (in the first room of the Warehouse0, you’ll get a call from Kindly Cheng. She’ll want you to burn down the Warehouse and destroy everything inside. Then when you talk to Qiu, she’ll want you to do the opposite — leave the Warehouse intact so you can hand it over to Mitsuhama. So you’ll have to make one or two choices. These choices will affect your ending for the campaign:
- If you burn down the Warehouse, then you’ll also have to decide whether to kill Qiu or let her walk away. Either way,
 Duncan will disown you, but you and the remaining members of your team will head to Seattle with Kindly Cheng and set up the Yellow Lotus there.
- If you give the Warehouse to Mitsuhama, then you and Duncan will leave the team and return to Seattle. Duncan will create a private security firm. You’ll stay out of the shadows.
- If you sided with Qian Ya during the main campaign, then no matter what you decide here, you’ll end up returning to Seattle alone, but you’ll be prosperous and “lucky.”
Congratulations for completing Shadows of Hong Kong!
Mission Overview
1 – Captain Jomo
2 – Locked Gate
You’ll be able to open this gate if you have Strength 5 or Decking 5, if you have Duncan, Is0bel or Racter in your party, or if you learned the Sub Station Gate Code (2324) inside the Office (#9).
3 – Power Substation
If you sabotage this substation, then you’ll turn off the power in Tai Po, which will give you extra time when attacking enemies.
4 – SDU Troops
You’ll encounter a trio of SDU troops at each of these locations.
5 – Knight Errant Troops
You’ll encounter a trio of Knight Errant troops here. One of them will drop an Ares Security Access Card when he dies. This card will get you into the nearby Office (Exit A).
6 – SDU Troops
You’ll encounter five SDU troops in this part of the train yard, including two in the back. The layout of the yard will make it difficult to complete this battle quickly, so be sure to turn off the power (#3) first. One of the troops will drop a Logistics Access Card when he dies. This will open one of the train cars (#8).
7 – Medical Crate
Inside this crate, you’ll find two  Premium Medkits.
8 – Train Car
This train car will start out locked. You’ll need a Logistics Access Card (#6) to open it. Inside, you’ll find a Prototype Combat Control Module. With Decking 6 or Drone Control 6, or with Is0bel or Racter in your party, you’ll work out that the module contains some sort of firmware update. It’s a good idea to grab the module. It’ll make the final Warehouse battle much easier.
9 – Office
If you examine the terminal in this office, then you’ll learn the Sub Station Gate Code (2324). This will get you through the substation gate (#2).
10 – Occupied Office
You’ll meet an Ares employee inside this office. There are a few things you can do with him:
- With Charisma 6 and a 100 nuyen bribe, you can convince the employee to forget that he saw you. This won’t hurt you or help you.
- With Charisma 6 and a 500 nuyen bribe, you can convince the employee to give you a Data Stick that will allow you to browse through the files in the executive office (#11).
- If you choose the Charisma 6 option but refuse to pay the employee anything, then he’ll call security, which will alert Krait to your presence. You’ll then have to kill the employee, which won’t gain you anything.
- With Strength 6, you can intimidate the employee into giving you a Data Stick that will allow you to browse through the files in the executive office (#11). You can also force him to give you his money, which will net you 137 nuyen.
- You can attack the employee. He won’t contact Krait, and you shouldn’t have any trouble killing him, but you won’t gain anything this way, either.
11 – Executive Office
You’ll find a terminal in this office, but you won’t be able to search through its files. There are two ways to remedy this:
- Examining the terminal will reveal a Matrix access point in the back of the office. Inside the Matrix, you’ll find a Data Archive node. Hacking it will show you the terminal’s files.
- Next door (#10) you’ll meet a startled employee. If you intimidate him or charm him, then he’ll give you a Data Stick that will allow you to see the files on the terminal.
When you read the files, you’ll see that Ares considers Krait to be “disposable,” and that she’ll be “liquidated” once they’ve taken over the HKPF. You might be able to use this information when you confront Krait inside the Warehouse.
12 – Spider Tank Charging Station
13 – Medical Crate
Inside this crate, you’ll find two  DocWagon Trauma Kits.
14 – Medical Crate
Inside this crate, you’ll find two Premium Medkits.
Exits
- Office entrance.
- Warehouse entrance.