This guide will help you complete the Rude Awakening mission in the Shadows of Hong Kong bonus campaign for Shadowrun: Hong Kong.
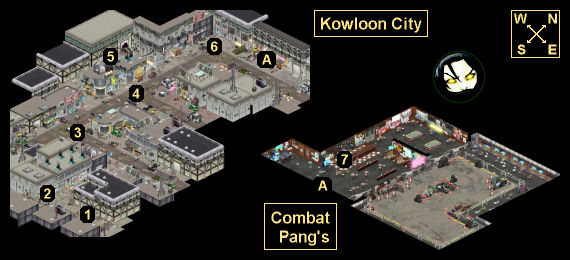
Rude Awakening Map
Rude Awakening Walkthrough
Background
Something is wrong.
The last thing that you remember, it was the night of the Kowloon City riots. You and your team were running an errand for Kindly Cheng, recovering an object before the inevitable police response turned the city upside down. Everything was going well, you had the item in hand, and then… nothing. The world went black.
A sudden explosion of pain behind your eyes jolts you back to the present. A nightmarish succession of dream-images flicker through your consciousness like a strobe light: a man with a pockmarked face. Slim fingers playing over the surface of your brain, leaving a slug’s trail of agony in their wake. A second figure whose face you couldn’t see, digging with relish through the scraps of memory that your tormentor left behind.
It was a rough night. And now, as your eyes snap open and adjust to the light, you find yourself in a reality that is little more comfort….
— Mission Complete —
Your words ring metallically off the confinement room’s walls. You’ve been talking for so long, recounting all the tedious details of your run, that your voice hums in your ears after you’ve finished speaking. The single flickering bulb above your head sways in an invisible breeze.
Beyond the light’s reach, your interrogator stands shrouded in shadow. You can’t see his eyes, but you can feel them quietly observing you from the safety of his corner. His silence opens the floodgate to your thoughts, and the questions come pouring in: were you brought here alone? With others? Most of all, what do your captors want from you?
You’ve finished your story — there’s nothing left to tell. It’s his turn to talk.
Karma Points
Walkthrough
You’ll begin the campaign inside an interrogation room. You won’t remember how you got there, only that you were on a mission for Kindly Cheng — to retrieve an ancient Jade Cong — when everything suddenly went black. Eventually, a Shadowy Troll will enter the room. He’ll let you know that you were magically interrogated, which means a mage probed your memory and saw some of the details of the mission, but he’ll want to know the rest. He’ll also claim that you were only interrogated by one mage, but you’ll remember two: one with a pockmarked face, and another who was much rougher on you, thus explaining your bloody nose.
As you talk to the troll, he might introduce himself as Mr. Yang, and he might reveal that the pockmarked interrogator is named Wallace Koo. But eventually he’ll start quizzing you about your mission. This is how the game will allow you to experience it, by treating it as a flashback sequence. So tell Mr. Yang who went with you (thus choosing your companions), and then play through the mission.
Flashback Sequence
You’ll begin the flashback sequence in the southern part of Kowloon City (#1). As you make your way to Combat Pang’s, you’ll encounter the HKPF in two places (#3, #4). Both times, they’ll be more interested in shooting people than in checking to see who’s armed or dangerous. After the first battle, you’ll find a Damaged Police Commlink on the body of one of the officers. When you pick it up, you’ll hear a message from Chief Inspector Krait exhorting her forces to further violence. Krait will play a much bigger role in this campaign than she did in the main campaign.
When you enter Combat Pang’s (via Exit A), you’ll get stopped by a ganger. He’ll tell you that the bar is closed, and that you should leave immediately. No matter how you respond, the ganger will eventually change his mind and call in his boss, Eddie “Combat” Pang.
When you talk to Pang, he’ll repeat that the bar is closed, and that you’re not welcome. With the Gang or Security etiquette, you’ll be able to convince him to give up the Jade Cong, but he’ll demand 500 nuyen for it. With Charisma 7, you can avoid paying anything. Otherwise, you’ll have to pay the fee or attack Pang and his men, including Sunny, his heavy weapons specialist. (If you sided with Qian Ya in the main campaign, then you’ll catch a lucky break in this encounter, and that’ll give you another way to get the artifact for free.)
If a battle starts up in the bar, then you won’t need to kill everybody. If Pang dies, Sunny dies, or the other four enemies die, then the fight will pause briefly, and if you have the Shadowrunner etiquette, then you’ll be able to convince the survivors to stop fighting and give up the Jade Cong. Otherwise, you’ll have to finish them off.
Regardless of how you handled Pang, you’ll find the Jade Cong behind the bar (#7). But when you pick it up and exit the establishment, you’ll get hit by a ton of tear gas, and you’ll fall unconscious. That’s how the flashback — and the mission — will end.
Mission Overview
1 – Starting Point
2 – Looters
You’ll come upon a pair of looters here. With Strength 7, the Gang etiquette, the Shadowrunner etiquette, or a 100 nuyen bribe, they’ll let you know that there are cops in the area, and that they’re shooting more than they’re talking. If you use the Gang etiquette, then you’ll be able to demand payment from the duo, and they’ll hand over 67 nuyen. Depending on how you handle the encounter, you might also get an option to attack the looters, but this won’t gain you anything.
3 – HKPF Patrol
No matter what you say to the HKPF patrol here, they’ll decide that you’re dangerous and attack you. After the battle, you’ll find a Damaged Police Commlink on the body of the HKPF captain. It’ll let you listen in on police broadcasts.
4 – HKPF Patrol
When you approach this location, you’ll spot some HKPF officers confronting a pair of civilians. If you do nothing, then the officers will open fire and kill the civilians. You can also attack the officers, or skirt around them to the west. You won’t get any sort of reward for saving the civilians (other than an achievement).
5 – Canister
Inside this canister, you’ll find a 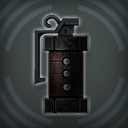 Knight Errant Flashbang Grenade.
6 – Civilians
No matter what you say to the civilians here, they’ll decide to head for an HKPF barricade and try to escape the city. This won’t go well for them, as you’ll see later.
7 – Bar
Exits
- Entrance to Combat Pang’s.
