This guide will help you complete the Prosperity Tower mission in Shadowrun: Hong Kong.
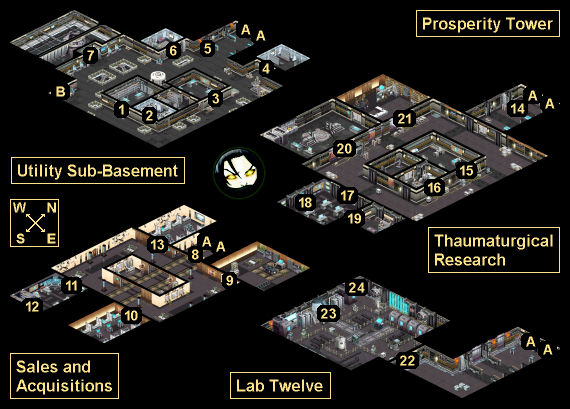
Prosperity Tower Map
Prosperity Tower Walkthrough
Background
Infiltrating the headquarters of a megacorp and locating Raymond Black will be challenge enough. Extricating him from his mother’s ASIST device before his memories are permanently altered is another thing altogether.
You hop the MTR South Island Line and roll noisily down to the nearby island of Ap Lei Chau, a dense forest of soaring skyscrapers and corporate greed. Amid them blending innocuously with its neighbors, stands Prosperity Tower. Emerging from the MTR station, you find a delivery van waiting for you. Just where Strangler Bao said it would be.
You pull the van around the building to the loading dock of Tsang Mechanical Services and its CEO, Josephine Tsang.
— Mission Midpoint —
The elevator codes acquired, you head into the enclosed space, watching the ceiling access panel closely as you make your way to Lab Twelve. Light elevator music contrasts sharply with the smell of sweat and cordite. As the lights on the elevator hit twelve, you cover the door and wait.
— Mission Complete —
Alarms blare as you hustle Raymond from the Special Projects section of Prosperity Tower, but you encounter no resistance. Raymond unsteadily gropes his way through the corridors of the corporate headquarters, holding onto your elbow for support. Occasionally, the old man fingers the gauze dressing on his head with his free hand, wincing when he touches a tender patch.
Tense minutes pass between the time you exit the building and enter the MTR station. The team remains on high-alert, scanning the streets and buildings for signs of Tsang security forces until, like a stream of cockroaches, you scuttle underground into the cool safety of the Mass Transit tunnels. You pay the fare, grab Raymond, and make your way to the subway platform, the sound of the old man’s ragged breathing loudly rushing past your ear. Seconds tick slowly while you wait for the subway train to arrive.
Karma Points
- [4] Make a plan.
- [1] Wear maintenance uniforms (#4).
- [1] Help the Tsang worker (#10).
- [1] Release the creature (#15).
- [10] Return to Heoi.
Walkthrough
When you report in to Kindly Cheng after completing the mission The Extraction, you and your companions will plan out how to rescue Raymond Black from Prosperity Tower. From the Plastic-Faced Man’s information, you’ll know that the tower has three security stations, and that you’ll need to hack into them to disrupt the tower’s alarm systems, and also determine where exactly Raymond is being held. If you gave the prototype laser to the other shadowrunner team during the mission Misdirection, then  Is0bel will reveal that she asked them for help, and that they provided details about of the tower’s Matrix layout, which will show you the quickest route to the security nodes, making the hacking sequences easier.
Next, you’ll discuss where to enter the tower. You’ll always to be able to select the lobby (aka the “direct approach”), but if you picked up Paydata: Wuxing Delivery Manifest & ID during the mission Bad Qi, then you’ll also be able to select the loading dock. The loading dock is the easier starting location, as it’ll give you extra ways to infiltrate the tower.
Finally, Kindly Cheng will give you Tsang security passes, which will make your infiltration easier, but in return she’ll ask you to look for dirt on Josephine Tsang while you’re in the tower. The passes won’t show up in your inventory. You’ll just have them when you talk to people. When the planning meeting wraps up, you’ll earn 4 karma points.
Infiltrating Prosperity Tower will involve a lot of fighting and Matrix hacking. You’ll find healing supplies while you’re in the tower, but it’s a good idea to take extras with you, just in case. You can avoid some fighting with a high Charisma, so if you have extra karma you don’t know what to do with, then that’s a place where you can put it. It’s also a good idea to make sure your decker has the best deck and programs you can afford. The quicker you can complete the Matrix sequences, the better off you’ll be. Finally, the Matrix sequences are required, not optional, so a decker is required as well. To get the mission started, you’ll need to take the MTR to Prosperity Tower.
You’ll begin the mission in one of two places, depending on what you decided when planning the mission. If you didn’t decide anything, then you’ll default to the direct approach. The two starting locations are described below:
- If you decided on the direct approach, then you’ll begin in the lobby (not shown on the map above). The receptionist there won’t be fooled entirely by your passes, so you’ll need the Corporate etiquette or Charisma 3 to talk your way past her. If you’re not convincing enough, then the lobby guards will attack you, but you’ll be given a three-turn window to disable the alarms before they go off. You can do this by hacking the receptionist’s terminal, which requires Decking 5.
If the alarms go off, then reinforcements will start arriving from the elevators, and they’ll keep coming forever until you hack the receptionist’s terminal. Plus, security personnel in the rest of the tower will go on alert, and you’ll have a tougher time convincing them that you should be in the tower. So hack the receptionist’s terminal right away. Once the battle is over, you’ll be able to use the elevators (Exit A) to reach the Utility Sub-Basement, Sales and Acquisitions, and Thaumaturgical Research.
- If you decided on the loading dock (not shown on the map above), then that’s where you’ll start. The worker there will be fooled by your passes, and he’ll allow you to use the elevator (Exit B), which will take you to the Utility Sub-Basement.
The three main floors of the tower — the Utility Sub-Basement, Sales and Acquisitions, and Thaumaturgical Research — all work in about the same way. If you initiate combat on any of these floors, then all of the security forces there will attack you, including the guards in the floor’s security office, who will conveniently leave the office door open for you when they rush out. You’ll then have to fight the guards while rushing your decker into the security office to turn off the alarm. You’ll be given a three-turn window for this (just like in the lobby), but it’ll probably take you more than three turns to navigate through the Matrix and get the alarm off, which means you’ll have to deal with waves of reinforcements arriving from the main elevators (Exit A) until you get the job done. One way to do this is to send your entire team into the security office, and then use overwatch to gun down guards as they enter to attack you.
While combat is mostly optional in this mission, hacking into the Matrix is required. Luckily, you’ll be given a large system trace threshold to work with, and this threshold will reset to zero when you reach Lab Twelve. That means you can get caught by numerous watcher ICs and force some of the blocker ICs, and still be ok, as long as you don’t go overboard.
In general, starting a fight before turning off the alarm for a floor is the “wrong” way to solve the floor. It’ll take you more time, it’ll damage your team and use up your healing supplies, and in some cases it’ll even cost you karma. To see how to solve the floors in the “right” way, read the walkthroughs below.
Floor B3: Utility Sub-Basement
The guard by the elevators (#5) will stop you when you get close to him. With Charisma 6 or a Wuxing pass (gained from starting the mission in the loading dock), he’ll allow you to pass. Otherwise, he and the other guards on the floor will attack you, which will prevent you from talking to anybody else on the floor.
Assuming you avoided a fight, you should next visit the maintenance manager (#1). You’ll have two ways to approach her:
- If you started in the loading dock, then you’ll be able to tell the maintenance manager that you’re Wuxing couriers with a package for the security office. She’ll send you over there, but when you bang on the door (#3), they’ll send you back to her. This will irritate the manager, and she’ll call the security office and get them to open the door. Then when you return to the office, the guards there will direct you to the back room, where you’ll find this floor’s security terminal (#2).
- With the Corporate etiquette or Charisma 6, you’ll be able to tell the maintenance manager that you’re new hires, and that you’re looking for something to do. She’ll give you a Locker Code (2627) and send you to the locker room (#4), where you’ll find new uniforms waiting for you. Putting them on (now or later) will earn you a point of karma.
When you return to the manager, she’ll tell you to reboot the controls on the maintenance terminal (#7). When you head over there, you’ll see an urgent message on the display. You should read it and accept the work order that it gives you. Then you should reboot the controls, as requested.
When you return to the manager, she’ll be happy with your work — until she learns that you accepted the work order. But she’ll decide that between the two of you, you should be able to get the job done. So she’ll send you back to the maintenance terminal, and she’ll give you instructions to follow. You’ll have to play along until the end, but at that point you’ll be able to complete the job or sabotage it. You should choose the latter option.
If you sabotage the job, then the turbine behind the terminal will explode, and the maintenance manager will send you to the security office to file a report. Then when you bang on the door of the office (#3), the security guards inside will open the door for you, and you’ll find the security terminal in the back room (#2). If you complete the job, then the manager will give you the rest of the day off, and nothing useful will happen.
If you don’t gain access to the security terminal (#2) from working with the maintenance manager, then you’ll only be able to get to it by attacking the two guards on the floor, which will cause the two guards in the security office (#3) to rush to their aid — and leave the office door open.
The security terminal will grant you access to the Matrix, where you’ll find two nodes: a security network node (to the south) and a secure data store (to the north). The former will disable the floor’s alarm system. The latter will give you the code (2627) to the locker in the locker room (#4) and the code (4990) for the first aid station (#6).
Note: The first two secure data stores you hack into will also give you Lab Twelve Access Codes (44526 and 25301), which you’ll need for the elevators to take you to Lab Twelve.
Floor 26: Sales and Acquisitions
Note: For this part of the walkthrough, we’re assuming that you’re wearing the maintenance uniforms from the Utility Sub-Basement (#4). If you’re not wearing them, then you should go and get them. They’ll make your life easier.
When you talk to the receptionist by the elevators (#8), she’ll allow you to pass if you have Charisma 5 or the Shadowrunner etiquette. For the latter, she’ll direct you to the VP of Operations (#9). If you try to pass by the receptionist without her consent, then she’ll call for security, which will cause all of the guards on the floor to attack you. This will prevent you from talking to anybody else on the floor, except for the VP of Operations, who will have need of your services (see below).
Assuming you avoided a fight, you should next talk to the Tsang worker to the south (#10). With Charisma 5 or the Corporate etiquette, the worker will tell you that she’s with Contracts & Acquisitions, and that the Sales team is hiding Tsang Real Estate Data from her to sabotage her career. If you volunteer to get the data for her, then she’ll ask you why you’re willing to help her. If you reveal that you need to get into the security office, then she’ll agree to give you a security keycard in exchange for the data (this is one of the friendly dialogue options that you’ll get if you’re wearing maintenance uniforms). Otherwise, you’ll need Charisma 6 or the Security etiquette to make the deal.
You’ll find the data on the terminal in the Sales office (#13), but the Sales team won’t allow you to use it while they’re in there. To get them to leave, you’ll need Charisma 6, Strength 6, or the Academic etiquette. Then to get the data from the terminal, you’ll need Decking 5 or Is0bel in your party.
When you deliver the data to the Tsang worker (#10), she’ll hand over the Security Station Card for Level 26: Sales, which will open the door to the security office. You’ll also earn a point of karma. However, when you enter the security office (#11), the guard captain there will stop you, and you’ll need Charisma 7 to placate him.
The security terminal in the office (#12) will grant you access to the Matrix, where you’ll find two nodes: a security network node (to the east) and a secure data store (to the west). The former will disable the floor’s alarm system. The latter will give you two blocker IC passwords for the core systems terminal in Thaumaturgical Research (#21): “Scion” for the special projects communications archive and “Prodigal” for the ASIST machine operations data.
Note: The first two secure data stores you hack into will also give you Lab Twelve Access Codes (44526 and 25301), which you’ll need for the elevators to take you to Lab Twelve.
Before leaving the floor, you should meet with the VP of Operations (#9). He’ll recognize you as a shadowrunner, even if you didn’t introduce yourself that way to the receptionist (#8), and he’ll try to make you a deal. The VP will offer you access to his core systems terminal in exchange for you hacking into a Foreign Accounts node and delivering to him whatever information you find there. If you agree to the deal, then the VP will give you the Tsang VP’s Core Access Chip, which will allow you to use the terminal in the back of his office. If you refuse the deal and attack the VP, then he’ll drop the access chip when he dies.
Inside the core systems part of the Matrix, you’ll find two nodes: Core System: Tsang Business Archive and Core System: Foreign Accounts. The Tsang Business Archive will give you financial records for the Walled City project, and you’ll see that lots of funds were “reallocated.” This is the dirt that Kindly Cheng wanted you to find on Josephine Tsang. The Foreign Accounts node will give you the Foreign Accounts Records that the VP requested, plus 2124 nuyen.
When you exit the Matrix and return to the VP, he’ll want the records and the nuyen. If you hand them over, then the VP will allow you to leave. Otherwise, if you decide to keep everything for yourself, then you’ll have to fight the VP plus his two bodyguards. If the security forces are still around on the floor, then they’ll help out, and you’ll have to fight everybody at once. But interestingly, if you attack the security forces first, then the VP and his bodyguards will ignore them, and you’ll still be able to talk to him afterwards. So if you want to keep the money, then your best course of action is to hack the security terminal (#12) and turn off the floor’s alarm systems, then attack the floor’s security forces, and then attack the VP.
Thaumaturgical Research
Note: For this part of the walkthrough, we’re assuming that you’re wearing the maintenance uniforms from the Utility Sub-Basement (#4). If you’re not wearing them, then you should go and get them. They’ll make your life easier.
When you talk to the guard by the elevators (#14), he’ll allow you to pass if you have Charisma 6. If you try and walk past the guard without his consent, then he’ll give you one warning. If you try again after that, then all of the guards on the floor to attack you, and all of the scientists will flee, preventing you from talking to them.
Assuming you avoided a fight, you should next talk to the researcher in the thaumaturgical lab (#20). You’ll need Charisma 6 to get him talking. After that, you’ll need Conjuring 6, Spellcasting 6, or the Academic etiquette to get him to tell you about his work. If you let him drone on and on, then he’ll tell you that his name is Wendel, and he’ll give you the Containment Door Code (1915), which will allow you to enter the containment lab.
Inside the containment lab (#15), you’ll find a research computer. If you use the lab controls to open the shutters, then you’ll see that some sort of creature is in the containment cell next door (#15). If you then ignore several warnings, you’ll be able to open the containment cell and release the creature — and even direct where it goes:
- If you send the creature to the thaumaturgical lab (#20), then the guards in the security office will rush out kill it, and they’ll leave the door to the office open. This is the only way to enter the office without a fight. Just don’t wander back into the lab and talk to the researcher again, or else he’ll blame you for everything, which will cause the guards to attack you.
- If you send the creature to the VP’s office (#21), then the mage there will kill it. When you talk to the mage afterwards, she’ll agree to leave so you can clean up the mess. This will allow you to loot the office and log into the core systems terminal without security getting called.
- If you send the creature to the elevators (Exit A), then it’ll flee the floor, but nothing interesting will happen.
Regardless of where you send the creature, you’ll earn a point of karma for freeing it.
Once you’ve gained access to the security office (#17), you’ll need to interact with the security terminal there (#18) to enter the Matrix. While you’re there, you’ll find two nodes: a security network node (to the north) and a secure data store (to the south). The former will disable the floor’s alarm system. The latter will give you the Equipment Room Door Code (8974), which will allow you to enter the equipment room (#19).
Note: The first two secure data stores you hack into will also give you Lab Twelve Access Codes (44526 and 25301), which you’ll need for the elevators to take you to Lab Twelve.
Lab Twelve
To reach Lab Twelve, you’ll need to enter the codes 44526 and 25301 at an elevator (Exit A). You’ll learn these codes from using the security terminals in the tower (#2, #12, #18), and then hacking into the secure data stores that you’ll find there. The first two data stores that you hack (regardless of the floor) will give you the codes.
When you exit the elevator, you’ll be stopped by three guards. No matter what you say to them, the encounter will lead to a fight. One of the guards will drop an Access Card when he dies. This card will get you through the door to the lab (#22). After going through the door, it will close and lock behind you, trapping you in the lab. Alarms will also go off, but nothing bad will happen until you enter the Matrix.
Inside the lab, you’ll spot Raymond in an ASIST machine (#23). When you interact with it, you’ll work out that your only option is to perform an emergency disconnect, which will require you to enter the Matrix and restore Raymond’s memory using a series of “engrams” (units of cognitive memory). At the same time, a Matrix access point will appear next to the machine.
While your decker is dealing with the ASIST machine, the rest of your team will have to fend off three waves of response team soldiers (ten soldiers total). The soldiers will start out at the elevators and then attack you in the lab. The door to the lab will remain locked until they arrive, so you’ll need to take up defensive positions inside the lab, ideally near the entrance door (#22), so the soldiers don’t take pot shots at your decker, who probably won’t have any cover.
Meanwhile, inside the Matrix, you’ll find a control hub in the main chamber, plus four transition points leading to the engrams. You won’t be able to do anything useful with the control hub yet, so ignore it for now and go after the engrams.
In each engram room, you’ll have to deal with watcher IC, white IC, and even black IC. Take these IC down as best you can (prioritizing the black IC, since they’ll damage your actual decker, not the decker’s persona in the Matrix), and then head for the engram bank in the back of the room. If you hacked into the core systems terminal in Thaumaturgical Research (#21), then you should have the passwords for the blocker IC protecting the banks. From left to right, these passwords are “Dawn,” “Dusk,” “Night,” and “Noon.” Of course, given the high system trace threshold you’ll have available to you, it probably won’t cause you any problems to just force the blocker IC. When you hack an engram bank, you’ll see a memory from the associated engram, but you’re not required to remember anything about the scene that plays out.
You’ll have ten turns to collect the four engrams and get back to the control hub. If you take too long, then you’ll fail the mission and have to load your game. When you examine the readme file in the control hub, you’ll see that the engrams need to be inserted in chronological order. So when you select the Host Engram Stream option, you’ll need to insert the engrams in the following manner:
- Slot 1: “young boy” engram.
- Slot 2: “young executive” engram.
- Slot 3: “middle-aged man” engram.
- Slot 4: “old man” engram.
If you insert the engrams correctly, then when you “reintegrate host,” your decker will get ejected from the Matrix, and you’ll have your full team available to mop up whatever remains of the response team soldiers in the lab. If you slot the engrams in the wrong order, then you’ll simply be allowed to try again.
After reintegrating Raymond and completing the lab battle, when you interact with the ASIST machine (#23) again, you’ll eject Raymond from it, and he’ll begin following you around. On your way back to the elevators (Exit A), you’ll run into three final soldiers. If you disabled all three floor alarms or killed enough guards on your way to Lab Twelve, then you’ll be able to talk your way past the soldiers. Otherwise, they’ll attack you on sight. Either way, when you reach the elevators, you’ll automatically exit the tower, and you’ll earn 10 karma points.
Heoi
During the MTR ride back to Heoi, Raymond will explain Prosperity to you. He’ll tell you that it was an experimental Fortune Engine at the heart of the Walled City, meant to improve the qi there — only the engine got “stuck” and started pooling negative qi instead. Worse, it opened a rift to another dimension, which gave one of the Yama Kings — Qian Ya, the Queen with a Thousand Teeth — access to the area. Raymond will then ask you to help him destroy the Fortune Engine, which you’ll agree to do.
When you arrive in Heoi, you’ll find the city in turmoil, with most people hunkering down to ride out the storm. But Maximum Law (if he’s still around) will refuse to leave his boat. If you talk to Ten-Armed Ambrose in Chrome Alley, then he’ll ask you to deliver Raquel the Uzi (a mission item, not a real weapon) to Law. You can do this, and even teach Law how to use the SMG (if you have Ranged Combat 1), but this won’t change anything. Law will survive regardless of what you do; only his dialogue after the final mission will change.
You won’t be able to talk to Kindly Cheng or enter the mahjong parlor, but if you found dirt on Josephine Tsang during the mission, then Cheng will pay you 5000 nuyen for it after the final mission.
Finally, you should talk to  Duncan and Raymond near the exit to the Walled City. The two of them will be bickering with each other, with Duncan blaming Raymond for what happened in the Walled City, and Raymond defending himself. Eventually, you’ll get four dialogue options in response. The first three will be:
- Stopping the Fortune Engine is what counts.
- Okay, boys, I think we’ve had enough family drama for today.
- You two need to focus on the job at hand. We can deal with this later.
The fourth option will be about listening. It’ll repeat something you said to Duncan in between missions earlier in the game (assuming that you talked to him). This line will be one of:
- Most people do not listen with the intent to understand; they listen with the intent to reply.
- He understands badly who listens badly.
- Listen to what you know instead of what you fear.
If you choose this listening option, then Duncan and Raymond will come to an understanding, and Raymond will mention that even more Yama Kings could enter the world through the rift opened by the Fortune Engine. Learning this fact is a requirement for getting the best ending for the campaign.
When you enter the Walled City, you’ll start the final mission in the campaign, City of Death.
Mission Overview
1 – Maintenance Manager’s Office
2 – Security Terminal
3 – Security Office
4 – Locker Room
You’ll find a locked locker in here. You’ll need a code (2627) to open it. You can get this code from the maintenance manager (#1) and the Matrix (#2). Inside the locker, you’ll find maintenance uniforms. Wearing these uniforms will earn you a point of karma, and also make it easier for you to talk your way past people in the tower.
5 – Guard
6 – First Aid Station
This station will start out locked. You’ll get the code for it (4990) from the Matrix (#2). Inside the station, you’ll find a  DocWagon Platinum Trauma Kit and a
  Premium Medkit.
7 – Maintenance Terminal
8 – Receptionist
9 – VP of Operations’ Office
10 – Contracts & Acquisitions
11 – Security Office
12 – Security Terminal
13 – Sales
14 – Guard
15 – Containment Lab
16 – Containment Cell
17 – Security Office
18 – Security Terminal
19 – Equipment Room
This room will start out locked. To enter it, you’ll need the door code (8974), which you can learn in the Matrix (#18). Inside the room, you’ll find two  Advanced Medkits, a
  DocWagon Gold Trauma Kit, an
  HE Phosphorus Grenade, a
  Remington 990 (Smartlink), two
  Renraku Flashbang Grenades, and the unique rifle
  Steyr AUG-CSL.
20 – Thaumaturgical Lab
21 – VP of Thaumaturgical Research’s Office
The mage in here will dismiss you no matter what you say and what you’re wearing. Worse, she’ll call security if you try to loot anything or jack into the core systems terminal behind her. There are two ways to make her leave: you can attack the security forces on the floor, which will cause her to flee, or you can send the creature (#16) into her office, and then explain to her what you’ll have to do to clean it up.
Inside the office, you’ll find the mage spells  Spell Focus: Life Siphon II and
  Strip Armor III. This is the only place in the campaign where you can acquire those spells. If you use the core systems terminal, then you’ll enter the Matrix, where you’ll find two nodes:
- Core System: Special Projects Communications Archive. The password for the blocker IC protecting this node is “Scion,” which you can learn from the Sales and Acquisitions security terminal (#12). Hacking the node will give you access to several emails, where you’ll see that Josephine Tsang wants her son’s memories altered, no matter what the cost.
- Core System: ASIST Machine Operations Data. The password for the blocker IC protecting this node is “Prodigal,” which you can learn from the Sales and Acquisitions security terminal (#12). Hacking the node will give you the Blocker IC Passwords for the ASIST Machine in Lab Twelve (#23).
22 – Lab Door
This door will start out locked. You’ll need the Access Card from the guards by the elevators (Exit A) to open it.
23 – ASIST Machine Console
24 – First Aid Box
You’ll find a Premium Medkit here.
Exits
- Main elevators.
- Basement elevator.