This guide will help you complete the Namazu mission in the Shadows of Hong Kong bonus campaign for Shadowrun: Hong Kong.
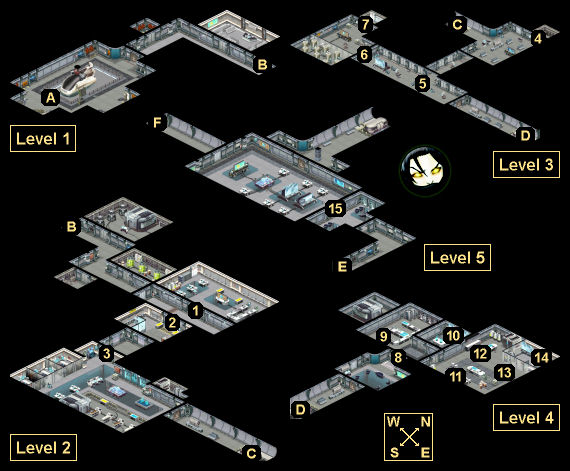
Namazu Map
Namazu Walkthrough
Background
The trip to Lee’s loaned minisub is uneventful, as is transit to the area near Hong Kong where Shiawase has built their research laboratory. The sub descends swiftly, and you are kept company by the hissing of the oxygen scrubbers — and the occasional ping of active sonar striking your hull. As you near the coordinates for the lab, Jomo begins switching off all but the most essential of systems.
After a few minutes, brighter light filters through the portholes as you ascend into a moon pool, and there is a dull thud as the facility’s clamp closes around the sub to lift it free.
— Mission Complete —
Jomo redlines the submersible’s throttle, and you rocket away from the Shiawase lab in record time. The ork remains glued to the sonar and inertial guidance readouts, constantly scanning for pursuit. Thankfully, nobody seems to be on your tail.
Soon enough, you’re ascending toward the impound yard, far from the dangers of a germ warfare lab — back to the land of dour police, a leaking boat, and an unfriendly city.
Home sweet home.
Karma Points
Walkthrough
The first time you talk to Quartermaster Lee in the Impound Lot, he’ll inform you that one of his friends is in trouble, and he’ll promise to sell you some military-grade gear if you help him out. Lee will then send a message to the mission computer entitled “Undersea Lab Job.”
When you read the message, you’ll learn that Meng-kai Seow, a high-ranking official with Monobe International, has been infected with a deadly bio-agent by Shiawase, and that while Shiawase has agreed to keep him alive, they’ll only do so if he provides them with insider information about Monobe. So Seow will want you to infiltrate Shiawase’s secret underwater lab and find the cure, and he’ll even loan you a minisub so you can get down there.
Level 1: Docking Bay
You’ll begin the mission in the docking bay of the underwater research lab Namazu (Exit A). Apparently it’ll be after hours, and you’ll find the rest of the level empty. All you’ll need to do is walk over to the elevator (Exit B) and head up to Level 2.
Level 2: Silver Dream Labs
On this level, you’ll finally spot a few guards when you approach a security checkpoint (#2). One of your companions will stop you before you get too close to them. You won’t be able to talk your way past the guards, or sneak past them. They’ll just attack you on sight, so you should initiate combat on your own (by clicking on the holstered gun in the upper right-hand corner of the screen) and attack them first.
Later in the level, you’ll come to another room with guards (#3), and you should use the same strategy against them. One of the guards will drop High Security Keycard when he dies. You’ll need this on Level 4. After the battle, a telecom terminal in the room will activate. When you interact with it, you’ll meet Dr. Janet Tang. She’ll warn you to leave the research facility before things turn ugly. Picking up the keycard and talking to Janet will allow you to use the exit tram (Exit C) and head for Level 3.
However, before moving on, you should browse through all of the computers in the two labs (#1, #3). You’ll learn about the facility’s Silver Dream project, which kidnaps people and turns them into unwilling sleeper agents, including Dreamers (deep-cover operatives), Ghosts (assassins), and Reapers (saboteurs).
Level 3: Silver Dream Sleeper Pods
In the middle of this level, you’ll come to a room filled with sleeper pods for the facility’s test subjects (#5). When Janet sees you in the room, she’ll awaken four Reaper agents, who will then attack you. Try to take down the troll first, since he seems to be the most dangerous. After the battle, a shocked Janet will once again try to convince you to leave the facility, to no avail.
To the west of the sleeper pods, you’ll come to a locked door (#6). You won’t be able to open this door until you’re making your way out of the facility. To the east, you’ll find the tram that will take you to Level 4 (Exit D).
Level 4: Germ Warfare
On this level, you’ll come to a locked door (#8), but the High Security Keycard from the cyberware lab (#3) will get you through it. Past the door, you’ll enter the hot lab, where you’ll finally meet Janet Tang in person (#13). She’ll tell you about SARS III, the pathogen Shiawase used against Meng-kai Seow, and also about the Silver Dream project. If you speculate that the Silver Dream test subjects might have become infected by SARS III, then Janet will downplay the idea, but she’ll look a little bit worried.
At the end of your conversation with Janet, you’ll have to decide what to do with her and her team. If you kill them, then you’ll remove them from the mission, and that will be that. But if you let them go, then Janet might be able to help you during your escape, and she might also pay you some money. So the latter option is the most rewarding if not necessarily the best.
After deciding Janet’s fate, Commander Garra will reveal himself and initiate a facility-wide lockdown. This will cause nine soldiers, including four drones, to attack you. At the same time, you’ll be given a five-turn countdown. When the countdown fiishes, you’ll get locked out of the Matrix and the facility’s computers, but you won’t die or anything. The countdown is only meaningful if you want to save the Silver Dream test subjects, and if you want to grab some paydata.
If you enter the Matrix (#10) during the countdown, then you’ll discover four “rooms” there. If you go west at the intersection, then you’ll find a Drone Control System node. Hacking it will disable all of the drones in the facility, including the ones attacking you in the hot lab. If you go north at the intersection, then you’ll find a Hot Lab Safe Control node. Hacking it will unlock the lab safe (#12), where you’ll find Paydata: SARS III Disease Sample (which will net you 1300 nuyen when you sell it on the Shadowland BBS).
Note: If you joined Qian Ya in the main campaign, then you’ll get lucky with the lab safe, and you’ll be able to open it without going into the Matrix.
If you want to save the Silver Dream test subjects, then you’ll need to interact with two computers. The research terminal (#9) will allow you to override the simsense feeds. The lab computer (#11) will allow you to disengage the Matrix interlocks. You can interact with these computers in any order (despite what Janet might have told you). When you do, you’ll be given the option of locking down the test subjects, or releasing them. If you lock them down, then they’ll probably escape on their own after you’ve completed the mission. If you release them, then they’ll help you out in a battle.
Escape
After defeating the security forces in the hot lab, you’ll need to grab the SARS III Antibodies from the refrigeration unit (#X14) and make your way out of the facility. When you reach Level 3 and pass by the sleeper pods again (#5), one of three will happen:
- If you disconnected the test subjects, then they’ll escape from their pods, and they’ll help you defeat the three security guards in the area. Afterwards, the test subjects will go looking for an escape route of their own.
- If you locked down the test subjects, then they’ll try to escape on their own, but you’ll never find out if they made it or not. You won’t have to fight anybody.
- If you ignored the test subjects, then four of them will escape from their pods and attack you.
When you board the final tram (Exit C), you’ll quickly realize that it’s being rerouted by the facility’s security forces. You’ll have two ways to respond:
- With Drone Control 6 or
 Racter in your party, or with Decking 7 or
  Is0bel in your party, you’ll be able to take control of the tram and send it to Level 2 where it’s supposed to go. However, when you reach the syberware lab (#3), you’ll be confronted by Commander Garra and three of his men. No matter what you say to them (including accepting their offer of surrender), the encounter will lead to a fight. Garra and Co. will probably hit you with some grenades right off the bat, but otherwise the battle should be straightforward. After the battle, you’ll need to take the elevator (Exit B) back to Level 1.
- If you pull the emergency brake, then you’ll end up on Level 5 (Exit E), and you’ll have to survive a major attack from Commander Garra and his men, plus reinforcements, plus four turrets. If Janet is still alive, then she’ll help you out by switching the turrets to your side, making the battle much easier. Otherwise, you’ll need to hunker down behind good cover, and pick off the enemies one at a time. After the battle, you’ll need to take the elevator (Exit F) back to Level 1.
Back on Level 1, you’ll get contacted by Janet, assuming she’s still alive. She’ll worry that the facility might have been compromised by your actions, and that SARS III might have gotten out. So she’ll ask you to leave behind some of the cure that you stole. If you comply, then she’ll wire you 850 nuyen. If you keep all of the cure for yourself, or destroy what you don’t need, then you won’t get anything from Janet, and you’ll perhaps unleash a pandemic.
To complete the mission, you’ll just need to return to Captain Jomo (Exit A). He’ll take you back to the Impound Lot, where you’ll receive 8 karma points. You’ll also receive 1700 nuyen when you check the mission computer on the Safeboat. Finally, when you return to Quartermaster Lee, he’ll have new weapons available in his shop.
Mission Overview
1 – Neural Sciences Lab
2 – Security Checkpoint
3 – Cyberware Lab
The two cyberware research terminals here will give you the Medical Closet Code (8236) and a Weapons Locker Code (4077), which you’ll be able to use on Level 3.
4 – Weapons Locker
You’ll need a door code (4077) to open this locker. You can learn the code in the cyberware lab on Level 2 (#3). Inside the locker, you’ll find an  Ares Voltaic Grenade and a
  Nemesis Arms Gyrojet Pistol.
5 – Sleeper Pods
6 – Locked Door
This door will start out locked but then open up when you’re making your way out of the facility.
7 – Medical Closet
You’ll need a door code (8236) to open this closet. You can learn the code in the cyberware lab on Level 2 (#3). Inside the closet, you’ll find a  DocWagon Platinum Trauma Kit and
  Shamanic Salve (II).
8 – Locked Door
9 – Research Terminal
10 – Matrix Access Point
11 – Lab Computer
12 – Lab Safe
13 – Janet Tang
14 – Refrigeration Unit
15 – Security Ambush
Exits
- Captain Jomo.
- Elevator connecting Levels 1 and 2.
- Tram connecting Levels 2 and 3.
- Tram connecting Levels 3 and 4.
- Entrance to Level 5.
- Elevator to Level 1.