This guide will help you complete Misdirection, Racter’s companion mission in Shadowrun: Hong Kong.
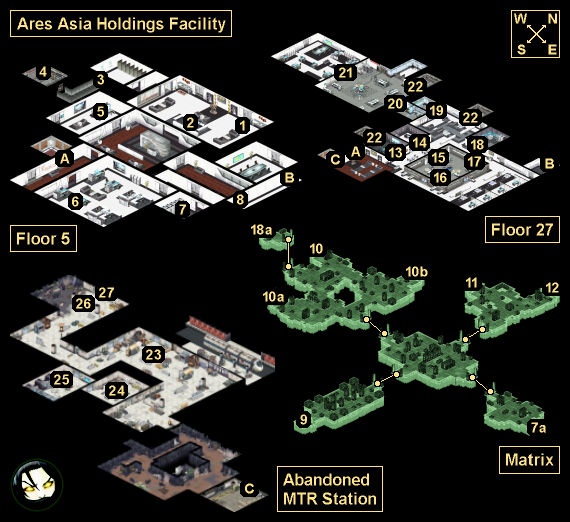
Misdirection Map
Misdirection Walkthrough
Background
Central Hong Kong spills out along Victoria Harbour, all glittering chrome and neon flash against the night’s darkness. The skyscrapers are a jagged nest of mirrored knives thrust into the sky, rending the clouds as they ascend into the heavens.
The Ares Asia Holdings complex squats menacingly over Chater Road — a steel and concrete tumor intertwined with nearby buildings in a web of skybridges and shared parking structures. You make your way inside, and ascend to the fifth floor — a public foyer that connects to the restricted areas of the complex.
As the elevator opens, you arrive in a cold, dimly lit reception area. Beyond it, your quarry awaits.
— Mission Midpoint —
The pungent smells of musty stone, grease, and the remnants of neurostun gas mix in your nostrils as you rappel down the elevator shaft. Whatever frustrated Knight-Errant security officers are in pursuit are too far away to be heard. All around you, there is only darkness and the occasional red-hued maintenance light.
As you reach the bottom and pry open the heavy elevator doors, light comes flooding into the shaft.
With any luck, you’re only minutes away from the MTR station, and with it, freedom.
— Mission Complete (Kept Laser Prototype) —
The MTR train pulls away from the station. You become lost in the crowd — just another face travelling from Central toward Kowloon. Every second puts blessed distance between you and the hornet’s nest of Knight-Errant soldiers you’ve left in your wake.
With the data planted and GPS module in your possession, it seems certain that Ares Asia will place the blame for your run at the doorstep of the Red Dragon Association.
— Mission Complete (Gave Away Laser Prototype) —
The MTR train pulls away from the station. You become lost in the crowd — just another face travelling from Central toward Kowloon. Every second puts blessed distance between you and the hornet’s nest of Knight-Errant soldiers you’ve left in your wake.
With the data planted and GPS module in your possession, it seems certain that Ares Asia will place the blame for your run at the doorstep of the Red Dragon Association. The loss of the prototype laser is unfortunate, but allies are often more valuable than gear — especially in the shadows.
With any luck, they’ll be able to pay you back soon enough.
Karma Points
- [1] Allow the other shadowrunner group into the main lab (#21).
- [1] Shut down the generator (#25).
- [8] Return to Heoi.
Walkthrough
After completing two shadowrunner missions, you’ll receive a message on the mission computer entitled “Urgent Task.” In it, Kindly Cheng will ask to set up the Red Dragon by making it look like they’ve stolen a prototype laser weapon from the Ares Asia Holdings Facility. Then she’ll warn you that other shadowrunners might be after the prototype as well.
After accepting the mission, when you head to MTR station or talk to  Racter, he’ll let you know that the two men who stole his research, Hardingham and Taylor, work at the Ares facility, and he’ll ask you to take him along on the mission. This isn’t absolutely necessary — Racter will be happy enough if you simply steal the research for him — but a few parts of the mission are easier if you have a rigger like Racter with you. A decker is also recommended, as an extended Matrix sequence can net you some paydata and more. To get started in the mission, you’ll just need to take the MTR to the Ares facility.
You’ll begin in the lobby on Floor 5 (#1). To talk your way past the secretary at the front desk (#2), you’ll need to have the Corporate etiquette, the Socialite etiquette,  Gaichu in your party (along with Racter, Charisma 6, or the Security etiquette), or Racter in your party (provided that you say you’re presenting a report). Otherwise, the secretary will call security, and you’ll have to fight a battle — here and on Floor 27 later.
Note: It’s better not to fight your way through the facility. That route will cost you a karma point later.
Past the front desk, you’ll need to visit a friendly public terminal (#5). Accessing it will allow you to alter visitor records (to frame Red Dragon) and determine that Hardingham and Taylor have their offices on the 27th floor. You might also want to visit the Matrix (#7), where you’ll find some paydata (#9).
To reach Floor 27, you’ll have two basic routes:
- The guards at the elevator (Exit A) will block you from using it. To talk your way past them, you’ll need the Security etiquette, or you’ll need to have Gaichu in your party along with Charisma 6. You can also hack the Security Scheduling Database in the Matrix (#12) to send the guards away, or you can kill them.
- With a decker in your party, you can send a drone through a vent (#3) to a power conduit (#4), and have it cut power to the elevator (Exit A). This will open a locked door (#8) and give you access to the stairwell (Exit B). The Elevator Override Control node in the matrix (#11) should also cut power to the elevator, but it didn’t work for us.
Note: When you first arrive on Floor 27, you’ll receive the objective “Retrieve the Auto-Repair Unit.” But be aware: you’ll receive this objective again in the main lab (#20), and depending on how you play the mission, it might be possible for you to pick up the Auto-Repair Prototype after receiving the objective the first time but before receiving it the second time. If this happens, the mission will break, and you’ll get stuck on Floor 27. So to be safe, don’t pick up the Auto-Repair Prototype until you’ve done everything else. To be extra safe, create a hard save when you first arrive on the floor.
On Floor 27, you should start out by looking around. If you search the recent messages on the lab computer (#16), then you’ll learn the door code — 98144 — to Taylor’s office (#14). On Taylor’s computer, you’ll be able to plant fake financial data, and you’ll learn the door code — 23847 — to Hardingham’s office (#13). On Hardingham’s computer, you’ll find the Blocker IC code — c0rt3xFRZ — for Gas Valve 3 in the Matrix (#10b). Also, on both computers you’ll learn about a troll who has been trying to break into the building. You’ll meet him at the end of the mission (#27).
Next, you should head into the server room (#18), where you’ll find the security system servers. Interacting with the servers will allow you to upload fake camera footage, which will complete your frame-job of Red Dragon. You’ll also be able to jack into the Matrix, which will take you to the same network that you saw on Floor 5, just starting on the opposite side (#18a). This might come in handy later.
When you head for the main lab (#20), you’ll have to pass by a security office (#19). The guards there will give you a warning the first time they spot you, but after that they’ll attack. To get past the guards without a fight, you’ll just need to interact with the shutter controls in the central lab (#17). This will close all of shutters in the area, including the shutters in the security office — which will allow you to walk right past it without being seen.
Note: If you end up fighting the security guards, then they’ll lock the main lab door to prevent you from going inside. To open the door back up, you’ll need to interact with the control panel in the security office.
Inside the main lab (#20), you’ll find the MP Laser IV Prototype on a table against the back wall. If you reached the lab relatively quietly, then you’ll also spot a rival shadowrunner team in the adjacent lab (#21) duking it out with Knight-Errant security forces. The door between the labs will start out locked, but you’ll discover that the other team has the keycard for the safe in the central lab (#15), and so — perhaps after some discussion — you’ll decide to let them in. When you open the door for them, you’ll earn a point of karma. If you reached the lab in a noisy fashion, then the other shadowrunner team will already be in the main lab, and you won’t earn any karma.
When you talk to the other shadowrunners — Bull, Dizzy, Opti, and the Jarl — they’ll give you the Lab Safe Keycard, and you’ll agree to work together while you escape from the facility. Then alarms will start going off, and deadly gas will start pouring out of three vents, and two groups of security forces will charge at you.
You’ll only be able to survive for 15 turns with the gas on. If you take too long, then you’ll die, and you’ll have to load your game. There are three ways to deal with the gas:
- With a decker, you can enter the Matrix (at #18 or #19) and shut down the three gas control valves (#10). This is much easier if you earlier dealt with the Watcher IC and hacked the valve nodes. Each time you close a valve, you’ll get four extra turns added to the gas timer.
- With a rigger, you can send a drone into the three gas vents (#22) and shut them down manually. Each time you shut off a vent, you’ll get four extra turns added to the gas timer.
- Failing the other two options, you’ll need to reach the exit elevator (Exit C) before the gas timer runs out. Luckily, 15 turns should give you plenty of time. Just don’t forget to grab the MP Laser IV Prototype (#20) and the Auto-Repair Prototype (#15) on your way out, because you won’t be able to leave without them.
Note:  DocWagon Trauma Kits will save you from the gas, which will only kill you on the final turn of the gas timer and not on any turns after that. Still, it’s better not to waste medical supplies.
After dealing with the gas and the security forces, you’ll need to pick up the MP Laser IV Prototype (#20) and the Auto-Repair Prototype (#15), and then head for the exit elevator (Exit C). When you reach it, if the gas is still on, then you’ll be able to leave right away. Otherwise, you’ll learn that you can’t open the elevator door yet, and you’ll have to wait for two turns while more security forces converge on you. Climbing down the elevator shaft will take you to an Abandoned MTR Station. The other shadowrunner team will automatically follow along behind you, and they’ll all survive, even if they “died” during the fighting or because of the gas.
When you arrive in the Abandoned MTR Station, you’ll have to decide what to do with the MP Laser IV Prototype. You’ll have two choices:
- If you keep the prototype, then you’ll receive a
 Prototype Sniping Laser when you return to Heoi. The other shadowrunner team won’t be happy with this, but they won’t argue with you, and they’ll leave peacefully.
- If you give the prototype to the other shadowrunner team, then they’ll stay with you for the rest of the mission (if you want them to), and they’ll help you out later in the campaign.
To reach a functioning MTR station, you’ll have to fight or avoid two groups of Knight-Errant security forces. You can avoid the first group (#23) by passing through the rooms to the south of them. You can skip the second group (#26) by simply ignoring them — if you start combat manually (by clicking on the holstered gun in the upper right-hand corner of the screen) when you get close to them, then you should be able to run through the door behind them (#27) before they can even respond to your presence. Just be aware: if you choose to fight the security forces, then you’ll have to deal with reinforcements in both battles. Fighting the first group will also cause four guard dogs to spawn by the elevator shaft (Exit C) and ambush you from behind.
The other interesting thing in the Abandoned MTR Station is the generator (#25). If you turn it off — which requires Intelligence 5 or Racter in your party — then you’ll gain a point of karma. Turning off the power will also prevent the Knight-Errant groups from receiving reinforcements (because the doors won’t work), and it’ll disable the two turrets with the second group. But the dogs will still show up if you attack the first group.
When you exit the Abandoned MTR Station, you’ll arrive in a functioning station (#27) — where you’ll meet Steeltooth the troll (whom you might have heard about upstairs at #13 and #14) and his shadowrunner team. They’ll demand the laser prototype from you. If you lie about it, and if you have Charisma 6 or Strength 6, then you’ll fool them and they’ll leave without a fight. Otherwise, you’ll have to kill them
After dealing with Steeltooth and his team, you’ll just need to board the MTR train to complete the mission. When you arrive back in Heoi, you’ll receive 8 karma points, and when you check the mission computer, you’ll receive 2000 nuyen for your work. You can also receive 200 nuyen (or a level 1 program worth at most that amount) by selling the mission’s metadata to Maximum Law. Finally, when you talk to Racter, you’ll learn that he’s put his research to good use — his drone  Koschei will now shut itself down for a turn and do some repairs once it’s taken too much dmamage.
Mission Overview
1 – Starting Point
2 – Front Desk
3 – Vent
4 – Power Conduit
5 – Public Terminal
6 – Office Terminal
With Decking 5, you’ll be able to browse through some of the files on the computer here, which will reveal the Secure Datastore IC Code (gu4nYU) and the Security Scheduling IC Code (ZH4NGf3i). These codes will allow you to skip the hacking mini-game at the associated nodes in the Matrix (#9, #12).
7 – Matrix Terminal
Using the terminal here (#7) will send you to the eastern side of the local network (#7a).
8 – Locked Door
9 – Secure Datastore
If you hack this datastore, then you’ll find Paydata: Ares Research Files, which you’ll later be able to sell for 792 nuyen.
10 – Gas Control Valves
These three nodes control gas valve 1 (#10), gas valve 2 (#10a), and gas valve 3 (#10b). You’ll be able to hack the nodes right away, but you won’t be able to do anything with the valves until gas starts flooding Floor 27.
11 – Elevator Override Control
Supposedly, this node is supposed to power down the elevator (Exit A), but it didn’t do anything for us.
12 – Security Scheduling Database
This node will send away the security forces on Floor 5, which will allow you to use the elevator there (Exit A).
13 – Hardingham’s Office
14 – Taylor’s Office
15 – Lab Safe
16 – Lab Terminal
17 – Shutter Controls
18 – Server Room
The Matrix access point in this room (#18) will take you to the western side of the local network (#18a).
19 – Security Office
You’ll find another Matrix access point in this office. It’ll take you to the same Matrix entrance as the access point in the server room (#18a).
20 – Main Lab
21 – Adjacent Lab
22 – Gas Vents
23 – Security Forces
You’ll encounter six Knight-Errant security forces here — three visible at the start, plus three reinforcements who will arrive through the door to the north. At the start of the battle, four guard dogs will also spawn by the elevator shaft (Exit C) and attack you from behind. Powering down the generator (#25) will prevent the reinforcements from arriving.
24 – Locker
Inside the locker here, you’ll find an  Advanced Medkit.
25 – Generator
26 – Security Forces
You’ll encounter eight Knight-Errant security forces here — five visible at the start, including two turrets, plus three reinforcements who will arrive through the door to the south. Powering down the generator (#25) will disable the turrets and prevent the reinforcements from arriving.
27 – Functioning MTR Station
Exits
- Elevator between Floor 5 and Floor 27.
- Stairs between Floor 5 and Floor 27.
- Elevator shaft between Floor 27 and the Abandoned MTR Station.