This guide will help you complete the Detention mission in the Shadows of Hong Kong bonus campaign for Shadowrun: Hong Kong.
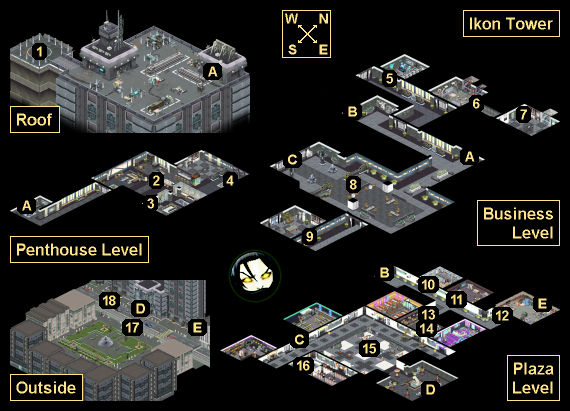
Detention Map
Detention Walkthrough
Background
The glittering expanse of Hong Kong stretches out beneath the helicopter as Jomo weaves his way between the city’s myriad skyscrapers. Rain spatters the tiny craft’s windshield as it slices its way through the calm skies above the Central District. Despite the late hour, the city streets below still glimmer with activity.
Soon enough, the black-mirrored walls of Ikon Tower stretch up before you. Jomo pulls the helicopter in for a landing, depositing you on the tower’s roof. Somewhere beneath your feet, Lillian Lai awaits.
— Mission Midpoint —
You lead Lillian Lai out of Ikon Tower, taking care to ensure that the public street in front of you is clear of guards. Central Hong Kong is surprisingly quiet; there is very little foot traffic at this hour, and only the occasional delivery van rolls by on the street in front of you.
Time to make contact with the mercenaries working for Yamatetsu, and hopefully get clear of the Fuchi forces behind you.
— Mission Complete (Sided with Fuchi) —
The night sky stretches out around you like neon-streaked velvet. Vergara and his mercenaries lie dead in the street, and Lily has been safely returned to Fuchi. Maybe she’ll live, and maybe she won’t — but returning her to Fuchi was the obvious choice, given their familiarity with her condition.
As the aircraft descends toward the impound lot, you begin gathering your gear, and prepare to disembark.
— Mission Complete (Sided with Yamatetsu) —
The night sky stretches out around you like neon-streaked velvet. Hoang and his Fuchi security forces are lying dead in the street, and Lily is safely away with Yamatetsu — though you are unsure for how long. Who knows if Yamatetsu will use Lily as a test subject — but Fuchi had their chance to cure her and failed. Maybe this way she’ll be able to live longer than a few months, even if it costs her some freedom.
As the aircraft descends toward the impound lot, you begin gathering your gear, and prepare to disembark.
— Mission Complete (Sided with Neither) —
The night sky stretches out around you like neon-streaked velvet. A pile of corpses litter the streets in your wake.
If Fuchi or Yamatetsu sent any aircraft to pursue you, Jomo has managed to evade them. Eventually, the faint running lights of the Benteng and the smaller vessels surrounding her appear on the horizon.
You think back on Lily and her predicament as Jomo brings the chopper in for a landing. With luck, maybe she’ll find a doctor to cure her condition. Yamatetsu and Fuchi were probably better options for survival, but is it really survival if you’re forced to live as a slave?
If she dies now, at least she’ll do so on her own terms.
Karma Points
Walkthrough
The first time you talk to Captain Jomo in the Impound Lot, he’ll tell you that he has a friend with a problem involving “a family member, megacorporations, and stubborn guards with guns.” He’ll then send a message to the mission computer entitled “Prisoner Liberation.”
When you read the message, you’ll learn that Martin Lai’s niece Lillian has been kidnapped by Fuchi Industrial Electronics, and that she’s being held in a penthouse in Ikon Tower. Martin will offer you “a hell of a lot of nuyen” to get her back, and he’ll even help you out by loaning you a helicopter so you can reach the tower easily.
The most notable thing about this mission is that it includes a major battle at the end. So it’s a good idea to stock up on healing supplies before going. We’d also recommend that you avoid using melee characters since they’ll attract too much attention and take too much damage. If Duncan has a  Shiawase Magnetic Arm, then he’s the perfect companion to take with you. Your enemies will have lots of grenades.
You’ll begin the mission on the Roof of the Ikon Tower (#1). As you make your way to the elevator (Exit A), you’ll get attacked by five drones. Just stay behind cover and take them down. You won’t find anything else interesting on the Roof.
Penthouse Level
The elevator on the Roof will take you down to the Penthouse Level, where you’ll discover Lillian arguing with Isane Konnair, one of her captors (#2). With Intelligence 7 or the Shadowrunner etiquette, you’ll be able to convince Isane to vacate the penthouse and let you have Lillian without a fight. Otherwise, you’ll have to kill Isane and her three Fuchi goons. If Isane survives, then she might help you in the big battle at the end of the mission.
Afterwards, when you talk to Lillian she’ll begin following you around like a party member. But when you head back to the elevator (Exit A), you’ll hear from Captain Jomo that he can no longer land on the Roof, which means you’ll have to exit the building through the ground floor entrance and meet him outside. So when you enter the elevator, you’ll go down to the Business Level.
Business Level
When you arrive on this level, you’ll discover that the building has been locked down, and that guards aren’t letting people use the elevators. So you’ll need to figure out a way to descend to the Plaza Level. There are three ways to do this:
- You can convince Francis Chow (#9) to give you the Matrix Service Room Code (40561). This will allow you to enter the Matrix Service Room (#5), where you’ll find a Matrix jack-in point. Then inside the Matrix, you’ll be able to hack into the Freight Elevator Override, which will give you access to the freight elevator (Exit B).
- You can send a drone to a gas stove and use it to start a fire (#7). This will pull two guards away from the main elevator (Exit C), leaving one frazzled guard behind. If you proceed to help “Jens Rasmussen” (#8) onto the elevator, then with Strength 7, the Corporate etiquette, or the Security etiquette, you’ll be able to join him.
- You can attack the three guards at the main elevator (Exit C). Six reinforcements will arrive to help them out, three from the north and three from the south. One of the reinforcements will drop an Elevator Keycard when he dies, which will allow you to use the elevator. You can reduce the number of guards at the elevator and the number of reinforcements (to one and four respectively) by starting a fire (#7).
Regardless of the elevator that you use, it’ll take you down to the Plaza Level.
Plaza Level
The Plaza Level is the ground level, so you’ll just need to find an exit from it so you can escape the tower. As with the Business Level, you’ll have two exits to choose from and three ways to access them:
- If you have Charisma 4 or Intelligence 4, and if you pay Witchita Red (#16) 200 nuyen, then she’ll give you the Automated Package Keypad Code (9900), which will get you into the drone room (#12). Inside the drone room, you’ll find an Automated Package Delivery System console. With Drone Control 6 or
 Racter in your party, you’ll be able to use the console to open up the nearby service entrance (Exit E). You can also open up the service entrance by hacking the Automated Package Delivery System node in the Matrix (#11).
- If you purchased the Rat Party simsense chip from Captain Jomo in the Impound Lot, then you’ll be able to use it in the odd machine in the middle of the level (#15) to create a virtual stampede of rats. This will cause everybody, including the guards at the main entrance (Exit D), to flee. If
 Gobbet is in your party, then she’ll dance to the show.
- You can attack the three guards by the main entrance (Exit D). You’ll have to kill them plus six reinforcements. The guards will attack you on sight, so you should start combat manually (by clicking on the holstered gun in the upper right-hand corner of the interface) to attack them first.
Regardless of the exit you choose, it’ll take you Outside.
Outside
Once Outside, you’ll need to head over to Commander Vergara (#17), the leader of the Yamatetsu mercenary team working with Lillian’s uncle Martin. However, before you can say much to him, Captain Hoang will lead a Fuchi team (including Isane if she’s still alive) out of the building behind you.
A long conversation will then ensue involving you, Lillian and the two team leaders. You’ll learn that Lillian is actually an executive with Fuchi, whom they’ve been “rejuvenating” — only they screwed up the treatments, and not only did they make her way too young, they also destroyed her autoimmune system, which is likely to kill her. Both leaders will claim that they can help Lillian, but it’ll be clear that they only care about using her to further their research.
So you’ll have to make a choice. You’ll never learn if one corporation is better than the other, so you’ll just have to pick whichever option seems the best to you. You’ll have three choices:
- Side with Fuchi. The Fuchi team (including Isane if she’s still alive) will help you against the Yamatetsu team, but Yamatetsu will get two waves of reinforcements, with three mercenaries on each side of the street each time (for 12 mercenaries total).
- Side with Yamatetsu. The Yamatetsu team will help you against the Fuchi team. If Isane is still alive and you picked up her dossier in the Matrix (#11), then you’ll be able to convince her to join you. Fuchi will receive two waves of reinforcements, with three soldiers on each side of the street each time (for 12 soldiers total).
- Side with neither corporation. The Fuchi and Yamatetsu teams will attack you, but they’ll also attack each other. If Isane is still alive and you picked up her dossier in the Matrix (#11), then you’ll be able to convince her to join you. Both corporations will receive two waves of reinforcements: Fuchi will get three soldiers on the western side of the street each time, and Yamatetsu will get three mercenaries on the eastern side of the street each time (for 12 enemies total). If you survive this option, then you’ll earn the achievement You’re on Your Own, Kid.
If you side with one corporation over the other, then the battle shouldn’t be overly difficult. We’d recommend focusing your attacks on one side of the street while your ally distracts the enemies on the other side, and then mopping up whatever leftovers remain.
But if you take on both corporations, then the battle will be a little more exciting. For that case we’d recommend rushing deep into the park, and staying on the western side (so the Yamatetsu reinforcements have no chance of seeing you). You’ll have to kill at least some of the initial Yamatetsu team, but most of the other combatants shouldn’t be able to see you, which means they’ll leave you alone and attack each other. Then you’ll just need to finish off the survivors at the end. But if you hide like this, then Isane will probably get killed quickly. She’s tough to keep alive if you follow this route.
After the battle, you’ll just need to talk to Lillian and then head to the rendezvous spot (#18) so Jomo can pick you up in the helicopter. When you return to the Impound Lot, you’ll earn 10 karma points, and when you check the mission computer, you’ll receive 2500 nuyen from Lillian.
Mission Overview
1 – Helipad
2 – Lillian
3 – Cabinet
Inside this cabinet, you’ll find  Shamanic Salve (II).
4 – Desk
On the desk here, you’ll find a credstick worth 250 nuyen.
5 – Matrix Service Room
This room will start out locked. To open it, you’ll need to learn the Matrix Service Room Code (40561) from Francis Chow (#9). If you sided with Qian Ya during the main campaign, then you’ll get lucky here, and you won’t need a door code at all.
Inside the room, you’ll be able to jack into the Matrix. Hacking the Freight Elevator Override node will allow you to use the freight elevator (Exit B).
6 – Vent
7 – Stove
If you have a rigger with you, then you can send a drone through the nearby vent (#6) and have it sabotage the gas stove here. The stove will explode when you get far enough away from it, distracting the guards on the level.
8 – Fuchi Executive
You’ll meet a Fuchi executive named Jens Rasmussen either here or at the elevator (Exit C). During your conversation with him, you’ll realize that he’s a fellow shadowrunner, and he’ll reintroduce himself as Awiin.
9 – Maintenance Room
You’ll meet a technician named Francis Chow here. With Decking 5, Charisma 6, or Strength 7, you’ll be able to ask him for help. Then with the Shadowrunner etiquette or the Socialite etiquette, he’ll reveal the Matrix Service Room Code (40561).
10 – Storage Room
Inside this room, you’ll find a  Force 6 Nature Elemental Fetish.
11 – Break Room / Matrix Access Point
When you enter this room, one of the employees inside will notice you and tell you to leave. But no matter how you respond to her, she’ll decide not to pursue the matter, and everybody else will simply ignore you. So you’ll be able to access the Matrix terminal in the room without any issue.
Inside the Matrix, you’ll find two nodes that you can hack: the Automated Package Delivery System and Shadowrunner Dossiers. The former will open the service entrance (Exit E) for you. The latter will give you the dossier on Isane Konnair, which will allow you to recruit her to your side when you exit the tower (assuming that she’s still alive).
12 – Drone Room
This room will start out locked. To open it, you’ll need to learn the Matrix Service Room Code (9900) from Witchita Red (#16). If you sided with Qian Ya during the main campaign, then you’ll get lucky here, and you won’t need a door code at all.
Inside the room, you’ll find  Hyper Ex plus an Automated Package Delivery System console. With Drone Control 6 or Racter in your party, you’ll be able to use the console to open up the nearby service entrance (Exit E). You can also open up the service entrance by hacking the Automated Package Delivery System node in the Matrix (#11).
13 – Service Door
This door will start out locked if you entered the Plaza Level via the regular elevator (Exit C). To unlock it, you’ll need to obtain the Service Door Key from Danny Spanecki (#14). If you entered the Plaza Level via the freight elevator (Exit B), then the door will start out unlocked.
14 – Danny Spanecki
If you entered the Plaza Level via the regular elevator (Exit C), then Danny will give you the Service Door Key, provided you have Charisma 6 or pay him 250 nuyen. Otherwise, he’ll just talk about flowers.
15 – Odd Machine (aka Fuchi Full-Spectrum Sensorimat 20509)
16 – Witchita Red
If you ask Red about exits from the Plaza Level, and if you have Charisma 4 or Intelligence 4, and if you pay her 200 nuyen, then she’ll give you the Automated Package Keypad Code (9900), which will get you into the drone room (#12).
17 – Commander Vergara
18 – Pickup Spot
Exits
- Upper elevator.
- Freight elevator.
- Lower elevator.
- Main entrance.
- Service entrance.