This guide will help you complete the Bad Qi mission in Shadowrun: Hong Kong.
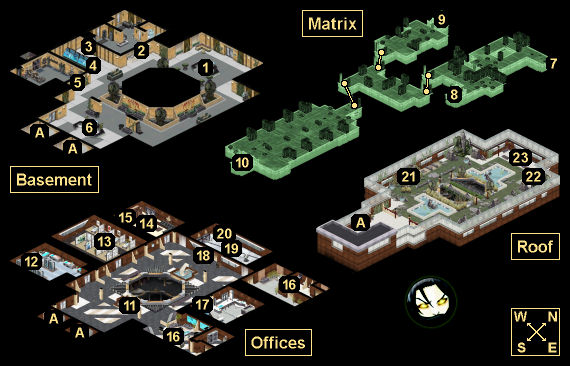
Bad Qi Map
Bad Qi Walkthrough
Background
The subway flies over the tracks toward Aberdeen. Monsoon humidity clings to your skin, as if it’s followed you from Heoi. Or perhaps it’s simply sunk this far into the earth, penetrating stone and machine, rousing the acrid smells of Hong Kong’s underground in its wake.
You’ve been handed a promising job — geomantic sabotage — with a single objective: disrupt the flow of Wuxing qi to destabilize the corporation. Your client is especially keen on the idea of Wuxing’s famed geomancy being used against it. The ultimate humiliation.
While the corporation’s office spaces are free game, the main target is Wuxing’s treasured lotus statue, which resides within a temple on the topmost floor of the monolithic building. Your client’s instructions are clear. The more damage you do, the worse the qi, and the better the pay.
— Mission Complete (Partial Disruption) —
Wuxing won’t know what hit them. The embarrassment of their own geomantic science turned against them will sit unfavorably on the tongues of Wuxing executives, and maybe even get a few people terminated. They’ll know it wasn’t just the building you battered — you sent a message. Everyone has a weakness that can be exploited….
The change in feng shui should keep them spinning for weeks. And while you weren’t able to disrupt all their qi, you still managed to waste Wuxing’s temple, the most important task in your client’s plan. With the company focusing on restoring their temple, it will be some time before they discover the full extent of your assault.
— Mission Complete (Full Disruption) —
Wuxing won’t know what hit them. The embarrassment of their own geomantic science turned against them will sit unfavorably on the tongues of Wuxing executives, and maybe even get a few people terminated. They’ll know it wasn’t just the building you battered — you sent a message. Everyone has a weakness that can be exploited….
The change in feng shui should keep them spinning for months. The complete disruption of their qi, and destruction of their temple, will cripple the energy at this branch of the company. And with Wuxing focusing on restoring their temple, it will be a long time before they discover the full extent of your assault.
Karma Points
- [1] Have Charles Pang (#2) use the elevator, or
- [2] Have Charles Pang (#2) report a theft.
- [1] Achieve 100% qi disruption.
- [8] Return to Heoi.
Walkthrough
After completing City of Darkness, you’ll receive a message on the mission computer entitled “Geomantic Sabotage.” In it, Kindly Cheng will ask you to travel to the Wuxing Skytower and disrupt the flow of qi there. She’ll recommend that you take a spellcaster with you, but this doesn’t appear to be important for anything. However, you should take a decker if you want to grab some paydata. To get started, just accept the mission and then take the MTR to the Skytower.
You’ll start out in the Basement of the Skytower. One of your companions will give you a Spoofed ID, and then a security officer (#1) will ask you to check in. The Spoofed ID will get you through, but it won’t work for your companions. For them, you’ll either need Charisma 3, or you’ll need to be polite to the officer and agree to pick up the necessary credentials at the check-in terminal (#4). You can also attack the security forces and fight your way through them, but this is inelegant, and it’ll cost you karma if you have the Security etiquette.
To move up to the Offices, you’ll need a Heightened Access Employee ID. There are a few ways to get one:
- Charles Pang (#2). With Body 3 or 100 nuyen, you can convince Charles to give up his Wuxing Employee ID. With this ID, or with Charisma 3, you’ll be allowed to enter the maintenance room (#5), where you’ll find a Security Override. The override will allow you to create a Heightened Access Employee ID at the check-in terminal (#4).
- Charles Pang (#2). With the Security etiquette, you’ll be able to convince Charles that you’re conducting a special security drill. This will give you three options:
- Have Charles report a fire. This won’t help you in any way.
- Have Charles report a break-in. This will cause the elevator security forces to take Charles with them to the 27th floor. You’ll earn 2 karma, and with the security officers gone, you’ll be able to loot a Heightened Access Employee ID from their desk (#6).
- Have Charles try to use the elevator without proper access. Charles will get shot and killed, but the elevator security forces will enter the elevator to clean up the mess, and they’ll disappear from the game. You’ll earn 1 karma, and with the security officers gone, you’ll be able to loot a Heightened Access Employee ID from their desk (#6).
- Matrix. If you jack into the Matrix (#3), then you’ll be able to collect a Security Override, which will allow you to create a Heightened Access Employee ID at the check-in terminal (#4).
- Combat. You can attack the security forces and then loot the Heightened Access Employee ID from the security checkpoint (#6).
With a Heightened Access Employee ID in hand, you’ll just need to use it at the security checkpoint (#6) and then take one of the elevators (Exit A) up to the Offices.
In the Offices, you’ll finally be able to start disrupting Wuxing’s qi. There are ten adjustments you can make. You’ll spot them when you walk next to them. Each adjustment will increase the qi disruption percentage, as detailed below:
- Fountain (#11): 10%
- Power junction (#12): 5%
- Four dividers (#13): 2% each
- Shift papers (#14): 5%
- Two mirrors (#16): 5% each
- Flames (#18): 10%
For most of these qi points, you won’t need to do anything special. You’ll just need to interact with them. But for the power junction (#12), you’ll need to learn the Maintenance Code (8484) in the executive office (#19), and then “overload the power settings.” Also, be aware that at some point while you’re making your adjustments, you’ll get attacked by four spirits.
To move up to the Roof, you’ll need to pick up the Temple Access Card (#19). This will allow you to use the elevators (Exit A) again. But don’t leave the Offices until you’ve increased the qi disruption percentage to 50%. You won’t be allowed to return to the Offices after reaching the Roof, and any missed qi points will cost you money and karma.
When you arrive on the Roof, you’ll get ambushed by five spirits, but two of them will spawn next to the statue on the far side (#23), and so you should be able to break up the fight into two battles. Killing the spirits will earn you 5% qi disruption. After winning the battle(s), you’ll find three more qi points that you can disrupt:
- Bushes (#21): 15%
- Water Pipe (#22): 15%
- Statue (#23): 15%
If you make all of the possible adjustments, on the Roof and in the Offices, then you’ll reach 100% qi disruption, which will earn you a point of karma.
When you return to the Elevators (Exit A) to leave the tower, you’ll get ambushed by five mages. They’ll move first and start with good cover, but if you focus your fire, you should be able to defeat them quickly enough. It also helps to have a melee character like Gaichu or
  Koschei around, since their attacks will ignore cover and cause the mages to waste a lot of time moving around.
When the mages are dead, you’ll just need to enter the elevators (Exit A) to complete the mission and return to Heoi. You’ll earn up to 2200 nuyen for your work (with the exact amount depending on your qi disruption percentage), plus 8 karma. You can also get 200 nuyen (or a program worth at most that amount) from Maximum Law by telling him the “metadata” for the mission.
Mission Overview
1 – Front Desk
2 – Locker Room
You’ll meet a Wuxing employee named Charles Pang in here.
3 – Matrix Access Point
Inside the Matrix, you’ll have to fight some White IC even if you’re able to avoid the Watcher IC. But while you’re there, you can pick up a Heat Suppression Routine (which will reduce your system trace by 20), a Security Override (which will allow you to create a Heightened Access Employee ID at the check-in terminal, #4), and Paydata: Wuxing Delivery Manifest & ID (which you’ll later be able to sell for 150 nuyen).
4 – Check-in Terminal
5 – Maintenance Room
You’ll meet a maintenance employee here, but she won’t help you with anything. This is also where you can find a Security Override for creating a Heightened Access Employee ID.
6 – Security Checkpoint
7 – Matrix: Start
8 – Matrix: Heat Suppression Routine
9 – Matrix: Security Override
10 – Matrix: Paydata
11 – Fountain Qi Point
12 – Power Junction Qi Point
You’ll need to know the Mainframe Code (8484) — learned in the executive office (#19) — to disrupt this qi point.
13 – Divider Qi Points
There are four dividers that you can adjust here. However, you’ll have to move the first one to unlock the second, move the second one to unlock the third, and so forth until you’ve moved all four.
14 – Shift Papers Qi Point
15 – Wall Safe
To open this wall safe, you’ll need the Security etiquette, Quickness 5, or the Mainframe Code (8484). You’ll learn the code in the executive office (#19). Inside the safe, you’ll find 150 nuyen.
16 – Mirrors Qi Points
17 – Research Lab
Inside this lab, you’ll find a weapon stand and a research computer. Examining the stand will allow you to interact with the computer. When you browse through the computer’s files, you’ll discover a manual for the weapon being researched. With Pistol 4 or Intelligence 5, you’ll learn how to open the weapon stand. Inside the stand, you’ll find a unique pistol called  The Bloody End.
18 – Flames Qi Point
19 – Desk
On this desk, you’ll find a Mainframe Code (8484) and a Temple Access Card. The code (despite its name) will allow you to unlock the power junction (#12) and the wall safe (#15). The card will allow you to take the elevators (Exit A) to the Roof.
20 – Windows Qi Point
21 – Bushes Qi Point
22 – Water Pipe Qi Point
23 – Statue Qi Point
Exits
- Elevators. These elevators will take you from the Basement to the Offices, and from the Offices to the Roof. You’ll need a Heightened Access Employee ID for the former and a Temple Access Card (#19) for the latter.
