This guide will help you complete the Return to Harfeld, The Lab Below, and Panacea missions in Shadowrun: Dragonfall.
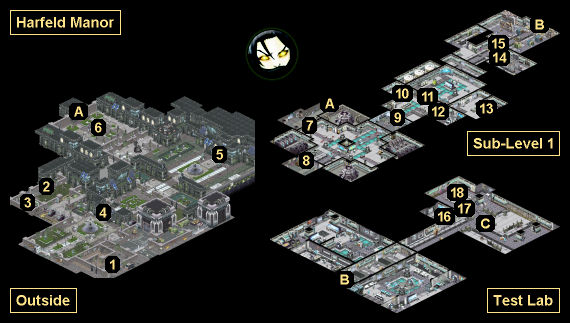
Return to Harfeld, The Lab Below, Panacea Map
Return to Harfeld, The Lab Below, Panacea Walkthrough
Background
The van lurches forward. The smell of anxious sweat hangs close and thick inside, making the cramped vehicle feel even smaller. The streets of Berlin are strangely quiet as you make your way past the city limits. It’s as if the whole of the Flux State is waiting for something. A calm before the storm.
An hour later, the van rounds a corner. In the distance you can see the silhouette of Harfeld Manor, backed by the light of the full moon. You switch the van’s headlights off and shift to electric. A short while later, you kill the ignition and roll quietly down the last hill, pulling to a stop on the side of the road. A bird of prey takes wing from a tree above you, beginning its nocturnal pursuit.
You know how it feels.
— Mission: The Lab Below —
After making your way across the manor grounds, you find the servants’ entrance open and the immediate interior clear of any resistance.
You find the elevator that you used during your prior escape waiting patiently for your arrival. It shudders to life now, ready to carry you down into the facility below. To the place where Monika met APEX and the world turned upside down.
Where this whole thing began.
— Mission: Panacea —
The sounds of machinery fade behind you as you venture further underground. Whoever built this facility was clearly well financed. It must have taken years to design, excavate, and build a complex like this in secrecy.
You continue through dimly lit halls, finally stepping into what appears to be another laboratory area. The corridor before you is deserted.
Dr. Adrian Vauclair is somewhere within this facility… and with him, the answers you seek.
Karma Points
- [5] Learn about Panacea (#7).
- [1-2] Send the self-destruct drones to a location (#12).
- [2] Talk Vauclair out of his plan (#16).
Walkthrough
You’ll begin this mission on the grounds outside Harfeld Manor (#1). As you explore, you’ll encounter hellhounds (with 60 HP), paramilitary security (50-70 HP), and gargoyles (80 HP). The gargoyles will start out looking like statues, and they’ll only activate if you get too close to them. Since the gargoyles can deal area-effect damage, it’s better to activate them when you’re fighting something else (so you can approach them with a single character) rather than outside combat (when you’ll have to approach them with your entire team clumped together).
The only thing you’ll need to do while you’re outside the manor is reach the freight elevator (Exit A). On your way there, you’ll run into a locked gate (#4). To open it, you’ll either need to pick up the Estate Courtyard Key (from #2), or “guess” that the override code is 4168. The freight elevator will take you down to Sub-Level 1.
The first room you’ll come to in Sub-Level 1 is the large lab you might remember from The Harfeld Manor Run (#7). If you freed APEX during the previous mission, then the lab’s guards will be dead, and the exit door will be unlocked. If you didn’t help APEX, then you’ll have to fight two guards, and one of them will drop a Lab Key Card when he dies. The key card will unlock the exit door.
Inside the lab, you’ll find a terminal with four entries about Vauclair’s Panacea Project. If you have Biotech 5-7 or Spellcasting 5-7, then you’ll get to read detailed versions of the entries. Otherwise, you’ll just see summaries. If you have Intelligence 7, then after reading all four entries, you’ll figure out what Vauclair is up to — developing a Doom-based virus “as infectious as the flu” that can “jump species barriers” — and you’ll earn 5 karma points.
Note: If Doom sounds familiar, it was the subject of one of Paul Amsel’s updates early in Act 2.
Next up, you’ll come to a security checkpoint (#9). You’ll encounter three guards there. If you freed APEX, then the two auto turrets by the entrance will help you out in the battle. Otherwise, the turrets will be offline. Clearing out the checkpoint will give you access to two offices:
- Lili’s office (#10). If you have Decking 5, then you’ll be able to read Lili’s emails. The third one will give you the Store Room Access Code (1247), which will allow you to enter the security storeroom (#13). Inside the storeroom, you’ll find a
 BuMoNA Gold Trauma Kit and a
  Premium Medkit.
- Security office (#12). Inside this office, you’ll find a security terminal, a matrix jack-in point, and a locked safe. If you helped APEX during the previous mission, then the security terminal won’t be locked, and you’ll be able to use it right away. Otherwise, you’ll have to jack into the matrix and hack a Lab Security Network Access node there in order to use the terminal.
The terminal will give you access to the security cameras in Sub-Level 1, so you’ll be able to see some of what’s waiting for you. It’ll also allow you to open the safe, where you’ll find a Drone Control Box. If you put the control box into one of your backpack slots, then you’ll be able to send a pair of drones to one of three locations: the mixing lab (#11), general storage (#15), or weapons storage (#14). With Drone Control 5, you’ll be able to take direct control of the drones.
The drones will self-destruct after 4 turns. If they’re not under your control, then they’ll attack any enemies they spot on the way to their destination. Sending the drones to the mixing lab will earn you 1 karma point. Sending them to either of the storage rooms will earn you 2 karma points. Unless you need some of the items in the weapons storage room — including two  HE Phosphorus Grenades — the best place to send the drones is general storage, where they’ll help you with a big fight.
To reach the exit from Sub-Level 1 (Exit B), you’ll have to do some fighting — first against five guards in the mixing lab (#11) and then against nine guards in the general storage room (#15). If you freed APEX during the previous mission, then you’ll have a pair of auto turrets helping you in the latter battle. In both cases (and in just about every major battle), you’ll probably have better luck if you draw enemies to you rather than charging in at them.
Note: Before leaving Sub-Level 1, be sure to read the emails on the terminal in the mixing lab (#11). They’ll mention some accidents that have happened recently. This information might come in handy later.
When you exit Sub-Level 1, you’ll end up in the Test Lab, where you’ll quickly meet up with Vauclair (#16). He’ll close the door behind you, locking you into the lab. Then he’ll get very talkative, and he’ll reveal everything — how he captured Feuerschwinge’s astral form, how he developed a Doom-like virus — Panacea — to kill all of the dragons, and how he’s going to use Feuerschwinge’s body to ravage Berlin and infect everybody with the virus. You’ll have three basic ways to respond:
- You can change Vauclair’s mind. To do this, you’ll need to point out that he’s doing exactly the opposite of what his younger brother (aka Hermie, aka Green Winters) would have wanted, and you’ll need to make a series of arguments to convince him that releasing the virus might have unintended consequences, and that it amounts to murder. These arguments can come from various sources, including Absinthe in Aljernon’s shop in the Kreuzbasar and the emails in the mixing lab (#11). You should also bring up Hermie whenever possible. The Academic etiquette, Intelligence 6, and Biotech 5 dialogue options will work as well, but they’re not necessary.
If you convince Vauclair that he’s wrong, then you’ll earn 2 karma points. But Audran won’t be swayed. He’ll kill Vauclair and keep Vauclair’s plan running on schedule, and he’ll leave you locked in the lab.
- You can let the conversation play out. If you keep calling Vauclair insane and keep threatening to kill him, then he’ll just shrug his shoulders at you and leave you locked in the lab.
- You can agree with Vauclair. Your teammates won’t like this, and they’ll attack you. This can be a tough battle, with a lot depending on the class you’re playing and which teammates you’re using. We’d recommend killing
 Eiger first, then
  Dietrich, then
  Glory, and then
  Blitz. If you have
  Panzerdrohne with you, then save it for last, as it might take a while to bring down.
After the battle, you and Audran will sit in the lab while Vauclair does his thing. You’ll then move on to the mission One Year Later.
Assuming you’re still battling against Vauclair’s plan (if not Vauclair himself), you’ll find yourself locked in the Test Lab. But before you can try to escape, you’ll get attacked by four firedrakes (with 120 hit points). The first two will come from the east, and then the next two will come from the west. The firedrakes will enter the lab one at a time, so you might be able to kill the current one before the next one arrives, making the battle fairly easy. Just be aware that firedrakes explode when they die, so it’s a good idea to keep your melee characters a few squares away at the critical moment.
After the battle, you’ll need to talk to Feuerschwinge’s astral form — aka the strange woman in the containment cell (#18). She’ll ask you to free her, and no matter how you rspond, she’ll tell you that you can escape the lab via a secret hatch (Exit C). When you go through the hatch, you’ll begin the mission Into the Dark.
Missions Overview
1 – Starting Point
2 – Hellhound Cages
At this spot, you’ll discover three hellhounds locked in cages and three guards watching over them. When the guards spot you, they’ll attempt to open the cages. If they succeed (by standing next to the cage panel when their turn starts), then you’ll have to fight the hellhounds along with the guards. Otherwise, you’ll only have to fight the guards. One of the guards will drop the Estate Courtyard Key when he dies, which will get you through the locked gate (#4).
3 – Break Room
Inside this room, you’ll find a  Defiance Super Shock and a
  Premium Medkit.
4 – Locked Gate
To open this gate, you’ll either need the Estate Courtyard Key (from #2) or the override code (4168).
5 – Locked Gate
You won’t be able to open this gate.
6 – Courtyard
In this courtyard, you’ll encounter seven paramilitary security guards, plus three gargoyles. If you have trouble with the fight, then you might want to try retreating the way you came, and letting the enemies come to you. If nothing else, this strategy will allow you to attack the gargoyles separately (or avoid them altogether).
7 – Main Lab
8 – Door Panel
This is the panel where  Monika died. If you examine it, then you’ll take a moment to think about your fallen teammate.
9 – Security Checkpoint
10 – Lili’s Office
11 – Mixing Lab
12 – Security Office
13 – Security Storeroom
14 – Weapons Storage
The only way to access this room is to send the self-destructing drones (from #12) to it. The drones will blow a hole in the wall, allowing you to enter. Inside the room, you’ll find two  HE Phosphorus Grenades,
  Fireball II, a
  Renraku Flashbang Grenade, a
  Ruger Super Warhawk revolver, and an
  SCK Model 100 (Smartlink) SMG.
15 – General Storage
16 – Vauclair
17 – Medical Supplies
Inside the medical supplies box here, you’ll find an  Advanced Medkit.
18 – Containment Cell
Exits
- Freight elevator.
- Elevator.
- Hatch.
