This guide will help you complete the Into the Dark and Dragonfall missions in Shadowrun: Dragonfall.
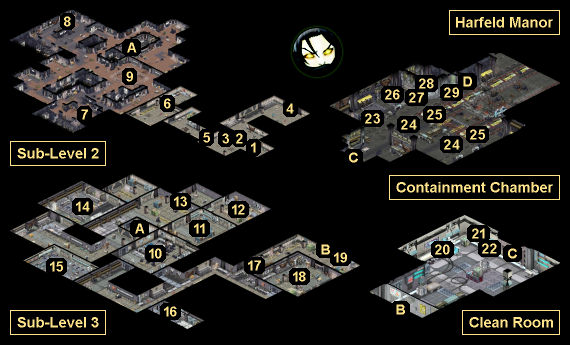
Into the Dark, Dragonfall Map
Into the Dark, Dragonfall Walkthrough
Background
You squeeze through the narrow gap beneath the floor panels and climb down into a large space beneath the lab complex. Darkness surrounds you, and the air smells moldy and stale.
As your eyes slowly adjust to the light, you can make out the dim planes of cobweb-covered walls and scattered construction equipment. Judging by the dust and disrepair, this place appears to have been abandoned long ago.
Meanwhile, somewhere else beneath Harfeld Manor, Paul Amsel’s killer is preparing to wake a dragon and unleash it on an unsuspecting Berlin.
— Mission: Dragonfall —
You exit the clean-room to find yourself at the threshold of a vast underground chamber. If the abandoned facility that you just fought through was purgatory, then you now stand at the gateway to hell. The heat emanating from ahead hits you like a hammer — the smell of sulphur and ozone is enough to make your lunch want to find somewhere to hide.
Above the noise created by the whir of turbines, you can hear the deep rumble of something feral waking up. Something very, very big.
You check your weapons and step into the vast chamber.
— Mission Complete —
You step out of the van, climbing down into the tunnel leading back to your safehouse.
Just hours ago, you saved Berlin from fire and ash, from the would-be sacrifice of Dr. Adrian Vauclair. It feels strange now, returning in secret. In silence. The other residents of the Kreuzbasar go about their business, unaware of what almost happened here tonight.
It’s finally over. Your team, and your kiez, are safe once again.
Karma Points
Walkthrough
You’ll begin this mission in a dark chamber in Sub-Level 2 (#1). To escape the chamber, you’ll have to restore power. This will require you to start a pair of generators. First, you’ll need to grab Regular Gasoline (#2) and Diesel Fuel (#3), the latter of which will be guarded by a single scorpyrine (with 80 hit points). Then you’ll need to add the Regular Gasoline to the portable generator (#4) and start it, and add the Diesel Fuel to the main generator (also #4) and start it as well. With the power back on, you’ll be allowed to open the exit door (#5).
As you explore the rest of Sub-Level 2, you’ll encounter more scorpyrines and firedrakes (with 120 hit points), and you’ll also notice some cracks in the floor. If you peer through the cracks, then you’ll get a view of some of the mercenaries and creatures waiting for you in Sub-Level 3.
You won’t actually need to do much in Sub-Level 2 other than make your way to the exit (Exit A). But if you examine the mysterious rock (#8), then you’ll be able to pick up some fetishes, and if you set off the blasting charges (#9), then you’ll be able to skip a fight in Sub-Level 3 (at #10). Descending to Sub-Level 3 is a one way trip.
When you drop down to Sub-Level 3, you’ll end up in an office with an HVAC diagram on the wall (Exit A). Examining the diagram will give you a Ventilation Map Diagram, which will provide you with information about the vents in the level. This will be useful when you reach the HVAC controls (#16). Combining the controls with the Nerve Gas (#14) will allow you to kill all of the enemies in the CIC (#10), bulk storage (#11), the firing range (#12), or administration (#18). If you’re in a hurry, then you should take out the mercenaries in administration, and then move through it to the exit (Exit B).
Note: If you freed APEX during APEX Rising, then it will call you while you’re in the office, and it will demand that you give it access to Panacea. It won’t much care how you respond.
Next up, you’ll come to a clean room. In this chamber, you’ll find medical supplies for you and your team (#21, #22), and you’ll also discover an Emergency Field Trauma Unit (#20), which will restore your team to full health. You’ll start the final boss battle in the next room, so be sure to take advantage of all of the healing. This is also a good place to save.
When you exit the clean room (via Exit C), you’ll come to the massive containment chamber where Vauclair has been holding Feuerschwinge’s body. A short way into the chamber, you’ll spot Vauclair or Audran (#28), depending on who’s alive. Nothing much will happen during this conversation, and at its end, the final battle will start up.
At this point, you’ll receive a notice on screen: “Feuerschwinge Virus Level 2/10.” You’ll need to prevent this timer from reaching 10. Confusingly, you won’t be given any sort of indication about how to do this, and you’ll see things like a matrix jack-in point (#23) and a pair of pump stations (#24), without any hint about how they can help you. Meanwhile, enemy troops will keep spawning, and they’ll do their best to kill you while you’re trying to figure things out.
Here’s what you’ll need to know for the final battle:
- Each turn will increase the virus timer by 1. If it gets to 10, then Feuerschwinge will get released on Berlin, and you’ll lose the game.
- If you jack into the matrix (#23), then you’ll find yourself in a small area with two nodes: Aux Virus Venting System A and Aux Virus Venting System B. You’ll have to defeat some IC (including a Black IC) when you arrive, and then some more after you’ve hacked one of the nodes, but each node you hack will reduce the virus timer by 1.
Note: The matrix nodes don’t have anything to do with the real world pump stations (#24).
Another Note: When you jack into the matrix, you should do so on the far (western) side of the jack-in point, as this will give you some cover during the real world battle.
- If you interact with one of the pump stations (#24), then you’ll unlock an associated vent (#25). Opening the vent will stop the virus timer for one turn, but the character involved will get petrified, and they’ll miss the rest of their current turn plus their next turn. You can repeat this process with both pump stations as many times as you’d like.
- Every so often, Feuerschwinge will breathe fire. This will damage anyone in front of her, including characters petrified by the vents (#25)
- After you’ve killed enough enemies, Audran will enter the battle. He’ll have two mages with him, and they’ll heal him and shield him, so you should kill them right away. Audran will have plenty of armor, so attacks that remove armor (like
 Glory’s Eviscerate) or ignore armor (like
  Eiger’s Interdiction Shot) are a good idea against him. When you eventually defeat Audran, he’ll drop an Emergency Stop Key. Picking up this key and using it with the Emergency Shut-Off Terminal (#27) is the only way to stop the virus timer for good. Using the terminal will also prevent any more reinforcements from arriving.
So you’ll have a variety of options for the final battle. But really, the easiest way to win is to ignore all of the options — the matrix and the pump stations (which will give you extra time but take characters out of play) — and just focus on the combat. That is, you should just kill mercenaries until Audran arrives, and then focus on Audran and his mages. You shouldn’t need to make it any more complicated than that.
After the battle, you’ll need to confront Vauclair (#28) or Audran, depending on who’s still alive. Either way, the character will die. Vauclair will kill himself, and Audran will either die from his wounds or die from you shooting him in the head with his own gun (as revenge for Paul Amsel). At the end of the encounter, the door to the control room will unlock.
Inside the control room (#28), you’ll find a terminal. It will allow you to open the emergency exit from the facility (Exit D), set the facility to self-destruct, give APEX control of Feuerschwinge (if APEX is still around), and lower Feuerschwinge’s astral form into the chamber (#29). This will give you several ways to end the mission:
- You can set the facility to self-destruct and then leave. This will cause Feuerschwinge to die.
- You can simply leave. Feuerschwinge will remain imprisoned, and she’ll quickly become the property of a corporation.
- You can talk to Feuerschwinge’s astral form using the containment console (#29). Feuerschwinge will swear that she won’t hurt anyone else, and she’ll sort of explain why she went on a rampage 40 years ago. With astral perception (that is, Spellcasting 1 or Conjuring 1), Intelligence 3, or the Academic etiquette, you’ll get a more complete explanation — that Feuerschwinge has a “forever task” to protect “the green,” and that when she woke up and saw what humanity had done to it, she went berserk.
At the end of your conversation, Feuerschwinge will ask you to kill her. You’ll have at most three ways to respond: - You can grant her request by activating “the emergency protocol” on the console. This will cause Feuerschwinge to die.
- You can convince Feuerschwinge that her forever task requires patience, and that she should stay alive. When you follow this up by reuniting her astral form with her physical body, she’ll break out of the containment chamber and fly away.
- If you freed APEX during APEX Rising, then you can give it control of Feuerschwinge and the facility, either here or in the control room (#28). Feuerschwinge will die, and APEX will become a new Great Dragon.
Regardless of your choice, the epilogue back in the Kreuzbasar will go about the same. First, you’ll need to meet with your team and find out what they plan to do next.  Glory will stay with you if you killed Harrow during Feuerstelle.
  Dietrich will stay with you if you at least attempted to save Alexander during False Flag.
  Eiger will stay with you if you completed The Engineer.
  Blitz will always stay.
  Dante and
  Panzerdrohne won’t say anything, but they’ll probably stay as well.
Next, you’ll need to visit with Altug Burakgazi in Cafe Cezve. He’ll offer to become your new fixer, and he’ll even have a new client for you. When you exit the cafe, if you freed APEX, then it will give you a call. If you gave it Feuerschwinge, then it’ll thank you. Otherwise, it’ll promise to see you soon.
To meet Altug’s client, you’ll need to board a train in one of the U-Bahn platforms. During the trip, you’ll meet a “strange man” named Hans Brackhaus (who you might remember from Shadowrun Returns). He’ll quiz you about a few things, and if you answer in a pro-dragon way, then he’ll hire you to work for the Great Dragon Lofwyr. This conversation will end the game.
Congratulations for completing Shadowrun: Dragonfall!
Missions Overview
1 – Starting Point
2 – Regular Gasoline
3 – Diesel Fuel
4 – Generators
5 – Locked Door
6 – Locked Office
7 – RFID ID Card
You’ll find an RFID ID Card on the ground here. You’ll have to kill two firedrakes to get it. The card will allow you to enter the locked office (#6).
8 – Mysterious Rock
After defeating the three scorpyrines in the area, you’ll be able to interact with the mysterious rock here. If you or a teammate has Spirit Summoning 5, then you’ll be able to loot a  Force 4 Earth Elemental Fetish and a
  Force 6 Earth Elemental Fetish from the rock.
9 – Blasting Charges
You’ll discover blasting charges drilled into the ground here. If you use the RFID ID Card (#7) to enter the locked office (#6), then you’ll be able to use a terminal to set off the charges, which will drop the floor onto the mercenaries below (#10), killing them and allowing you to skip a fight.
10 – CIC
You’ll encounter six Vanguard mercenaries here — unless you gas them (#16) or drop a floor on them (#9).
11 – Bulk Storage
Inside this chamber, you’ll encounter two firedrakes, unless you gas them (#16).
12 – Firing Range
Inside this chamber, you’ll encounter two scorpyrines, unless you gas them (#16). Once the room is clear, you’ll find five  Russian Military Grenades in the shelves.
13 – Jack-In Point
When you enter the matrix here, you’ll quickly come to a four-way intersection. To the west, you’ll discover a Security Logs node, which will give you the Supply Box Code (3971). You’ll find the supply box at the end of the level (#19). To the north, you’ll discover a Secure Door Control, which will open the secure door between the firing range (#12) and bulk storage (#11). This will cause the scorpyrines in the firing range to attack the firedrakes in bulk storage, and save you some trouble. To the east, you’ll discover a Secondary Door node, which will unlock a door (#17) that will give you a safe route to the exit (Exit B).
14 – Maintenance Room
Inside this room, you’ll get attacked by three scorpyrines. After defeating them, when you search the room you’ll find an  Advanced Medkit and Nerve Gas. You’ll be able to use the nerve gas with the HVAC controls (#16).
15 – Clinic
Inside this room, you’ll get attacked by two firedrakes. After defeating them, you’ll find two  Advanced Medkits in the supply boxes on the western wall.
16 – HVAC Controls
These controls will allow you to gas (and kill) the enemies in one of the rooms in Sub-Level 3. You’ll only be able to gas one of the rooms. The Ventilation Map Diagram (found in the office at Exit A) will show you which room goes with which vent: 1 – firing range (#12), 2 – bulk storage (#11), 3 – CIC (#10), and 4 – administration (#18).
In order to send the gas, you’ll first need to pick up the Nerve Gas from the maintenance room (#14). Then you’ll need to use the controls to choose a room (1-4) and pull the bypass lever. This will allow you to attach the Nerve Gas to the vent and send it on its way. All of the target rooms are either optional or can be bypassed in some way, so pick whichever one helps you the most.
Note: HVAC stands for Heating, Ventilation, and Air Conditioning.
17 – Secondary Door
This door can be unlocked in the matrix (#13).
18 – Administration
You’ll encounter five Vanguard mercenaries in this room, unless you gas them (#16).
19 – Supply Box
This box will start out locked. To open it, you’ll need the code (3971), which you can learn in the matrix (#13). Inside the box, you’ll find four doses of  Kamikaze.
20 – Emergency Field Trauma Unit
This machine will allow you to heal up everybody in your team.
21 – Medical Supplies
From this medical supplies box, you’ll find enough  Premium Medkits that you’ll be able to give one to everybody in your team.
22 – Medical Supplies
Inside these supply crates, you’ll find a pair of  BuMoNA Gold Trauma Kits.
23 – Matrix Pump Access
24 – Pump Stations
25 – Vents
26 – Medical Supplies
Inside this supply box, you’ll find an  Advanced Medkit.
27 – Emergency Shut-Off Terminal
28 – Control Room
29 – Containment Cell / Console
Exits
- Ventilation duct.
- Blast door.
- Blast door.
- Emergency exit.
