In this guide we’ll show you everything there is to know about the Den, the home of the slaver’s guild.
Introduction
The Den is a fairly low level place where you’ll come to pick up some easy xp, a few quests, the companion Vic and most importantly, your wastemobile.
Tubby on the west side and Flick south of Becky’s Casino Bar are decent merchants with which to upgrade your supplies. Beware of the kids loitering near the doorways of the establishments in the town, as they’ll regularly attempt to steal from you when you walk by them. So check your inventory — or their inventory — every now and again, and then steal back from them if they took anything. Nobody will care if you’re caught stealing from the kids, so you can keep trying until you get your items back.
If you’re playing a female character named Buffy, and if you’re wearing some form of leather armor when you talk to Rebecca inside Becky’s Casino Bar, then Rebecca will give you all sorts of good loot, including a 10mm SMG, Metal Armor, five Stimpaks, and $1000.
If you wander around the Den with a weapon in your active item slot, then an addict might randomly accuse you of killing someone and attack you. If you steal something from somebody in the Den, then an addict might accuse you of taking something from them and attack you. Nobody will care if you kill these addicts, and you won’t lose any karma for it.
Inside Mom’s Diner on the East Side, you can get healed for cheap by buying rat loaf or rat pie from Mom. You’ll also meet Stacy in the diner. If you let her tell you about her cat Cuddles, then you’ll earn 200xp. Finally, you might notice a drunk farmer named Karl in the back of the diner. He’s involved in the Ghost Farm questline from Modoc. If you ask him for his story, then he’ll tell you about ghosts scaring him away from his farm. You should do this before leaving the Den for Modoc, or you’ll just have to run back for the story later. After finishing the Ghost Farm quests, you’ll be able to tell Karl that it’s safe for him to go back home, which will earn you 500xp. If you say the wrong thing to Karl and he passes out drunk, then using the Doctor skill on him should wake him up and let you talk to him again.
You’ll find a brotherhood outpost on the West Side of town, but it’s not involved in anything.
Metzger the slaver and his guards can be killed for xp and a subsequent reward from Becky when you feel up to it. However, finish Lara’s quests first. I’d advise you to come back later and complete the assassination of Metzger due to your probable weakness at this point, then talk with the slaves to free them and Becky for your reward.
Quests & Opportunities
Here is a list of some of the quests and other opportunities in the Den, each with a brief synopsis containing at least one way to solve it. The remaining ways, and possibly other minor quests I will leave up to you.
Collect Money from Fred
The first building you’re likely to see after entering the Den on the West Side is Becky’s Casino Bar. Inside, you’ll meet Rebecca, the owner. If you ask her about work, and if your karma isn’t negative, then she’ll tell you that Fred has a longtime debt of $200, and she’ll ask you to collect it.
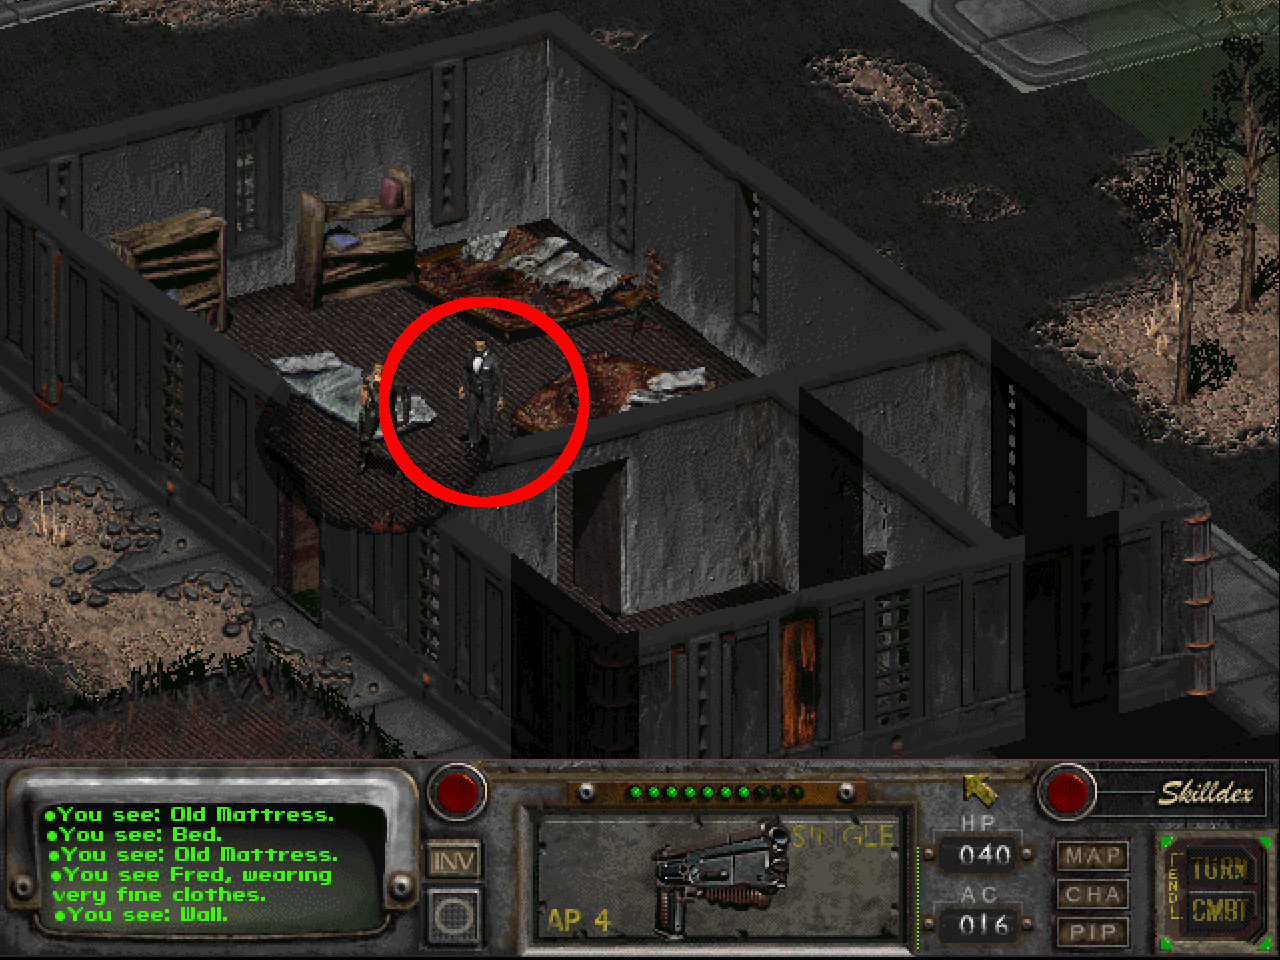
Fred: Before…… and after.
Fred can be difficult to track down. He usually hangs out in the casino or in Flick’s shop to the south, but he wears yellow rags and looks just like all of the other male vagrants in town. The only difference is that he’s called a “citizen of the Den” rather than a “reliant” — until you talk to him, that is, after which he should he labeled “Fred.”
When you talk to Fred, you’ll need to be honest with him, or else the conversation won’t go anywhere and you’ll have to start over. Fred will beg you to let him keep half of the money, and if you agree, then he’ll ask for $50 beyond that. As long as you let him keep some of the money (it doesn’t matter how much), then at some point 3-6 months later, you’ll learn that Fred (now wearing a fancy suit) struck it big in the casino, and he’ll pay you $2000 along with a Plasma Grenade, Micro Fusion Cell (x250), and Small Energy Cell (x200) — a nice haul for the $100 cost, provided you’re still playing the game at that point.
When you return to Rebecca and pay off Fred’s debt, she’ll let you keep half of it, and you’ll earn 200xp plus 5 karma.
Get Book from Derek
After completing Rebecca’s first quest (see Collect Money from Fred above), she’ll give you a second quest — to recover the book The Lavender Flower that Derek borrowed a while back.
You’ll find Derek on the eastern side of town in front of Mom’s Diner. He’ll be another “citizen of the Den,” but he’ll be wearing green, and he won’t wander around, so he should be easier to locate than Fred from the previous quest. However, when you talk to Derek, he won’t be any help. He’ll just know that he dropped the book… or threw it… somewhere.
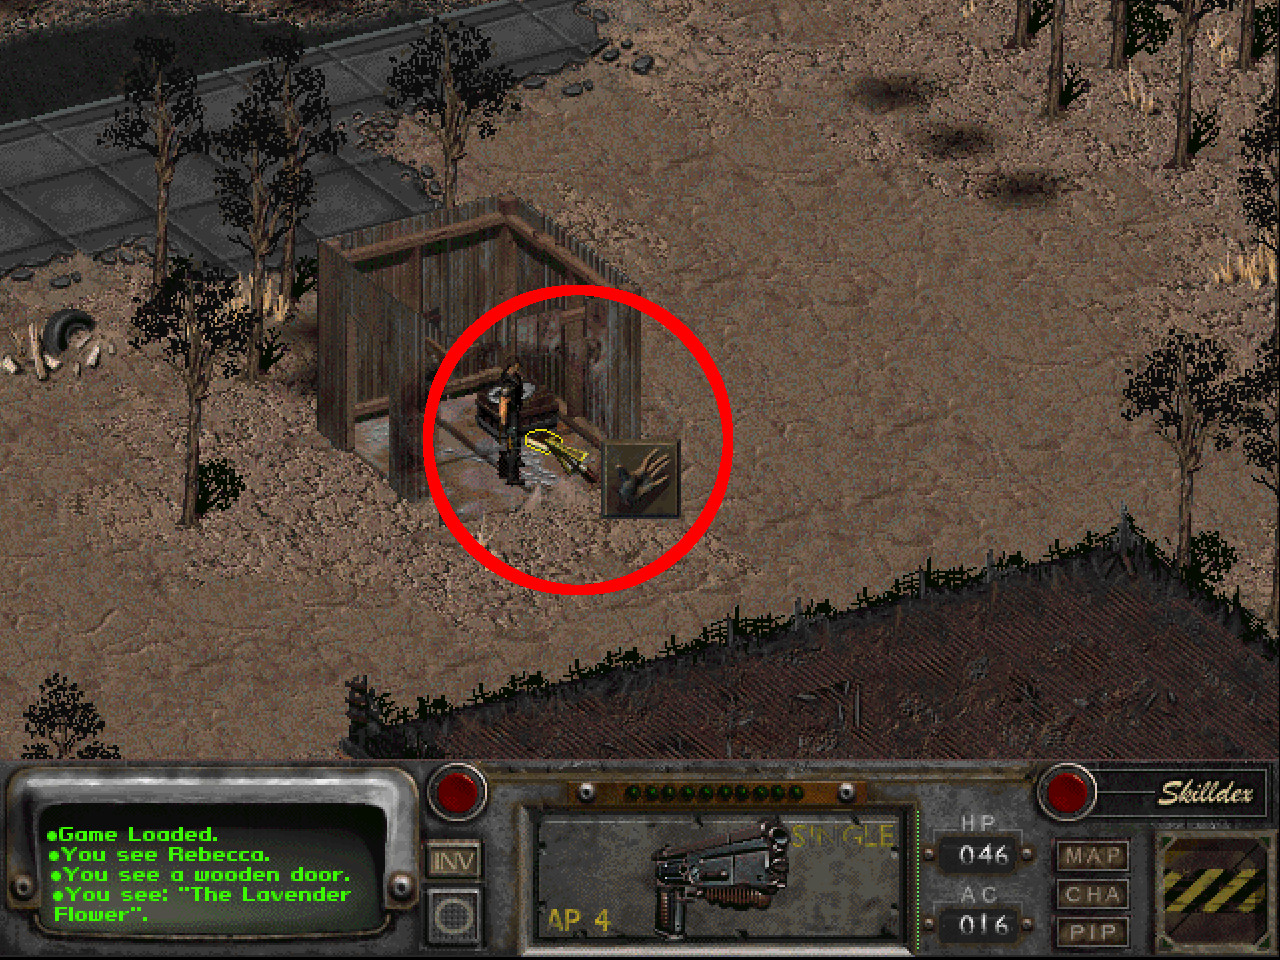
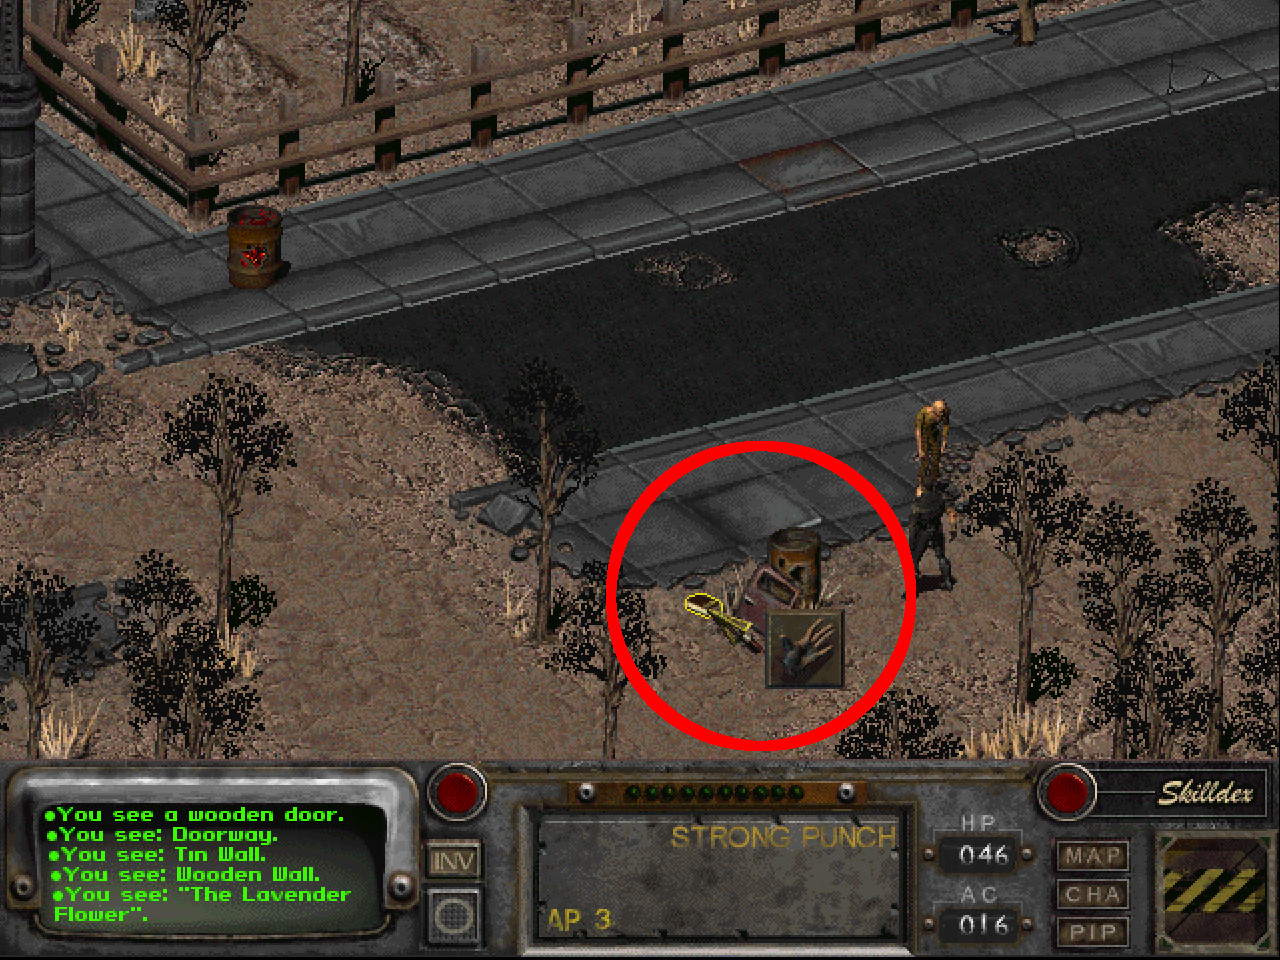
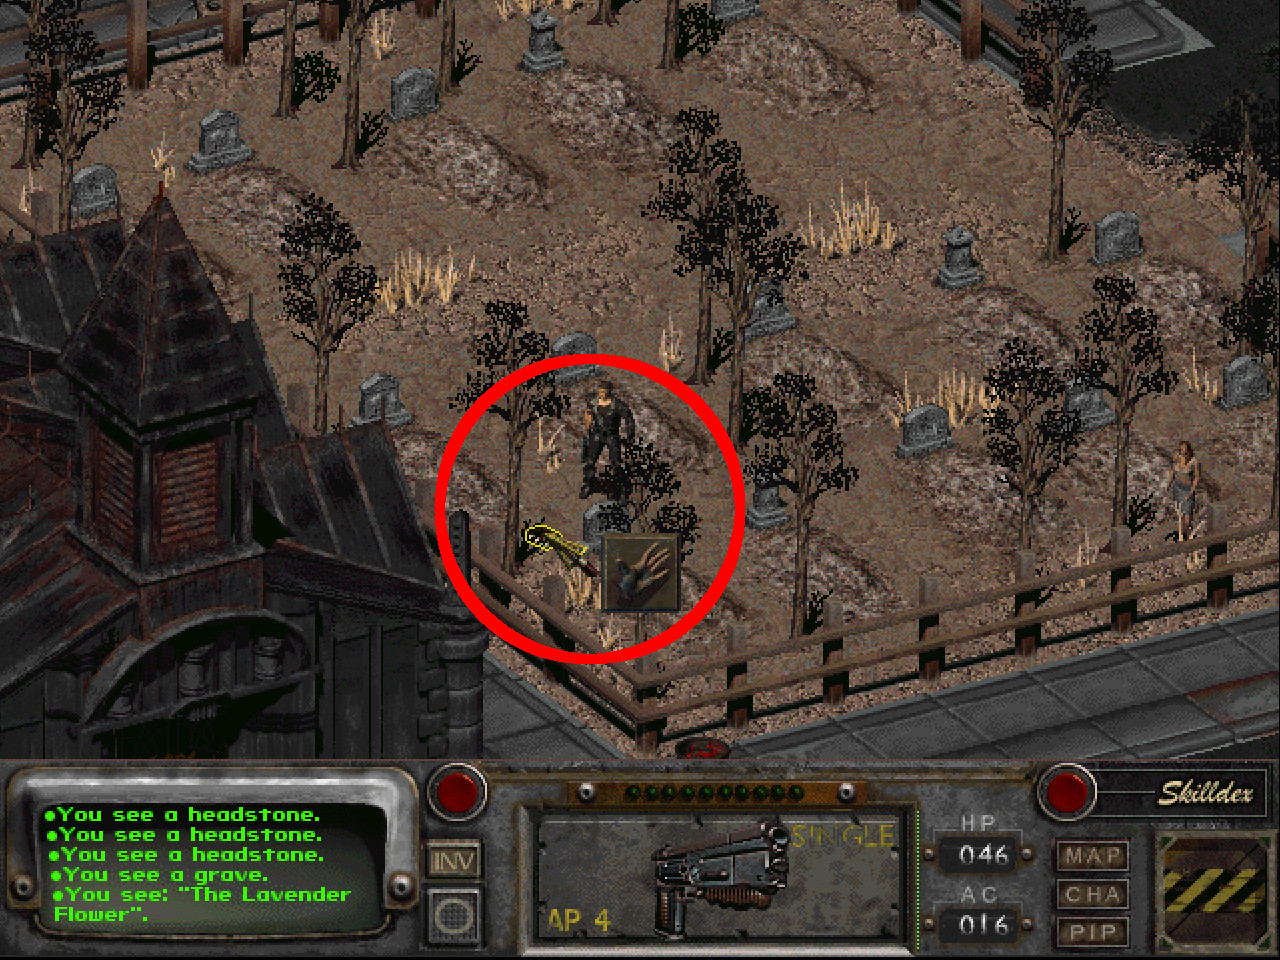
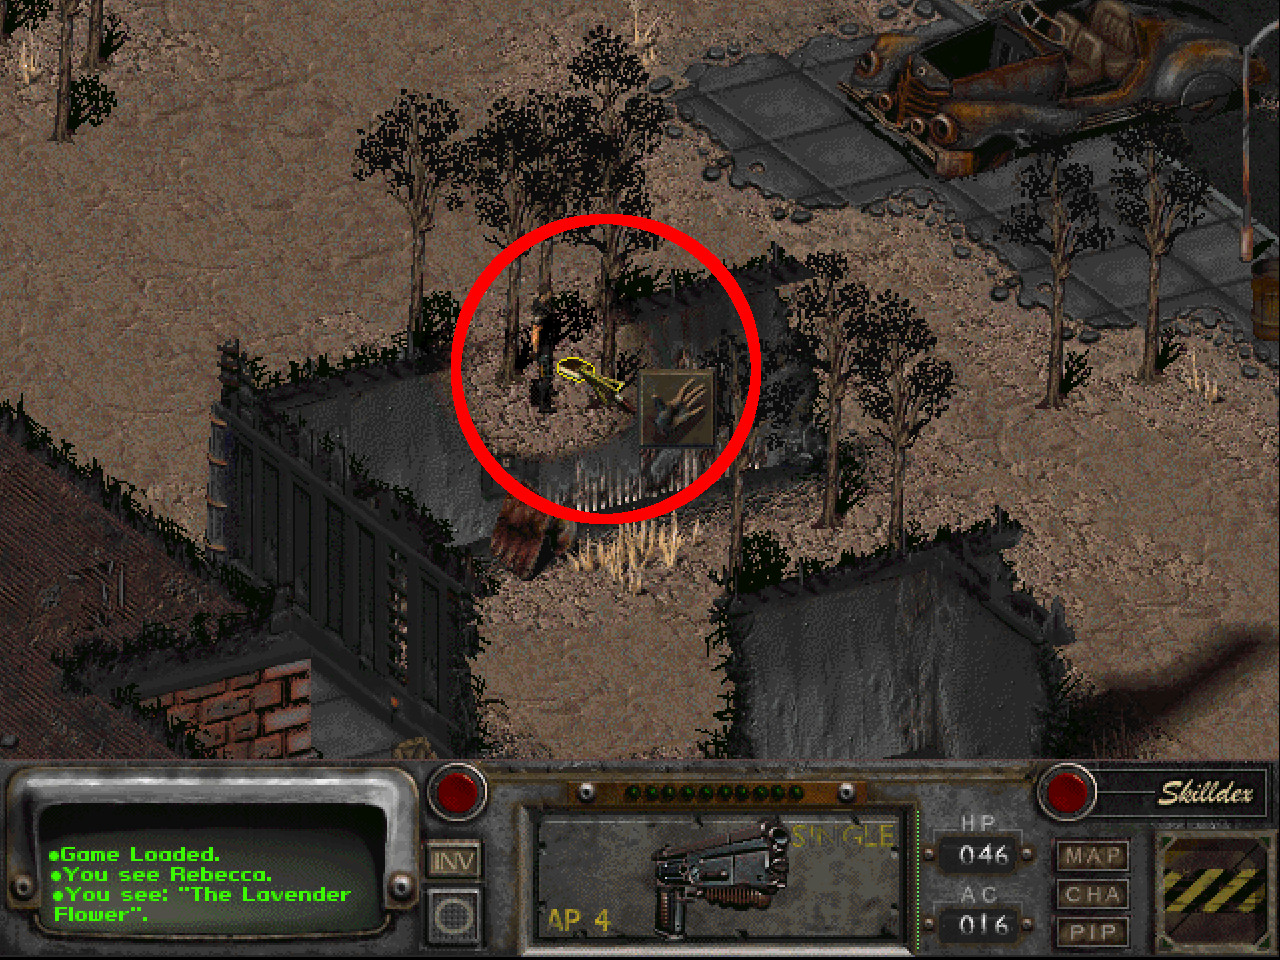
The four places where you can find the book on the East Side of the Den
The book can be in one of four places on the eastern side of town: in the outhouse on the northern side, by a barrel on the southern side, in the graveyard, or behind a wall east of the slaver’s guild. If you have trouble finding the book, just walk around the map and press the shift key every so often to highlight items on the ground.
When you deliver the book to Rebecca, you’ll receive $80 and 300xp.
Lara Wants to Know What Is Being Guarded in the Church
In an unmarked building on the western side of the West Side, you’ll meet the gang leader Lara. If you ask her about work, then she’ll tell you that Metzger’s slavers are guarding something in a church on the East Side, and she’ll ask you to find out what. She’ll also warn you not to get into a fight.
When you visit the church, you’ll meet a guard named Tyler outside. If your Speech or Strength is high enough, then you’ll be able to convince him that you’re working for Metzger, and he’ll allow you to enter. This will earn you 500xp. If you fail to convince Tyler, then you can just wait an hour and try again. Inside the church, you’ll discover several crates containing “various chemicals.” This will earn you another 500xp.
When you return to Lara and tell her what you found, she’ll pay you $200 for your work.
Get Permission from Metzger for Gang War
After completing Lara’s first quest (see Lara Wants to Know above), she’ll come up with a new task for you. She’ll decide that it’s time to settle some “old matters” with Tyler, and she’ll ask you to visit Metzger and request his permission.
You’ll find Metzger inside the slaver’s guild on the East Side of town. You won’t have to do anything special for him to give his approval. When he does, you’ll earn 200xp. Then when you return to Lara, she’ll pay you $50.
Find Weakness in Tyler’s Gang Guarding the Church
After completing Lara’s second quest (see Get Permission from Metzger above), she’ll tell you that Tyler’s gang is bigger and better funded than hers, which means she’ll need to even the odds before she can attack it. To that end, she’ll ask you to look for a weakness in the gang, but she won’t give you any hints about where to begin your search.
To find a weakness, you’ll just need to head back to the church on the East Side of town and talk to Tyler again. He’ll happily reveal that a friend of his is throwing a party, and that most of his gang will go to it and get drunk, leaving only a skeleton crew behind at the church. Learning this bit of news will earn you 200xp.
When you return to Lara, she won’t give you a reward — yet. To get it, you’ll have to help her with her next quest (see Help Lara below).
Help Lara Attack Tyler’s Gang
This is Lara’s final quest, where you’ll get to help her gang take on Tyler’s gang at the church on the East Side of town. This is a combat quest, so you might need to wait a while until you’re powerful enough to complete it.
When you tell Lara that you’re ready to go, you’ll automatically wait until nightfall and then move to the church. Lara and the three gang members with her will charge at Marc the door guard, but after killing him, they’ll start following you, and they won’t fight anybody else unless you get things going again. At this point you can just end combat and get your reward (and ignore the guards inside the church), or you can keep fighting and finish the job. You’ll earn more xp and find more loot if you kill all of the guards, so that’s the best way to go if you’re capable.
If you continue fighting, then your best course of action is to shoot at somebody through the doorway to the church and draw them to you. That enemy will attack you, but if you’re lucky, then any other enemies who notice the fighting will target Lara or her gang, allowing you to stay safe. You don’t need to keep Lara alive. If she dies, then you’ll find your reward on her corpse.
Once the fighting is done, Lara will pay you $400 for your help. You’ll also earn around 500xp for defeating Tyler’s gang members, and you’ll find some 10mm Pistols and 10mm JHP on their corpses.
Note: Instead of helping Lara, you can warn Tyler about the attack, and then turn on Lara when you arrive at the church. This path will cause you to lose karma, but you’ll earn 1000xp this way, and Tyler will pay you $100. Plus you should find $400 on Lara’s corpse.
Deliver a Meal to Smitty for Mom
On the East Side of town, you’ll meet Mom inside Mom’s Diner. During your conversation with her, she’ll ask you to deliver Smitty’s Meal to Smitty in the junkyard on the West Side of town. When you do, you’ll receive 150xp and 10 karma, and Smitty will give you a Stimpak. Then when you return to Mom, she’ll give you a free meal, which will heal you up to 20 hit points. If you’re not in need of healing at that point, you can decline the meal and eat it later.
Free Vic from His Debt
AKA “Free Vic from his debt by getting his radio from his house in Klamath and paying Metzger.”
The Slaver’s Guild is on the East Side of town. When you meet Metzger there and ask him about Vic, he’ll tell you that Vic sold him a faulty radio, and that he won’t allow Vic to leave until he fixes it. However, he should give you permission to talk to Vic.
Vic is being held in a locked room on the eastern side of the guild (not the in the slave pens). The guard by the door won’t allow you to enter unless you talk to him first. He’ll open the door for you if Metzger gave you permission to see Vic, if you ask him to let you in and pass a Speech check, if you offer him money and pass a Barter check (which will cost you $300), or if you join the slavers. There are other options as well. If nothing works and you don’t want to kill the slavers, or if you can’t stealthily pick the lock on the door, then you can just go outside and talk to Vic through the window of his room.
When you talk to Vic, he’ll tell you that he can’t fix Metzger’s radio without some spare parts from a radio he has in his house in Klamath. If you haven’t picked up Vic’s Radio yet, then you’ll need to visit Klamath to get it. You’ll find Vic’s house on the eastern side of the Downtown map. You’ll have to use Vic’s Radio for this quest. Other Radios won’t work.
When you give Vic his radio, he’ll use it to fix Metzger’s radio. Then when you talk to Metzger, he’ll allow you to buy Vic for $1000 — or only $500 if you’re female with at least 6 Charisma and agree to sleep with him. This might be a big expense for you at this point in the game, but Vic is a useful companion, and it’s worthwhile to free him.
After freeing Vic, he’ll agree to join you. If you have Vic’s Water Flask (from Arroyo or Klamath) with you, and you ask him about it, then he’ll tell you that he got it from a brahmin dealer named Ed in Vault City, and he’ll mark Vault City on your world map. This will earn you 200xp.
Sabotage Becky’s Still
Inside Becky’s Casino Bar on the West Side, if you ask Rebecca for a drink, then she’ll offer you whiskey for only $5. But if you go to the Hole on the East Side, Frankie will charge you $20. If you ask Frankie why his whiskey is so much more expensive, he won’t have any idea, and he’ll hire you to find out how Rebecca keeps her prices so low.
Back in Becky’s Casino Bar, you’ll need to head to the locked and guarded room in the back. The guard at the door will prevent you from fiddling with it, but every so often he’ll wander over to a craps table and flirt with the dealer there, provided you’re not standing too close to him. During this time, nobody will notice if you try to pick the lock on the door.
Past the door, you’ll find a staircase leading down to the basement, where you’ll discover a still. You’ll need to interact with the still (nothing will happen) to officially notice it. When you return to Frankie and tell him what you found, he’ll pay you $100 and you’ll earn 400xp. Frankie will then ask you to destroy the still with a Crowbar, and he’ll tell you that you can find one in a back room (in a bookcase in Sheila the prostitute’s room).
At this point, you’ll have two ways to complete the quest:
You can convince Frankie to buy his whiskey from Rebecca. This will earn you 900xp and 70 karma.
You can use a Crowbar on the still to destroy it. Then when you return to Frankie, you’ll receive $500 and 700xp, but you’ll lose 50 karma. When you tell Frankie about the still, you can also point out that Rebecca will just rebuild it, and convince him to buy his whiskey from her. This will give you the same reward as selecting the other option right away. However, because you destroyed her still, Rebecca will stop talking to you, and you’ll no longer be able to gamble in her casino.
Get Car Part for Smitty
In the junkyard on the West Side of town, find Smitty the mechanic. He’ll tell you about the Chrysalis Motors Highwayman in his lot, and he’ll offer to sell it to you — if you bring him $2000 plus a Fuel Cell Controller. You’ll get the controller for completing Skeeter’s first quest in Gecko. When you buy the car, you’ll complete the quest, but you won’t receive a reward other than the car itself.
The car is well worth the investment. Its trunk will allow you to store all sorts of weapons and ammunition (or anything else you want to hang onto), and driving it will allow you to move much faster on the world map. The only downside to the car is that it uses up energy when you drive it, so you’ll have to keep it supplied with Micro Fusion Cells (which Smitty sells) or Small Energy Cells. Smitty will “fill” the car when you buy it. After that, you’ll have to use your chosen energy source on the front end of the car from time to time to keep it running.
Note: To see how much energy the car has remaining, interact with it and select the binoculars icon. You’ll also see the energy gauge while you’re on the world map. To add energy to the car, interact with it and select the backpack icon, and then use either Micro Fusion Cells or Small Energy Cells.
After buying the car, if you return to Smitty after picking up the Fuel Cell Regulator from Klamath, then he’ll install it for you for $750. The regulator will cut the energy usage of the car in half, so it’s another worthwhile purchase. You can get other upgrades for the car in the NCR and New Reno.
Return Anna’s Locket
At the southern end of the West Side of town, you’ll discover the Great Ananias and his Mysteries of the Netherworld. Ananias will have two attractions for you to enjoy: an Egyptian mummy and a ghost story. The mummy is a part of Percy’s quest in Gecko. The ghost story, on the other hand, will trigger a quest here.
When you ask Ananias for the ghost story, he’ll tell you about a queen who was murdered and robbed of a special amulet. Moreover, he’ll claim that she haunts the room to the west, and can be seen there every night. If you enter the room between midnight and 4 AM, you should see Anna the ghost there. If you talk to her, she won’t hear you or recognize your presence, but she’ll mention that she’s looking for her locket.
For a hint about Anna and her locket, you should talk to Mom in her diner on the East Side of town. She’ll tell you that the haunting started two years ago, and that the man who lived there at the time was named “Joseph, Joel or something like that.” She’ll also mention that the man had a locket, and that he’s since joined up with the local thugs.
You’ll meet a trio of thugs on the West Side of town right next to the exit to the East Side. One of them will be a Jet dealer named Joey. If you keep pressing him, he’ll eventually admit that he stole Anna’s Gold Locket. At that point you can buy it from him for $50, you can scare him into giving it up, or you can kill him plus the other two thugs for it.
When you return to Anna and give her the locket, you’ll earn 250xp, and Anna will disappear and leave behind Anna’s Bones. To complete the quest, you’ll need to take the bones to the graveyard on the East Side, and bury them in Anna’s grave, which is located in the southern row. This will require you to have a Shovel, which you can conveniently find in a bookcase and on the floor in the haunted house. Then you’ll just need to use the Shovel on Anna’s grave to dig it up, interact with the grave to place the bones inside, and finally use the Shovel on the grave again to cover it back up. This will earn you 1200xp (even though the game will say 600xp) and 25 karma.
Note: If you dig up any other graves in the graveyard, then you’ll earn the Gravedigger reputation. This won’t affect anything in-game, but you will lose 5 karma each time you dig up a grave.