
- Aion Classic
- Aliens: Crucible
- Alone in the Dark
- Alpha Protocol
- Arcanum: Of Steamworks & Magick Obscura
- Baldur's Gate
- Baldur's Gate 3
- Baldur's Gate II
- Baldur's Gate II: Shadows of Amn
- Baldur's Gate: Dark Alliance
- Baldur's Gate: Dark Alliance II
- Beyond Divinity
- BioShock
- Champions of Norrath
- Champions: Return to Arms
- Curse of the Azure Bonds
- Cyberpunk 2077
- Dead by Daylight
- Death's Door
- Demon Stone
- Deus Ex
- Deus Ex: Human Revolution
- Deus Ex: Invisible War
- Diablo
- Diablo II
- Diablo III
- Dice Legacy
- Disco Elysium
- Divine Divinity
- Divinity II: Ego Draconis
- Divinity: Original Sin
- Dragon Age II
- Dragon Age: Origins
- Drakensang: The Dark Eye
- Drakensang: The River of Time
- Dungeon Lords
- Dungeon Siege
- Dungeon Siege II
- Dungeon Siege III
- Dungeons & Dragons Online
- Dungeons & Dragons Heroes
- Dungeons & Dragons Tactics
- Dungeons & Dragons: Dragonshard
- Elden Ring
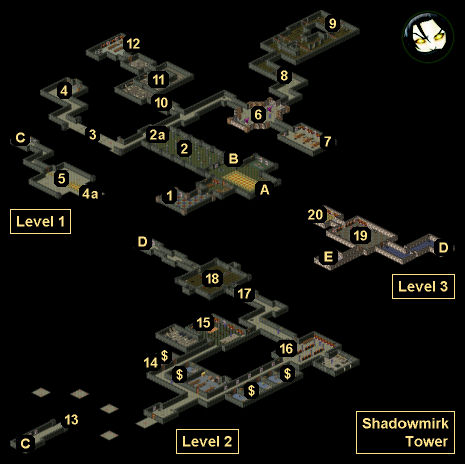
- Eschalon: Book I
- Eschalon: Book II
- Eschalon: Book III
- Eye of the Beholder
- Eye of the Beholder II
- Eye of the Beholder III
- Fable II
- Fable III
- Fable: The Lost Chapters
- Fallout
- Fallout 2
- Fallout 3
- Fallout 4
- Fallout Tactics
- Fallout: Brotherhood of Steel
- Fallout: New Vegas
- Final Fantasy X/X-2
- Freedom Force
- Freedom Force vs. Third Reich
- Game of Thrones
- Going Medieval
- Gotham Knights
- Hearts of Iron IV
- Hellgate Global
- Hellgate: London
- Hogwarts Legacy
- ICARUS
- Icewind Dale
- Icewind Dale II
- Jade Empire
- King's Bounty: Armored Princess
- King's Bounty: The Legend
- Legend of Grimrock
- Legend of Grimrock II
- Lionheart
- Mass Effect
- Mass Effect 2
- Mass Effect 3
- Neverwinter Nights
- Neverwinter Nights 2
- Pillars of Eternity
- Pillars of Eternity II: Deadfire
- Planescape: Torment
- Pool of Radiance
- Pool of Radiance: RoMD
- Pools of Darkness
- Risen
- Risen 2: Dark Waters
- Rust
- Secret of the Silver Blades
- Shadowrun Returns
- Shadowrun: Dragonfall
- Shadowrun: Hong Kong
- Sifu
- Sons of the Forest
- Space Siege
- Star Wars: KotOR
- Star Wars: KotOR II
- Starfield
- Stranger of Paradise: Final Fantasy Origin
- Stray
- System Shock 2
- Temple of Elemental Evil
- The Callisto Protocol
- The Elder Scrolls III: Morrowind
- The Elder Scrolls IV: Oblivion
- The Elder Scrolls Online
- The Elder Scrolls V: Skyrim
- The Elder Scrolls V: Skyrim
- The Forgotten City
- The Incredible Adventures of Van Helsing
- The Incredible Adventures of Van Helsing II
- The Outer Worlds
- The Witcher
- The Witcher 2
- The Witcher 3: Wild Hunt
- Titan Quest
- Torchlight
- Two Worlds
- Valheim
- Vampire: tM - Bloodlines
- Vampire: tM - Redemption
- Witcher 3: Wild Hunt
- Wizards & Warriors
- World of Warcraft


Welcome to GameBanshee!
Game Banshee is a site for gamers looking for gaming guides and gaming news! We cover a variety of games including World of Warcraft, Cyberpunk 2077, Fallout 4, HOI4, Final Fantasy X/X-2, Skyrim, Valheim, The Outer Worlds, Dead by Daylight, Death's Door, The Forgotten City, ICARUS, Elden Ring, Sifu, Stranger of Paradise: FFO, Hogwarts Legacy, Starfield, Rust, Stray, Gotham Knights, Sons of the Forest, Baldur's Gate 3, and other AAA and indie game titles.
Our detailed guides will help you enhance your gaming experience, improve your gameplay, and help you gain efficiency!
Follow On Us
Recent Updates

December 15, 2023
13 Best Video Games To Play On Christmas

August 19, 2023
Best Open World Survival Crafting Games for PC

April 16, 2023
Diablo IV – Open Beta Retrospective and Changes

April 16, 2023
Wartales Reviews
Our Communities