The Consecrated Snowfield is a secret, optional open world area. It contains a number of dungeons, and is also where you can access the Haligtree. The snowfield is difficult to navigate thanks to the snowstorm that perpetually blankets the area, and the enemies here are some of the toughest in the game.
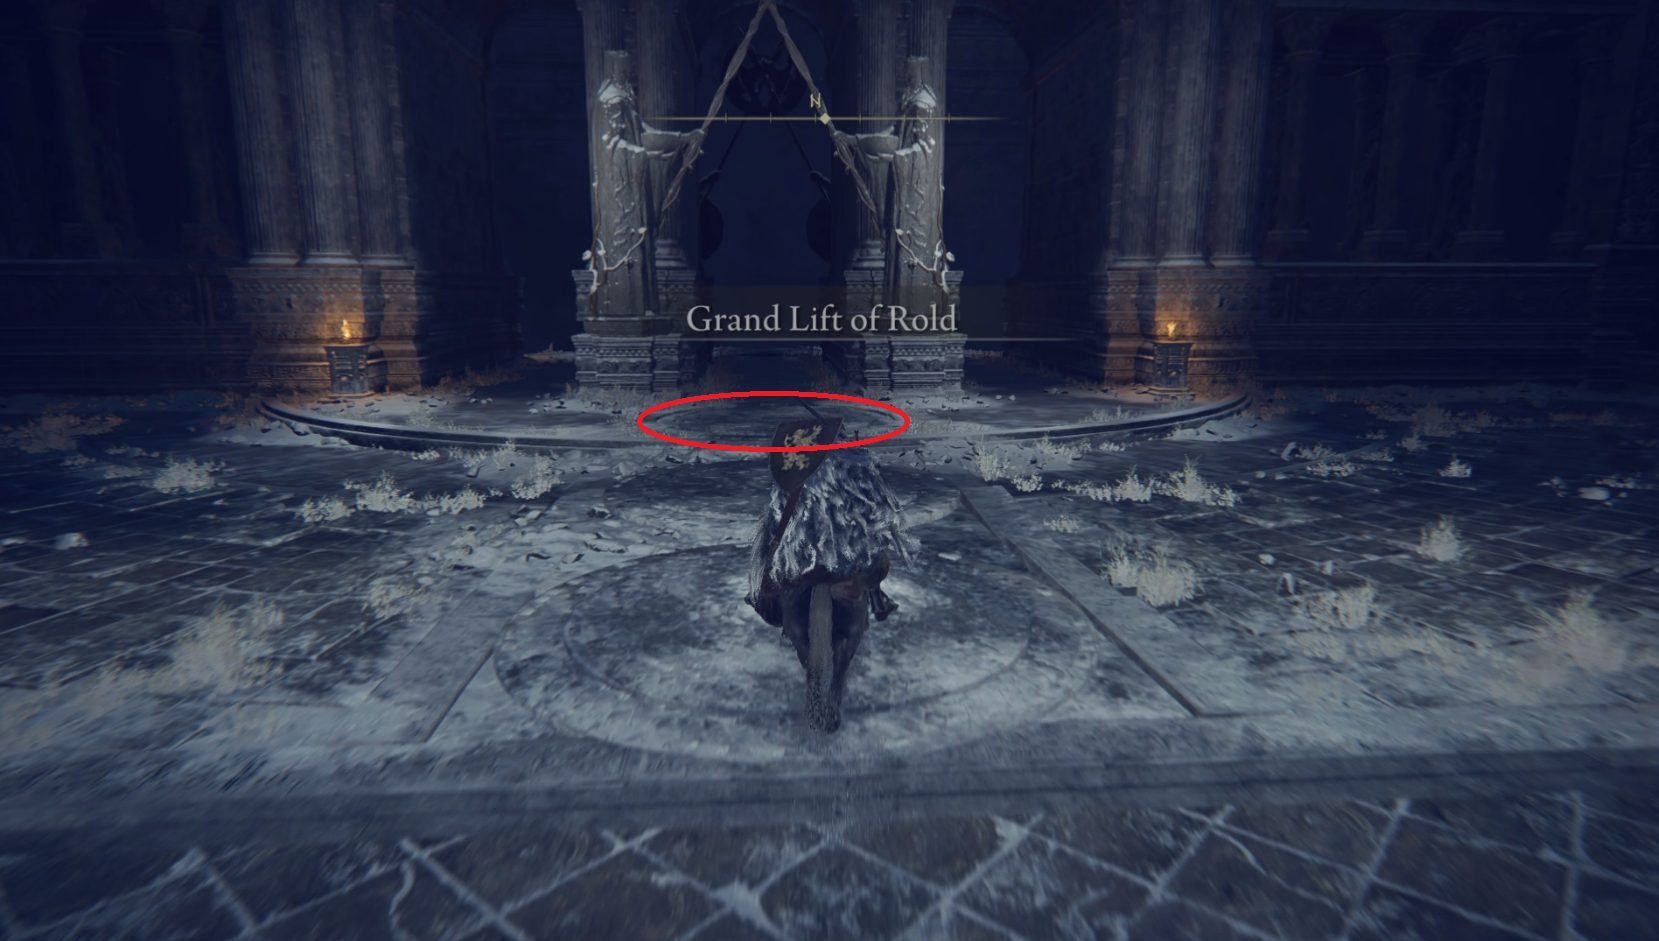
The Consecrated Snowfield is accessed from the Grand Lift of Rold at the end of the Forbidden Lands, and you’ll also need the (left) and (right) halves of the Haligtree Medallion. Once you have both halves, you can stand on the circle on the lift platform, and use the D-Pad to select “Hoist Secret Medallion”.
Then press the input to hoist the medallion, and you’ll be treated to a cutscene — once it ends, you’ll find yourself in the Hidden Path to the Haligtree dungeon. You don’t have to complete the whole dungeon (much of it is accessed via a secret path), but you will have to make your way to the dungeon’s exit to reach the Consecrated Snowfield.
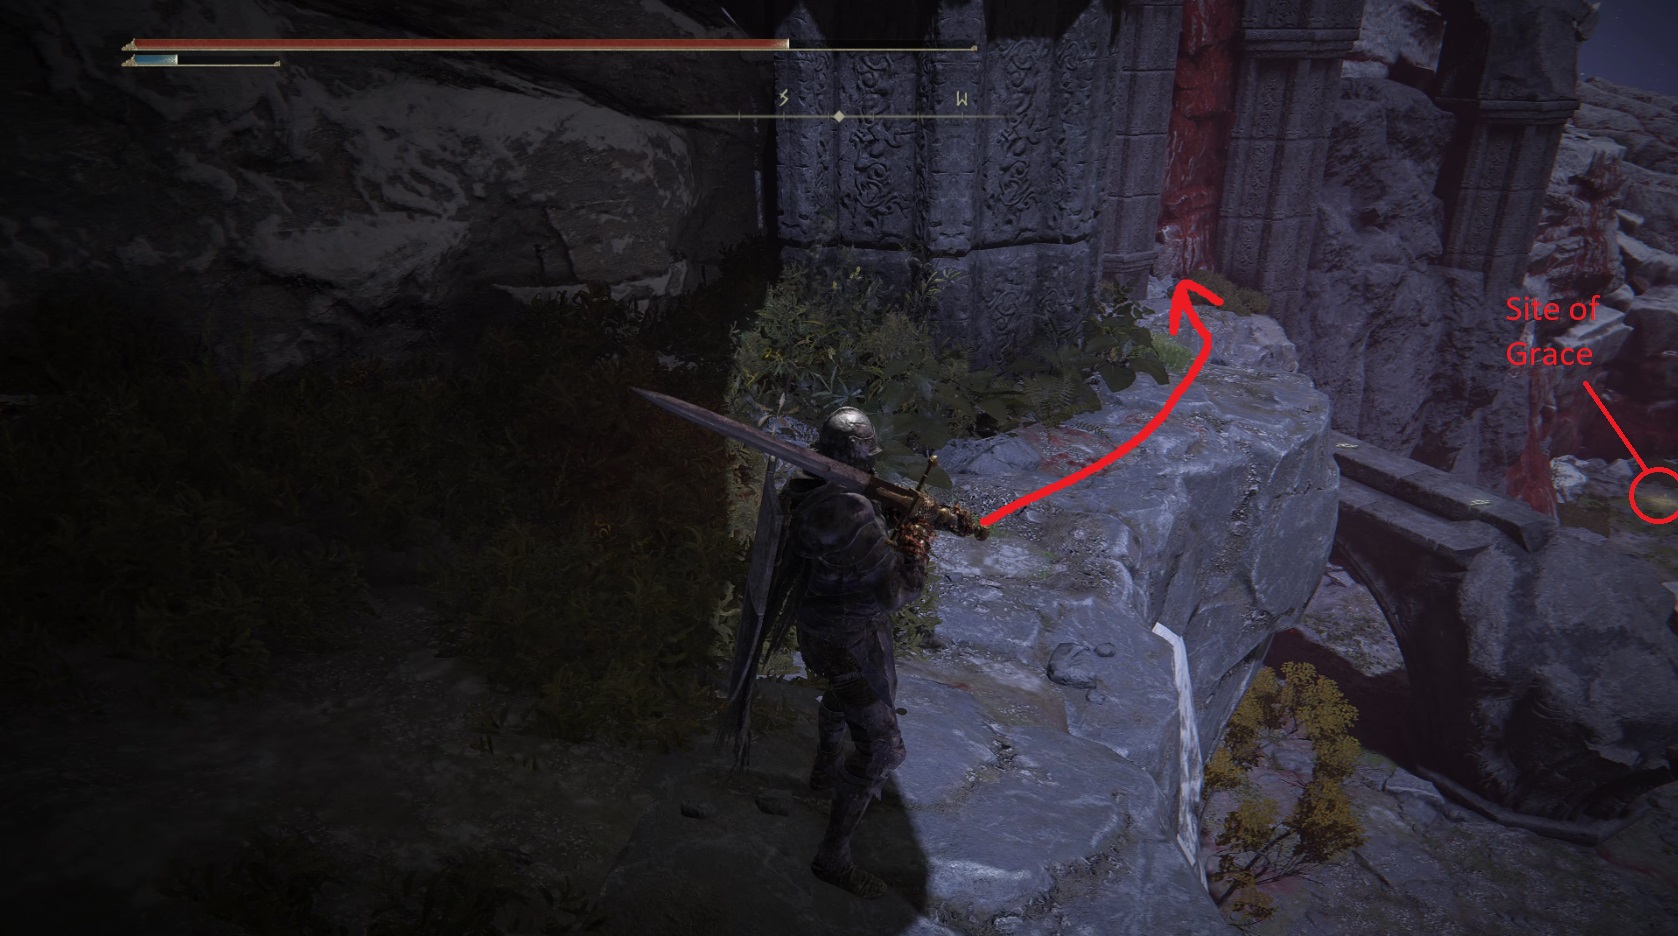
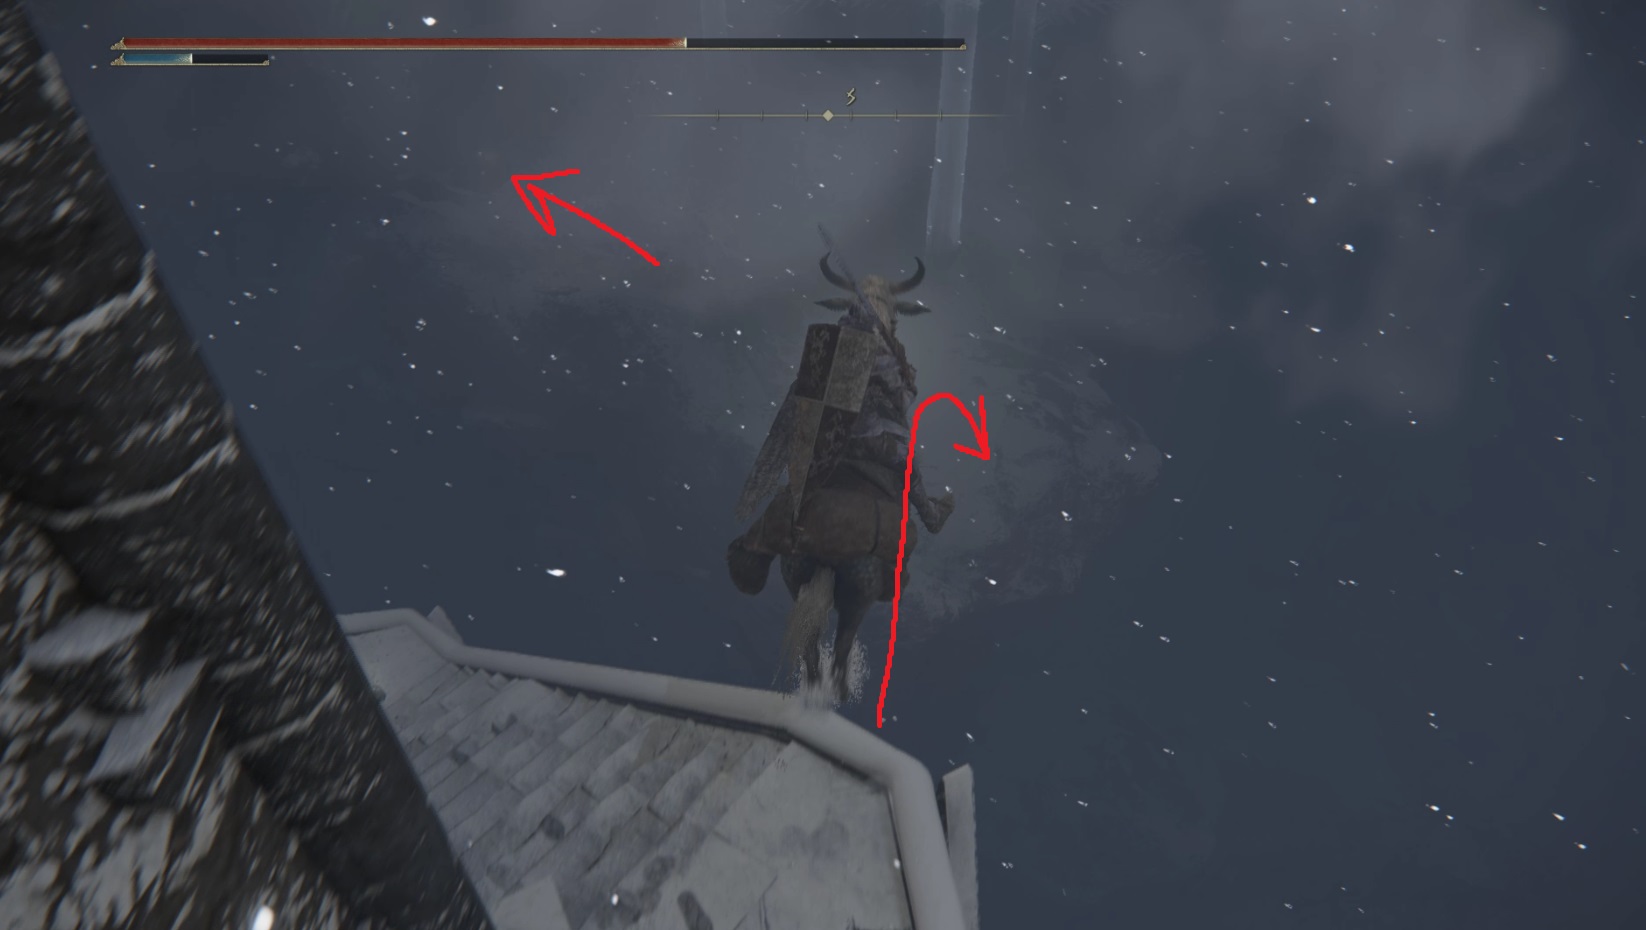
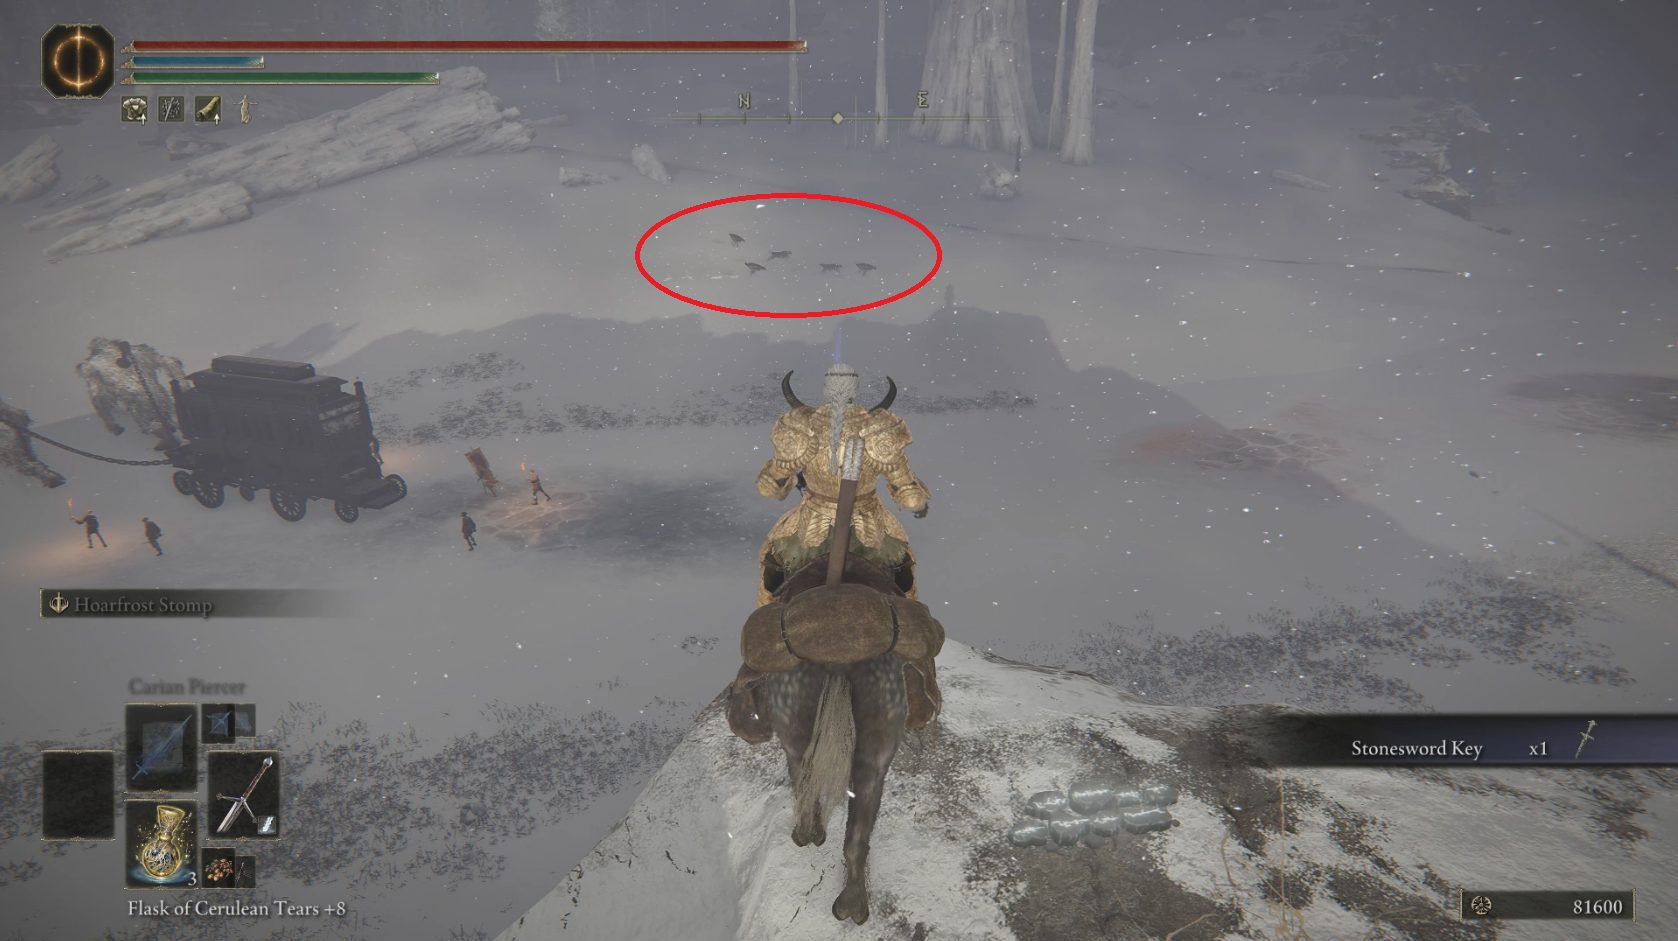
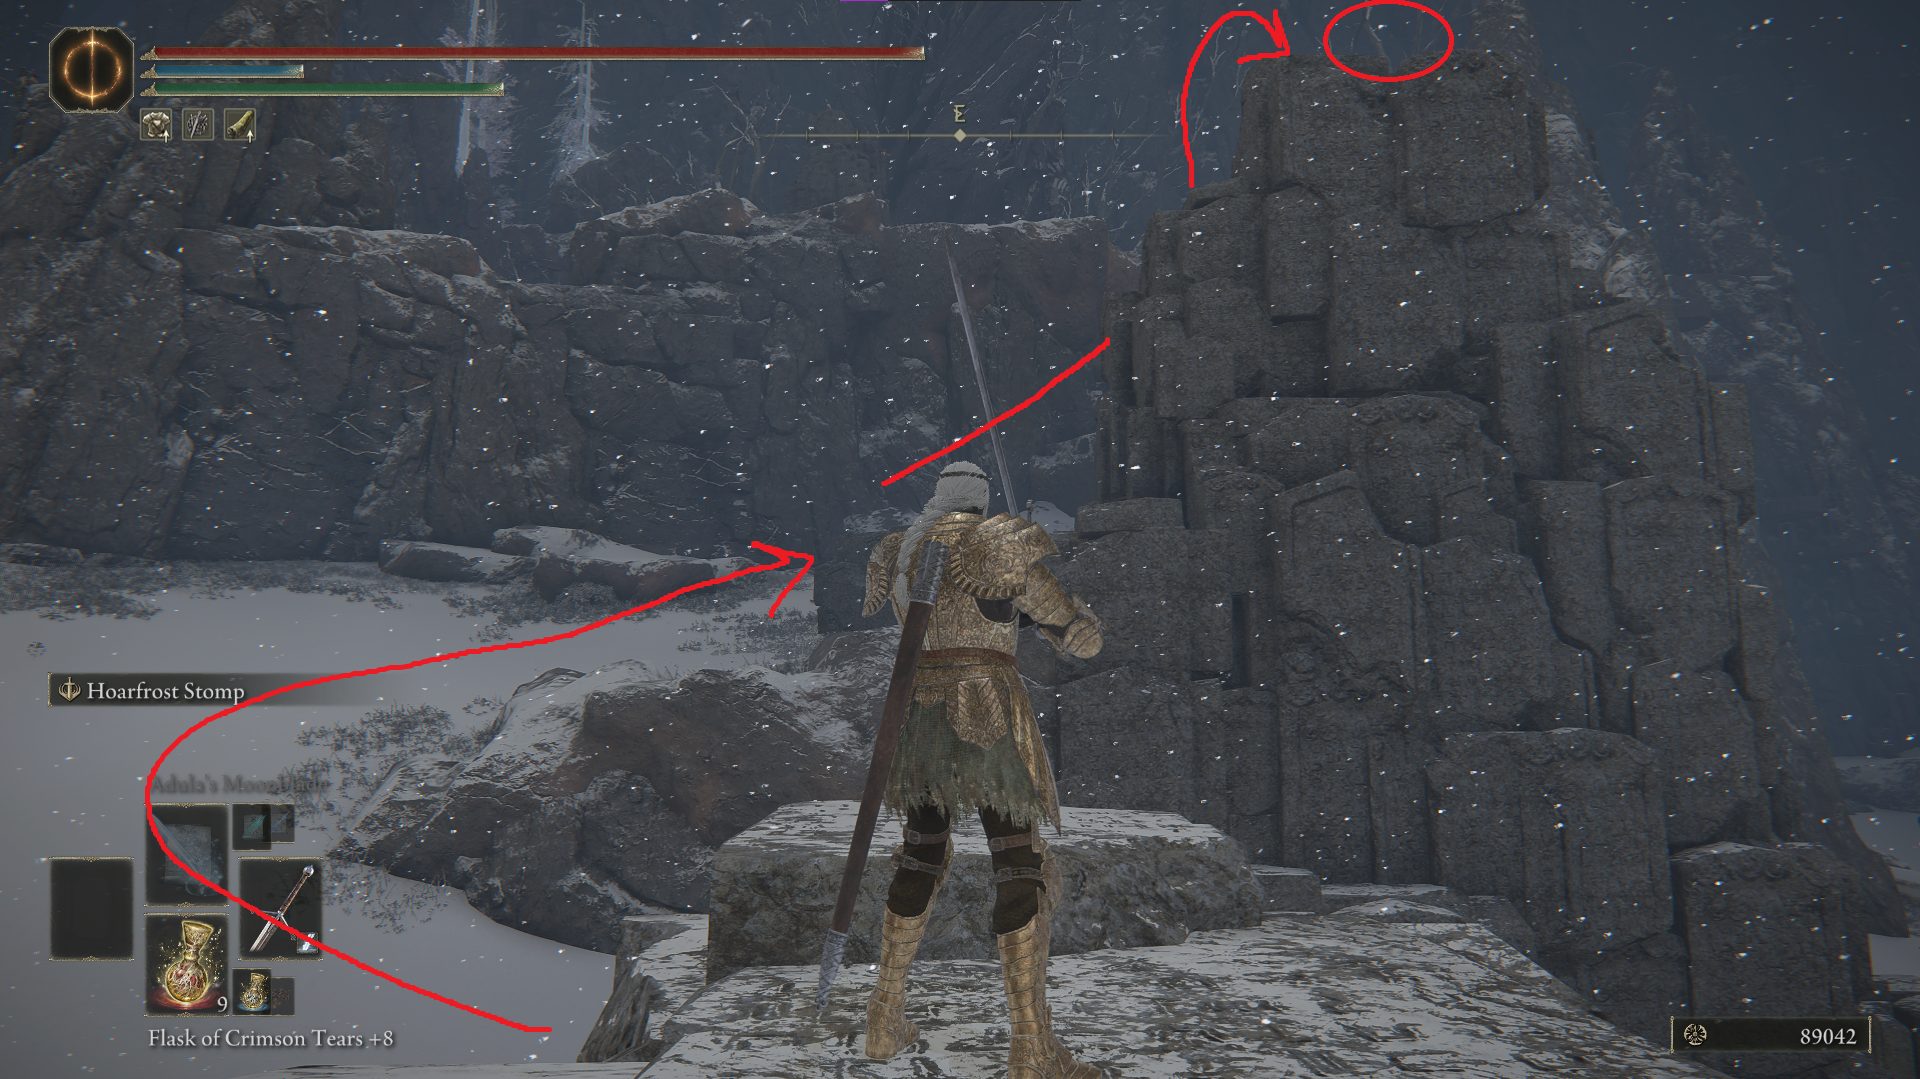
From the Secret Path to the Haligtree site of grace, head north up the stairs, out of the dungeon, and into the oppressive fog and snow that permeates this region. At the entrance of the dungeon, mount Torrent and then face just east of north (see image below). Ride in this direction and avoid falling off the cliff on your left, and you should soon reach the Consecrated Snowfield site of grace.
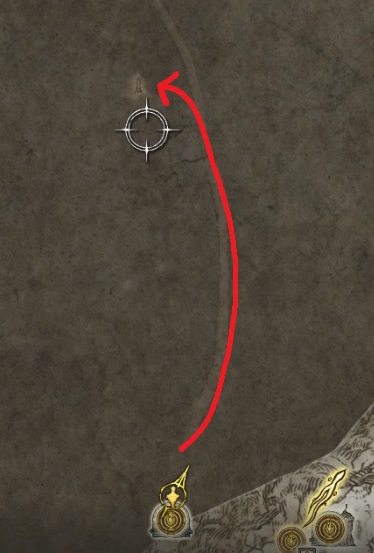
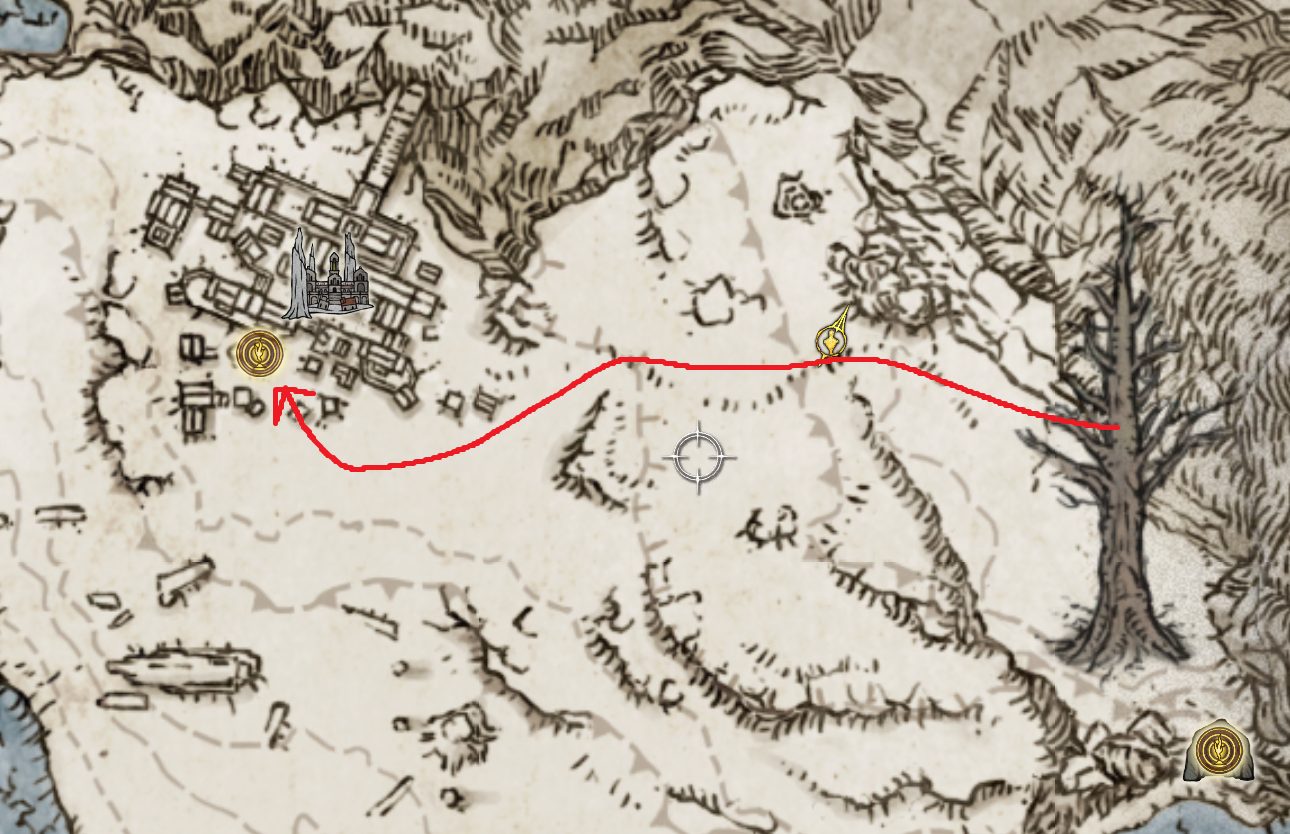
If you’re having trouble finding the site of grace, don’t stress about it — the dungeon site of grace is fairly close, and our next step is grabbing the area map to make navigation easier. Open your map and find the monument icon to the north, then set a series of waypoints on the road that lead to the map monument.
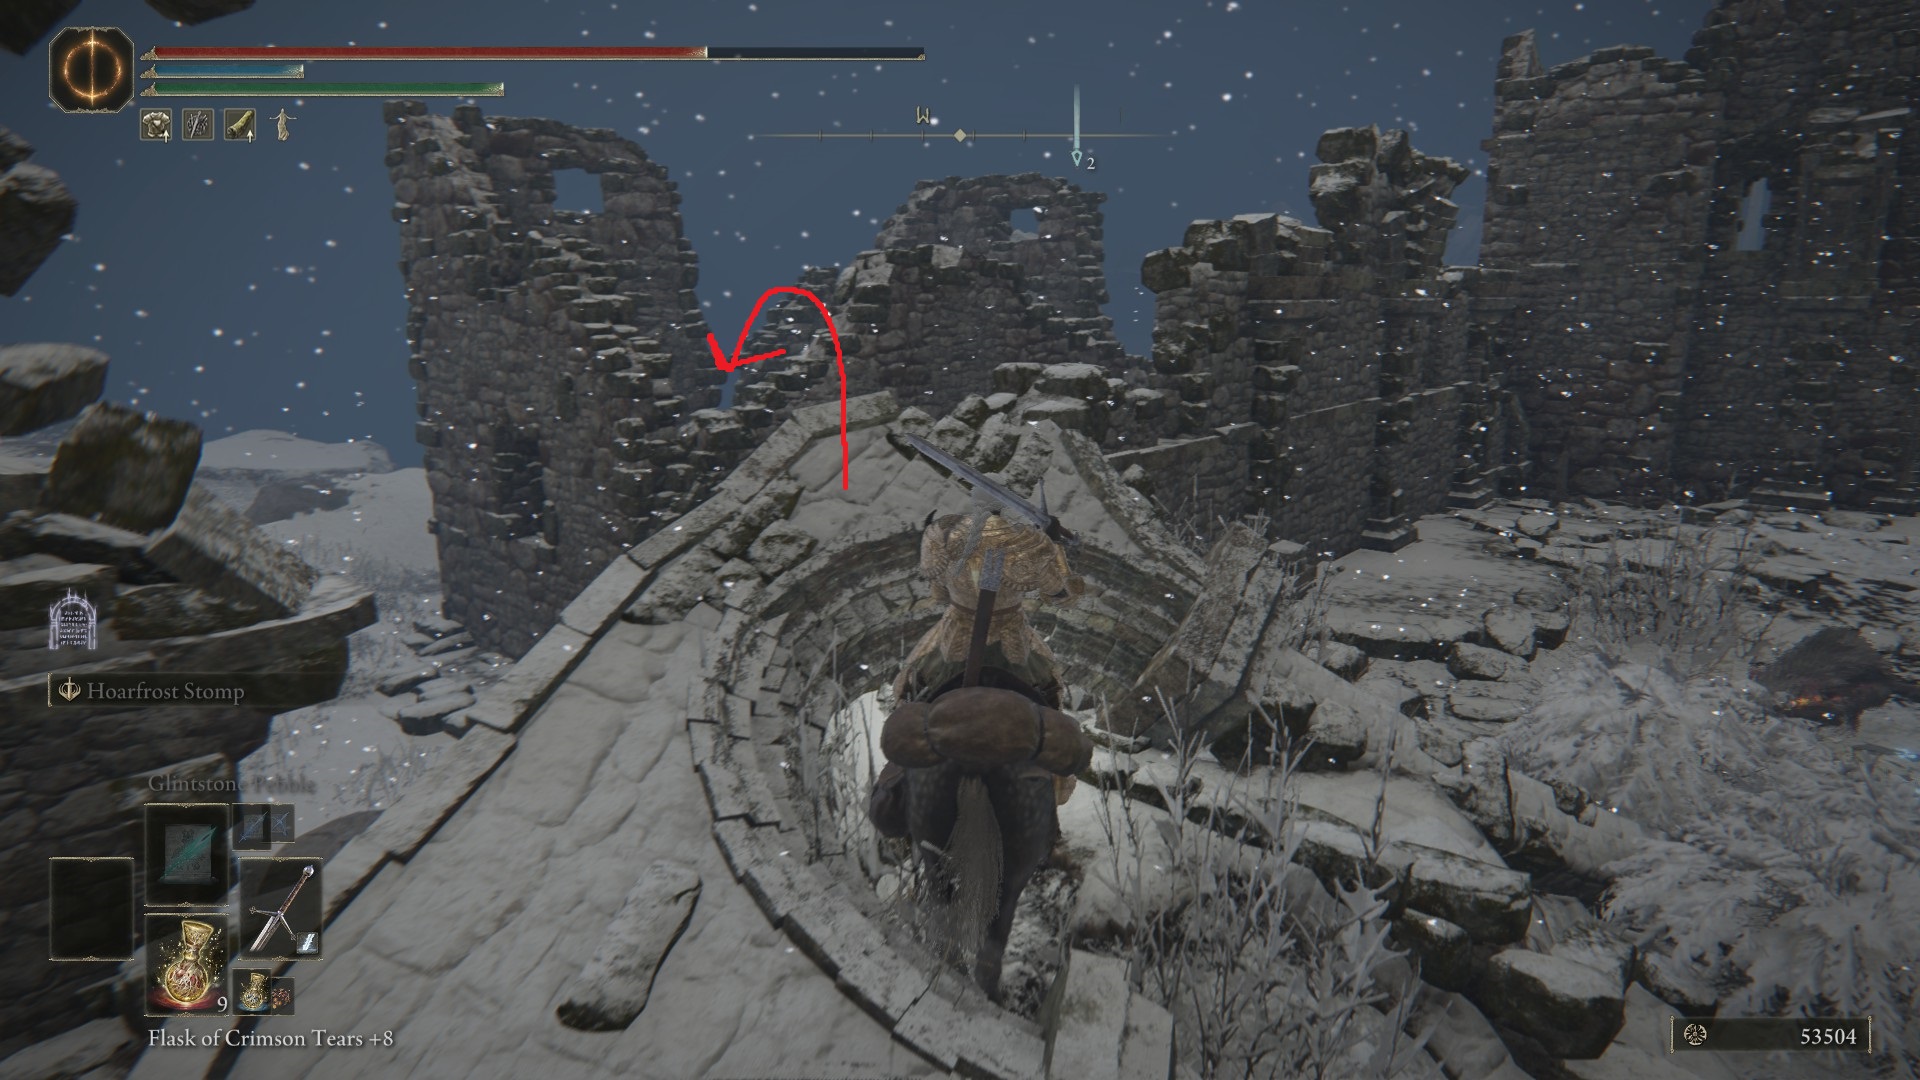
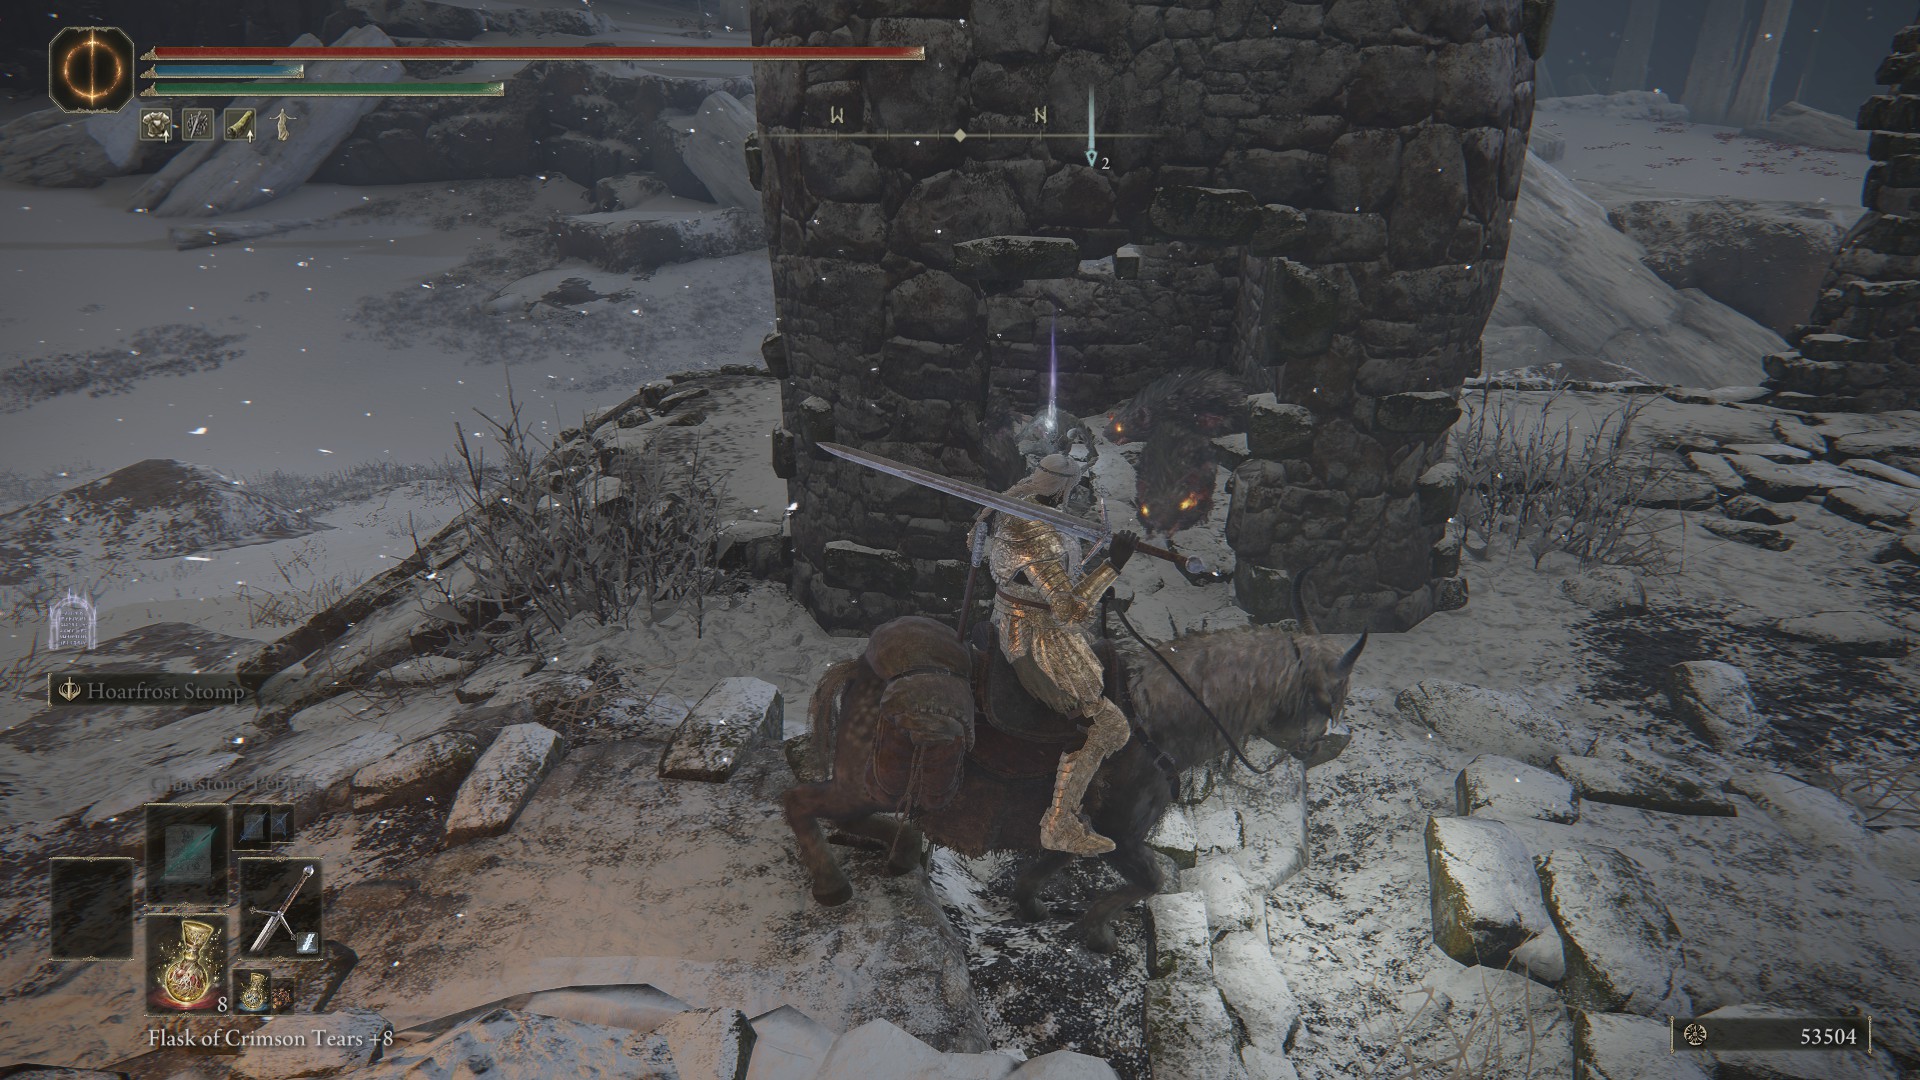
The “road” according to the map runs into a few trees, so you’ll have to navigate around some obstacles. You may also be attacked by an albinauric on wolfback or two — these enemies may chase you, so you’ll need to fight them if you can’t outrun them. Once you reach the map monument, pick up the Map: Consecrated Snowfield and then teleport back to the Consecrated Snowfield site of grace (or the Hidden Path to the Haligtree site of grace if you didn’t find the other grace yet — if this is the case, take a look at where it is on the map and go get it).
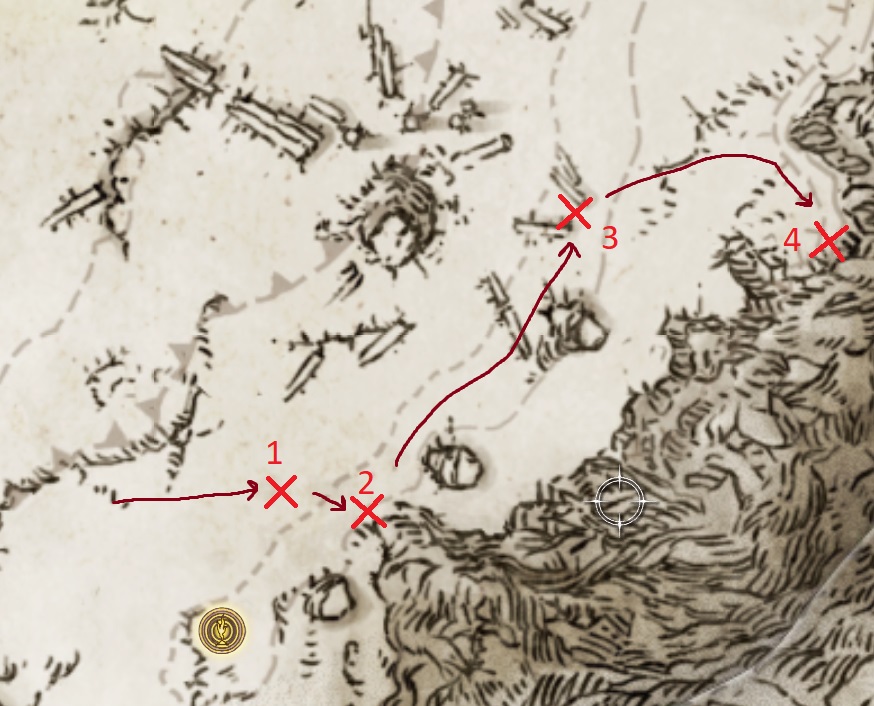
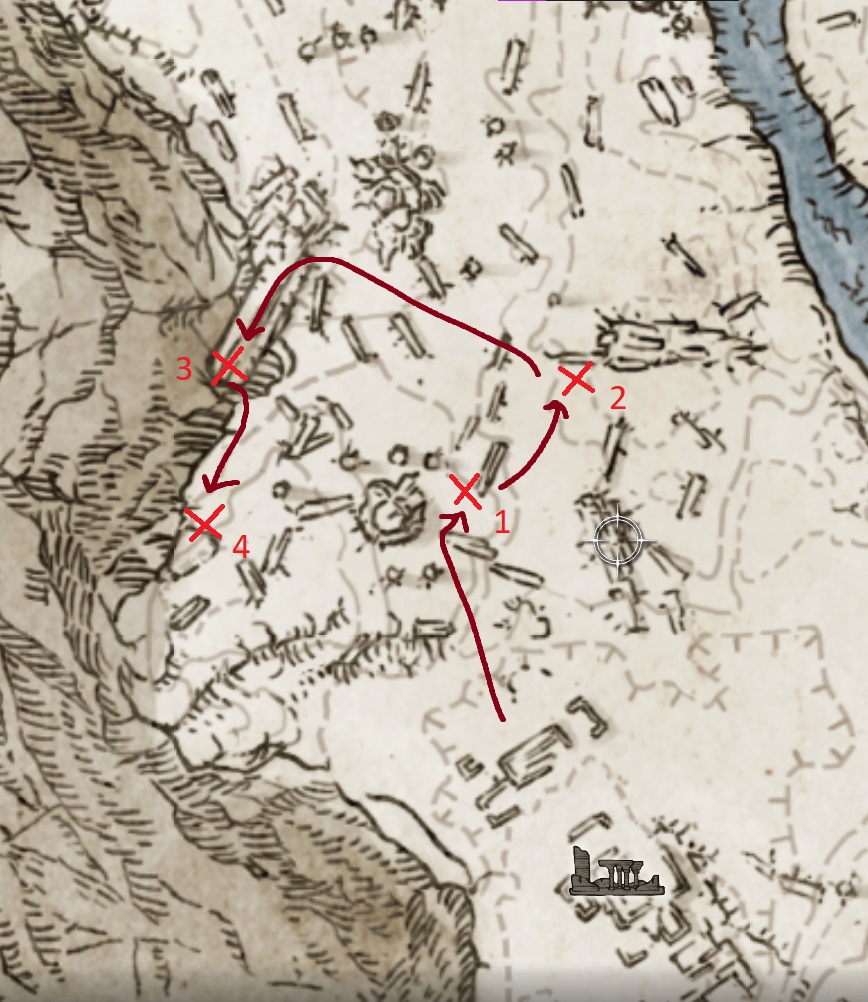
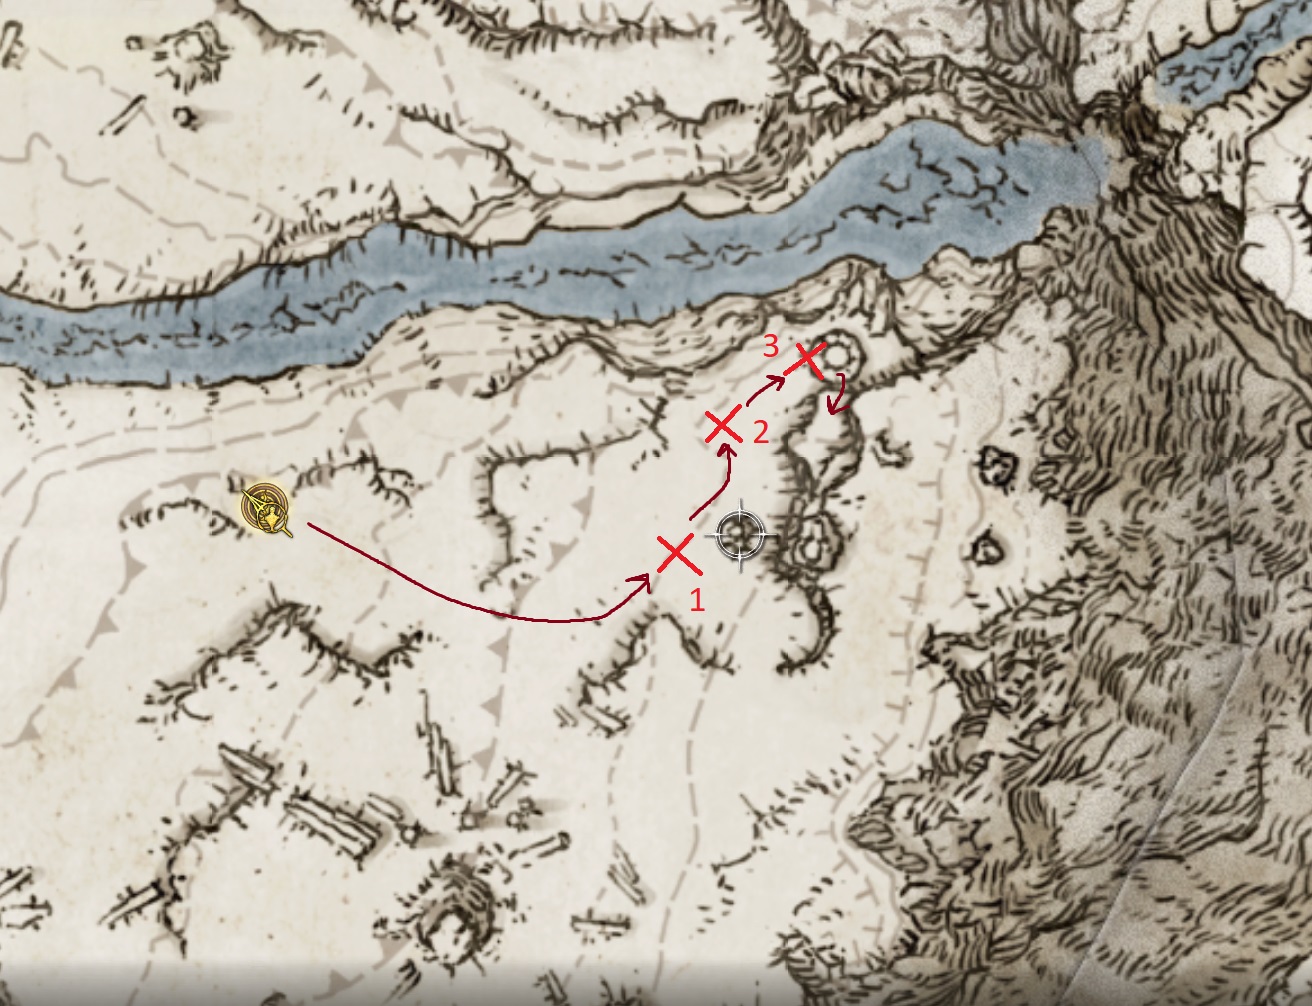
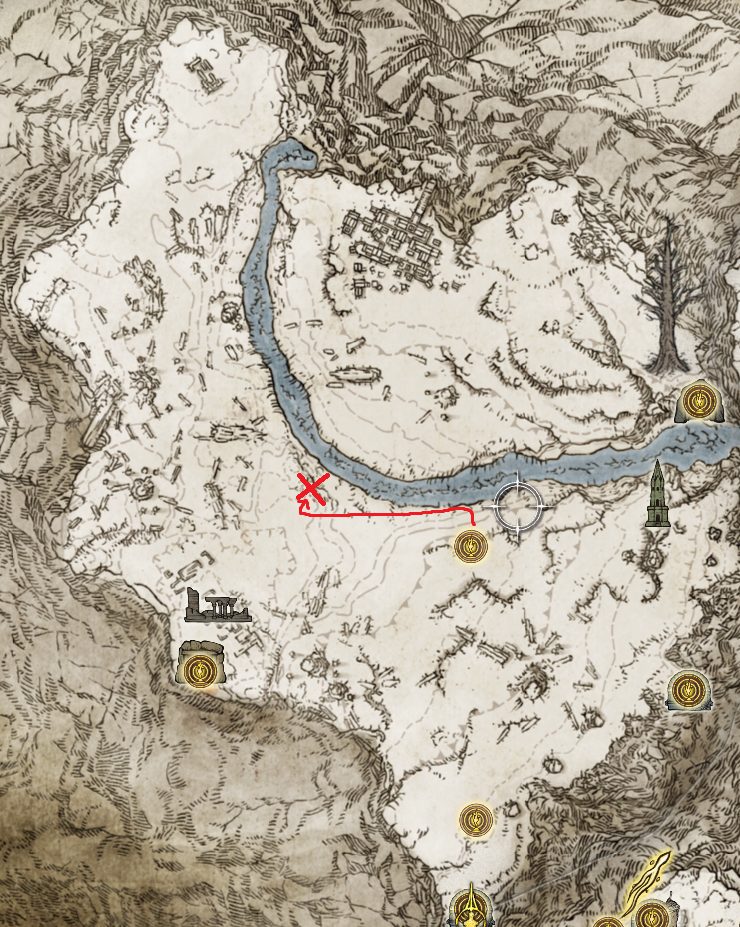
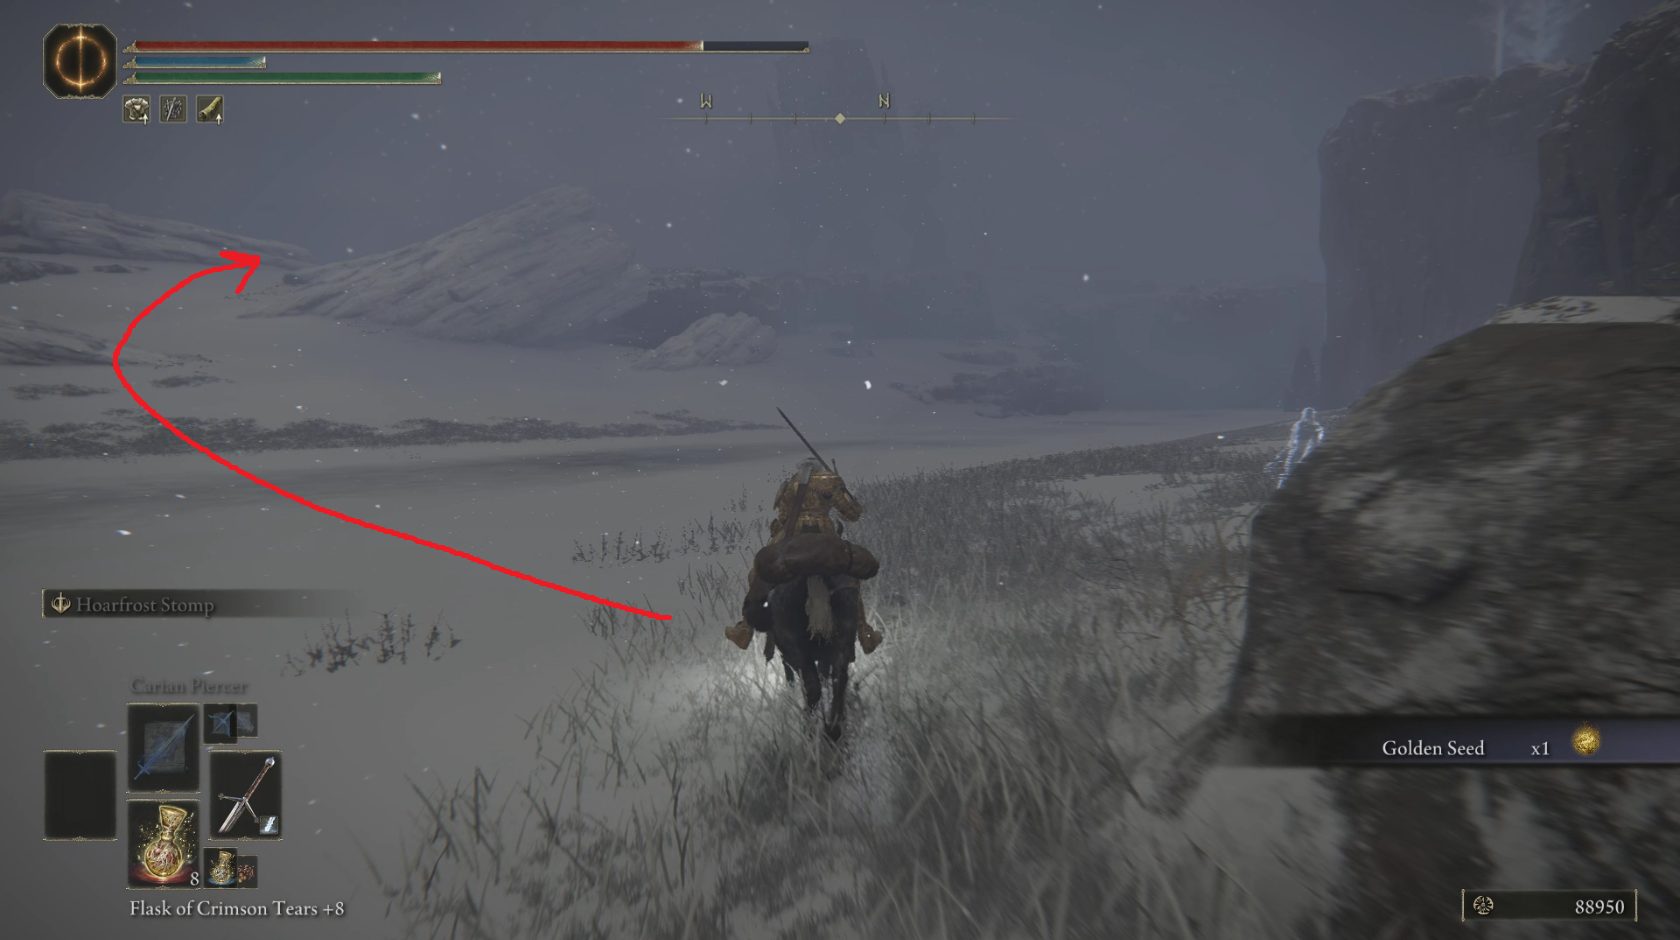
Map in hand, we’ll now be able to use beacons to make navigating this area much easier! That being said, our first stop won’t require any map shenanigans. From the Consecrated Snowfield site of grace, ride due west, and you should soon reach a graveyard (it will be on your right). There is a rotten duelist here, and defeating him will earn you the Rotten Battle Hammer and the Rotten Duelist Helm. Check out our guide on the boss fight if you need help defeating this guy. Once he’s down, you can grab the rest of the golden runes in the graveyard, and then open your map and set beacons on the following locations:
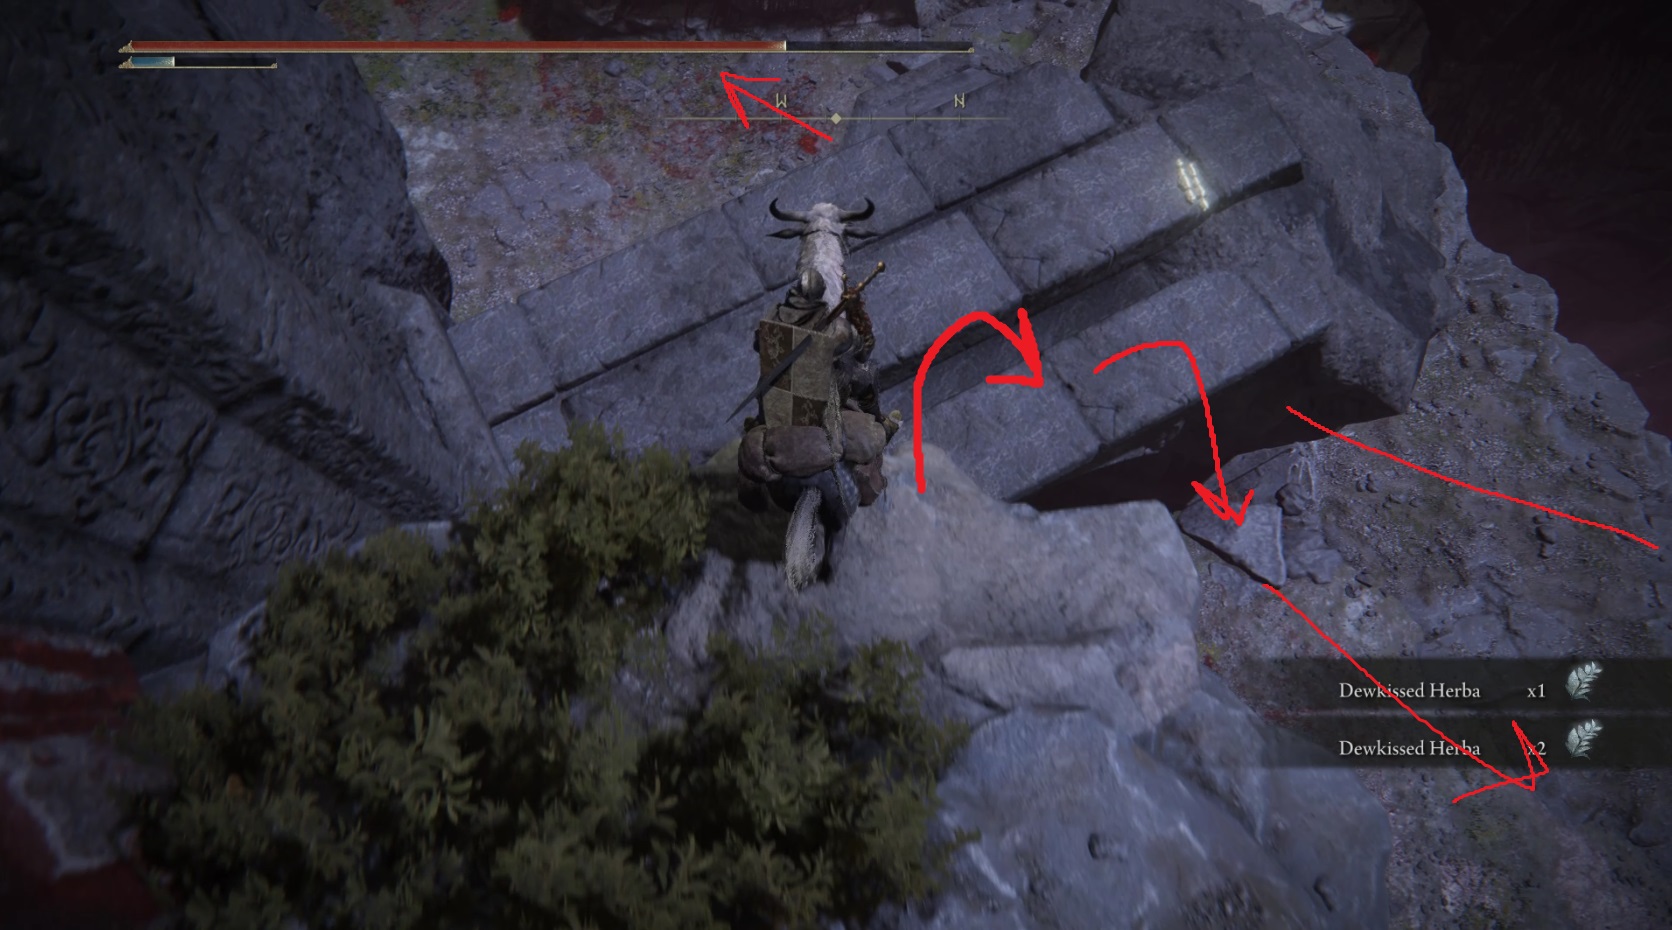
At the first marker, you’ll find the Nomadic Warrior’s Cookbook [23]. Next, head to marker two, where you’ll find a loot beetle with a Somber Smithing Stone [8] clinging to the southeastern side of a rock. On your way to marker 3, follow the road and you’ll probably run into the cart that “patrols” this section of the road — smack the giants to stop the cart, then loot St. Trina’s Torch from the chest on the back and continue to marker #3 (if you miss the cart, you can check here again on your way back across this area).
At marker 3, you’ll find a handful of nobles, one of whom holds a treasure chest containing a Golden Rune [13]. Then go east, where you’ll run into another group of nobles fighting some wolves for a corpse with x2 Old Fang — continue east and slightly north, then swing south when you near the cliff wall and head to marker 4. On your way, you’ll find x2 Lump of Flesh, and then you’ll soon reach the Consecrated Snowfield Catacombs.
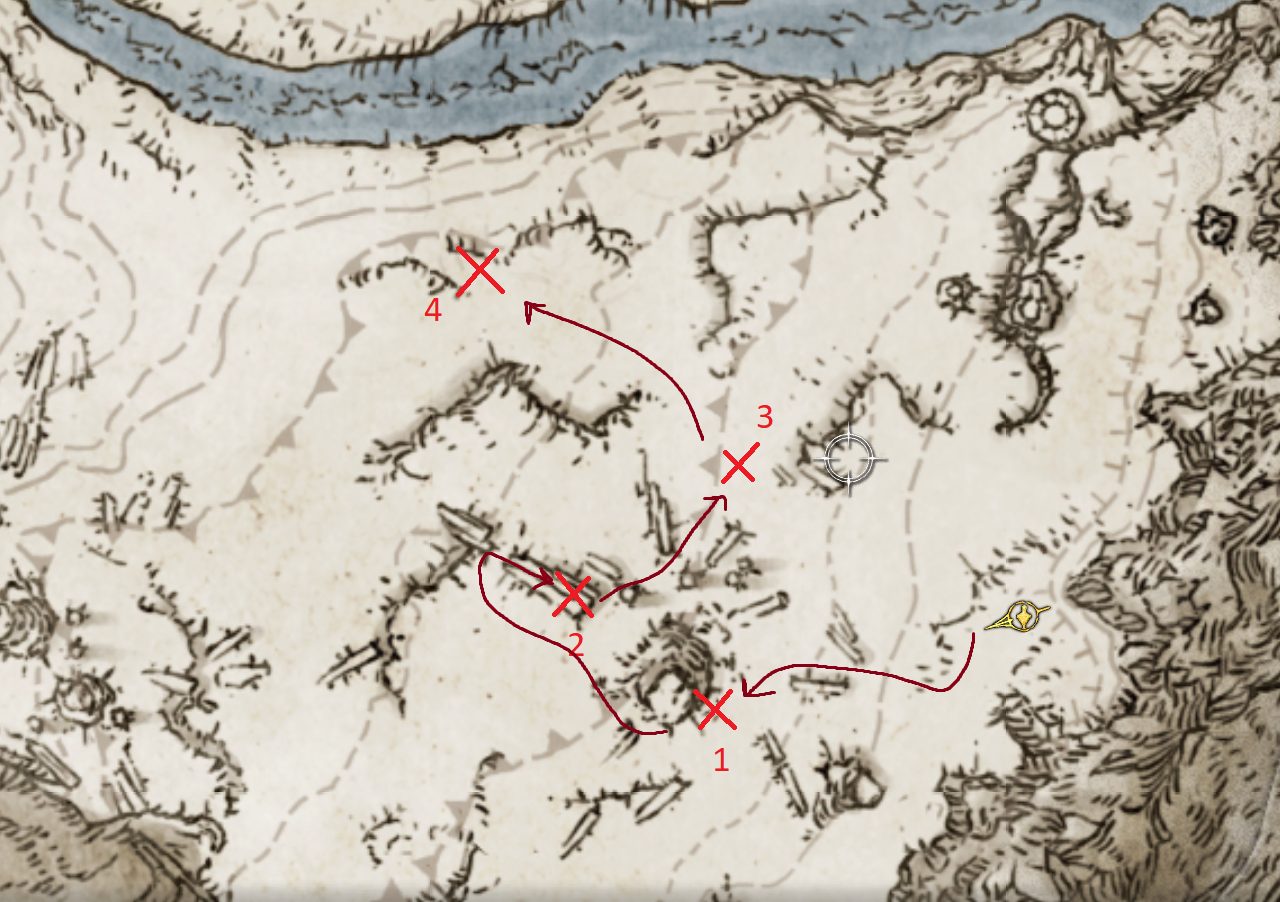
Once you’ve left the catacombs, open your map — we’re going to set some more markers.
Head to marker one, on the southeast side of the large tree. You’ll find a couple coffins here, one of which contains a Golden Rune [11] — up against the tree is an Illusory Tree with a Golden Seed at its base. Next, head to marker 2 — this is a spot you can die fairly easily at, so read ahead before continuing.
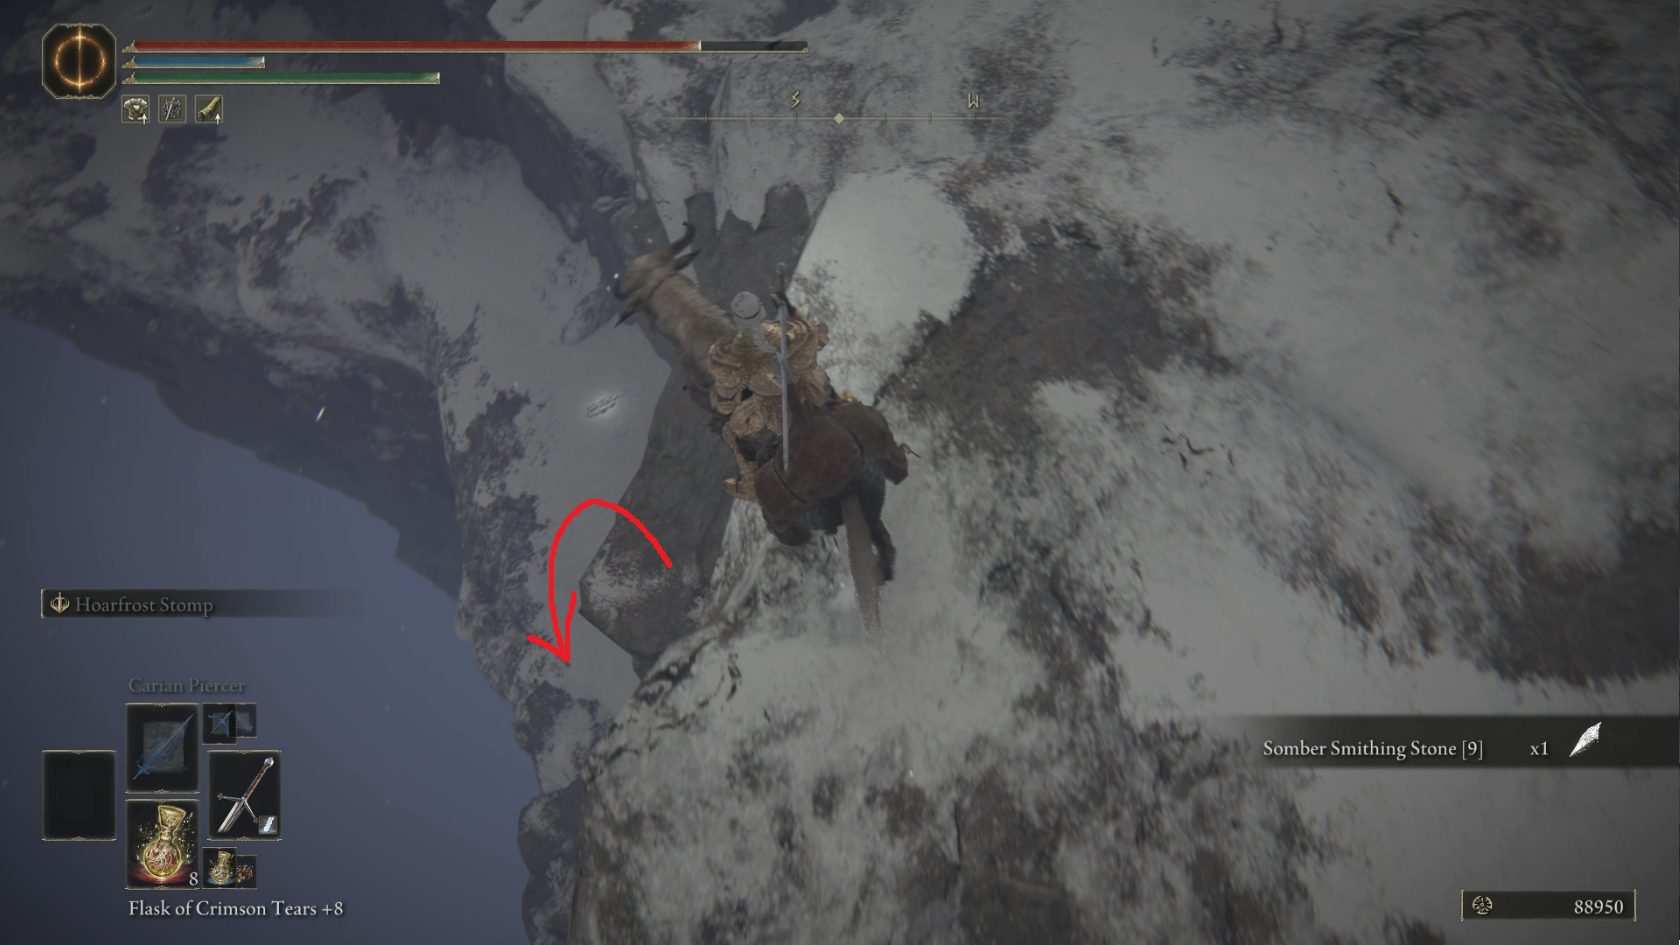
As you make your way around the tree, there will be glowing blue balls of electricity, just like the ones in the Siofra River. They’ll fire multiple fast projectiles at you if you get too close, so swing wide around them. The Somber Smithing Stone [9] on the top of the old tree trunk (indicated by marker 2) is protected by two such glowing blue balls, but as long as you dash quickly up the tree and drop off the end, these will miss you. However, you can aggro the other balls while escaping the first two, so zig-zag back and forth as you continue to marker 3.
Here, you’ll find two nobles trying to dig their companion out of the ice. If you attack the guy stuck in the ice, it will transform into a rune bear and attack you — killing this bear yields a Larval Tear. Consider heading to marker 4 and grabbing the Inner Consecrated Snowfield site of grace before taking on the rune bear if you decide you want the Larval Tear.
Once you’re at the Inner Consecrated Snowfield site of grace, you have the option of passing time until night — this will allow you to face the Night’s Cavalry Duo. Defeating this boss earns you the Night’s Cavalry Armor Set, plus an Ancient Dragon Smithing Stone and 84,000. If you wait until night, the two Night’s Cavalry will be escorting the cart in the next section. Either way, rest at the site of grace and then head southwest — you’ll soon see the cart and its defenders on your left, making their way north on the road. Craft/equip raisins before you engage, as the Night’s Cavalry will often hit Torrent instead of you.
Attacking one of the trolls pulling the cart will aggro the Night’s Cavalry on that side, so you can just attack one and then ride a fair distance away from the cart to 1v1 each cavalryman separately; the technique in our boss guide will work well here in the flat, open snow. Once both knights are defeated, or if you’ve decided to skip them, you can attack the trolls again to stop the cart and then grab the Flowing Curved Sword from the chest on the back of the cart.
Now open your map, ’cause we’re dropping some more beacons!
Head to marker 1 to find a corpse with a Golden Rune [13] slumped against a massive tree. Then continue around the tree to marker 2, where a couple of ancestral followers guard the Stalwart Horn Charm +1. The sorcerer is much stronger than its twins in the Ancestral Woods, so don’t disrespect these enemies if you choose to face them. Also watch out for the flask beetles here, as some of them explode upon death. Continue to marker 3, which is in the Yelough Anix Ruins. This is another area where you can quickly be dismounted and killed, so engage carefully or give enemies a wide berth.
You can collect a lot of unique crafting materials here, so stock up on Eye of Yelough and Yellow Ember if you’d like them for crafting (both are useful for countering or using Madness builds, so only really relevant for PvP).
You’ll find a sleeping troll at marker 3 — wait for him to stand up, grab the Golden Rune [13] he was lying on, and then quickly jump from the broken wall into the small structure to the west (before the troll starts casting spells at you).
You’ll find yourself by stairs that lead under the ruins — head down ’em and through the door to find a chest containing the Unendurable Frenzy incantation. Head back up the stairs and jump through the window to the northwest (you’ll need to dismount to fit), then remount torent and continue to marker 4, the Yelough Anix Tunnel visible on the map, via the route shown above. If you head due south instead of following the suggested route, you’ll take some fall damage, plus you’ll miss a Smithing Stone [7].
From the tunnel entrance, head east back up the path and then turn northwest, making your way through the Yelough Anix Ruins once again. The last building at the far end of the ruins is full of frenzied rats and holds a Stonesword Key — draw the rats out and kill them, or dive in and grab the item if you’re a gambling Tarnished.
Continue northwest, and make your way to the eastern side of the large tree — you’ll be automatically dismounted, and soon the Sanguine Noble will invade and start approaching from the north. Against this foe, melee spells like Adula’s Mooonblade are the best bet for mage characters, while jumping heavy attacks will work well if you’re a melee character — defeating this Sanguine Noble will earn you the Sanguine Noble set. Next, we’ve got a few items to grab, and then we’re going to take a waygate to Mohgwyn Palace.
Head to marker 1 and grab the Smithing Stone [8], then continue to marker 2, where a few dogs are eating a corpse that holds x4 Crystal Dart. Then make your way out onto the tree trunk to marker 3 to pick up the Hero’s Rune [2]. From here, you can jump to the southeast, or take the safer route back down the tree trunk and then southwest along the edge of the cliff — marker 4 is where you’ll find a bloody waygate (guarded by a single albinauric and a few slime). Use the waygate and you’ll be transported to the outskirts of Mohgwyn Palace.
Head southwest out of the tunnel, and you’ll be treated to a view of the palace. Turn left and follow the narrow cliff path south and west (1), then drop down onto the stone block platform below (2). Drop off the platform and head east to the edge of the cliff, where a corpse holds a Golden Rune [11]. Then turn around and go through the arch heading west — you’ll soon find the Palace Approach Ledge-Road site of grace. Activate it, and then teleport back to the Inner Consecrated Snowfield site of grace. Feel free to explore Mohgwyn Palace now instead of teleporting. However, this walkthrough will exclusively cover the Consecrated Snowfield.
(1)(2)
For this next bit, you’ll need the Fanged Imp Ashes or a few Crystal Darts to solve the puzzle — although if you aren’t doing a sorcery build, you don’t need the item earned from the puzzle.
At the Inner Consecrated Snowfield site of grace, open your map — you know what time it is.
Head east to marker 1, where you’ll find x3 Miquella’s Lily. Then continue north-northeast to marker 2, where you’ll find three mage balls surrounding the Glintstone Craftsman’s Cookbook [8]. With that secured, you can head a bit further northeast to marker 3, the Albinauric Rise. To open this tower, you’ll need to get an imp to kill another imp. Depending on if you’re using the summons or the Crystal Darts, there are two ways of doing it:
Summon the Fanged Imp Ashes, and then let them kill one of the spectral imps around the tower. There are a few that spawn behind the tower, so head back there and summon the ashes, then get one of the spectral imps low HP — don’t kill it, but leave it low HP and let your summons finish it (it’s a good idea to kill other spectral imps that spawn so your ashes can focus on the low HP one).
Mount up and grab the attention of both of the spectral imps that are roaming around the tower. Once they’re following you around, use 2 – 3 Crystal Darts on one of the imps until you see a jolt of electricity coursing through them. Now, this imp’s attacks will also hurt its friend, and once they do, they will start fighting to the death.
Once your summons kill a spectral imp or you make one of them kill its colleague by using Crystal Darts, the rise will open. Head inside and up the ladder, then take the stairs to the top, where you’ll find the Graven-Mass Talisman. Head back through the doorway, but don’t go down the stairs. Instead, get a running start and use Torrent to double jump south, to the snowy rocks just below the tower. Once you land, there will be a treasure chest to the east with a Rune Arc inside.
Loot it and then drop down to the northwest (look over the edge to make sure there’s somewhere to land), and make your way back to the steps that lead into the Albinauric Rise. From the steps, go north-northwest carefully to the edge of the cliff — you’ll find a tombstone sticking out from the cliff. Head out onto it and look down over the left (southwest) side of the tombstone, and you’ll see that the next tombstone down is blocked by a mage ball.
Fortunately, you can — while mounted — simply walk southwest towards the lower tombstone, and if you hold that direction, you’ll fall right past the mage ball and land on the tombstone below. Torrent will take a decent chunk of damage, you’ll take a lot less, and you’ll both be alive!
You can then drop twice more to the southwest, once onto another tombstone and then to the rocks below, where you’ll find x3 Old Fang. From here, you’ll need to land on another tombstone to the north-northwest, and from there you can drop to the bank of the frozen river. Once you land, you’ll see a giant crab just ahead to the northeast. Head towards the crab, smack it to aggro it, and then continue northeast. You’ll quickly find a statue on the river’s left bank with an item inside — wait behind it (making sure the crab is still chasing you) and the crab will destroy the statue as it moves towards you, allowing you to snatch the x3 Smithing Stone [8] inside.
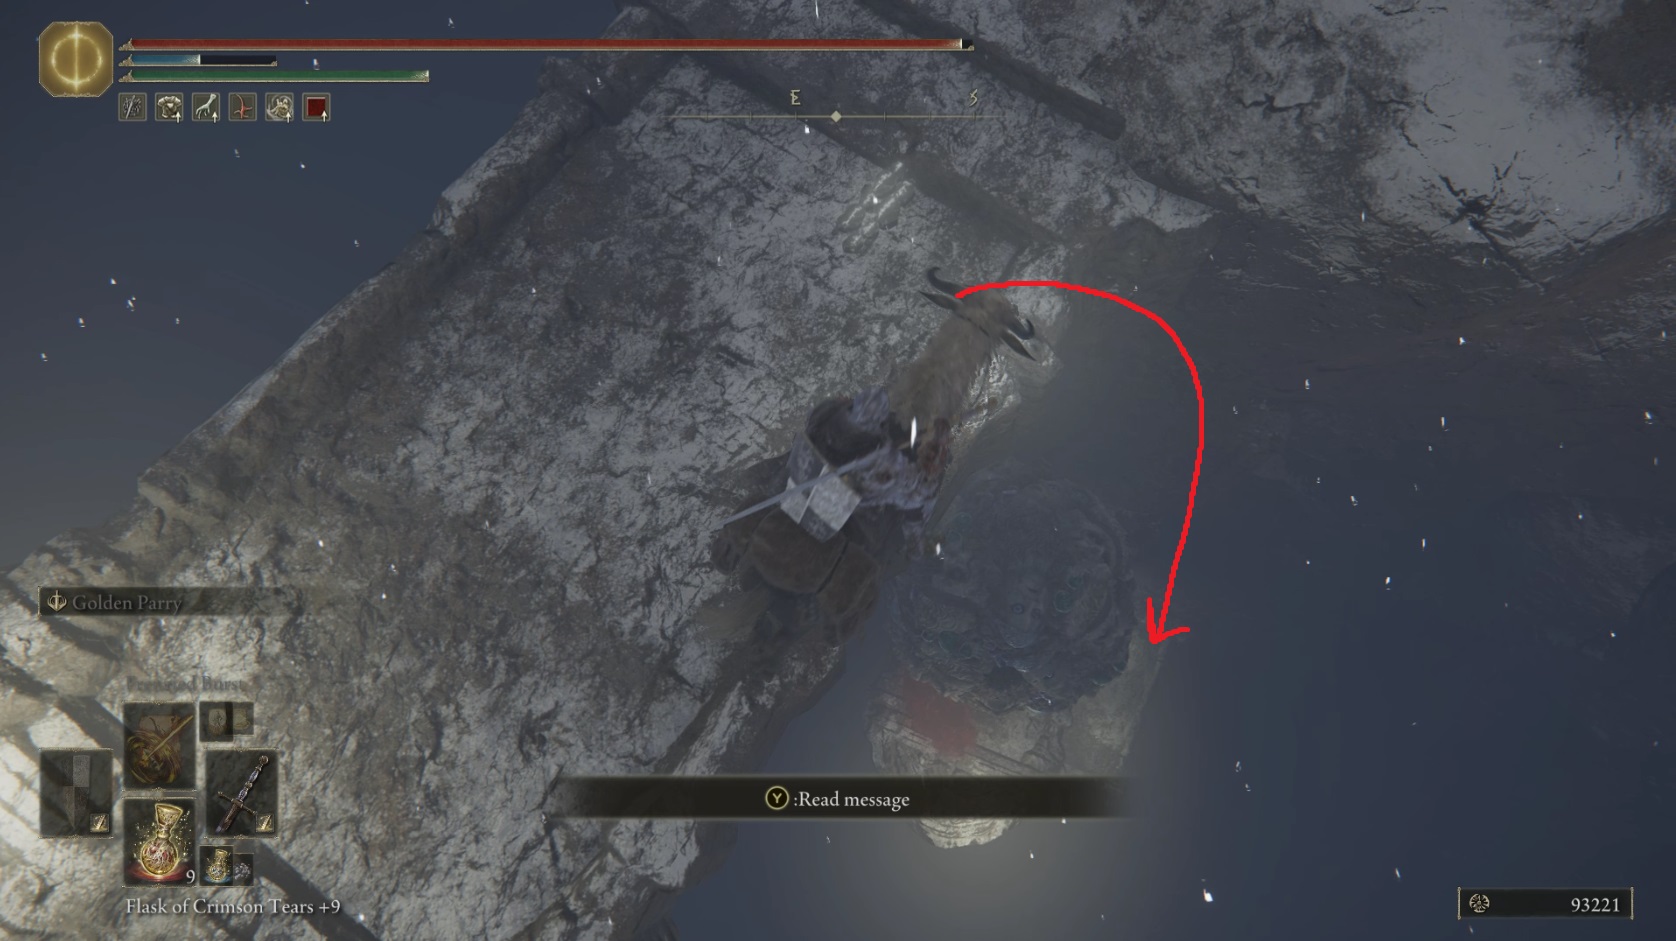
From the statue, continue east just a bit while looking left at the cliff wall — just around the corner is a cave guarded by a large land octopus.
The cave is also sealed by an imp statue, and you’ll need x2 Stonesword Key to enter. You can be patient and either kill the land octopus or draw it away from the entrance, or you can risk taking a bit of damage and just ignore it while unsealing the entrance of the Cave of the Forlorn.
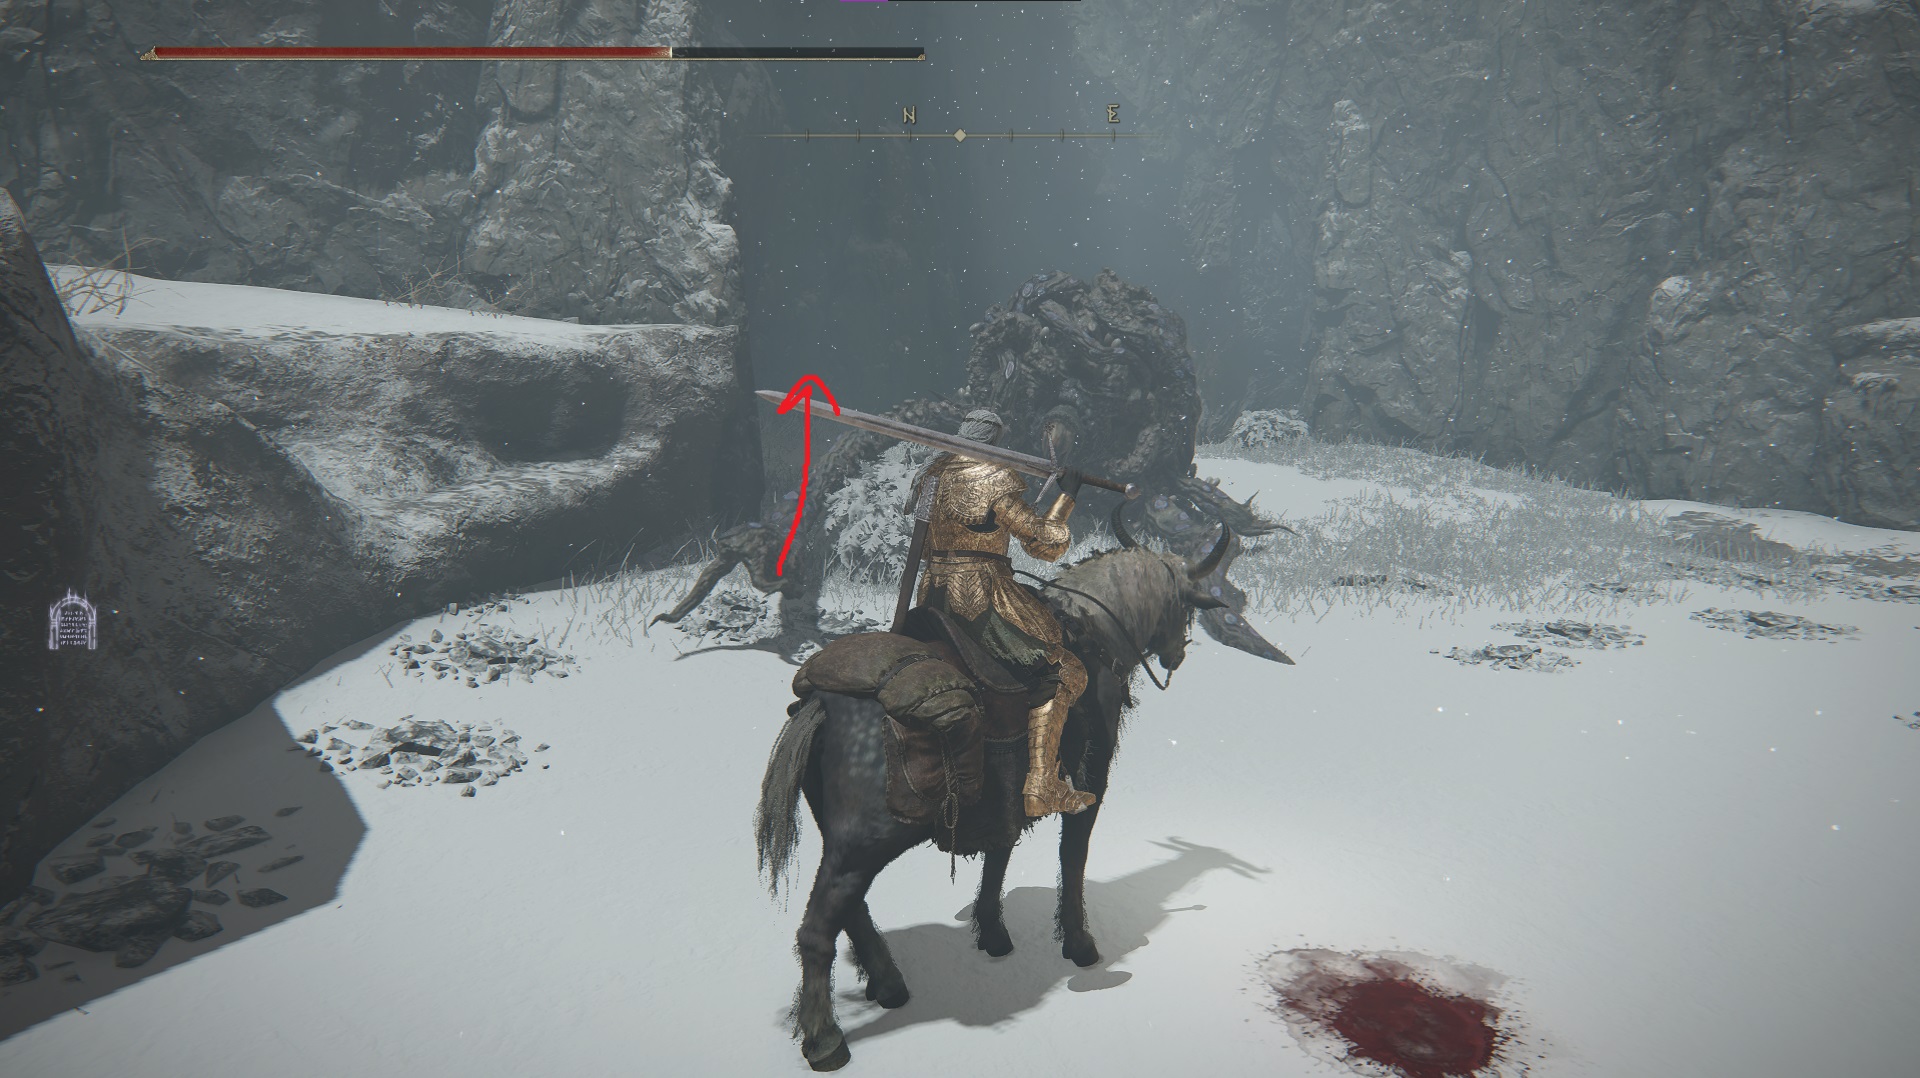
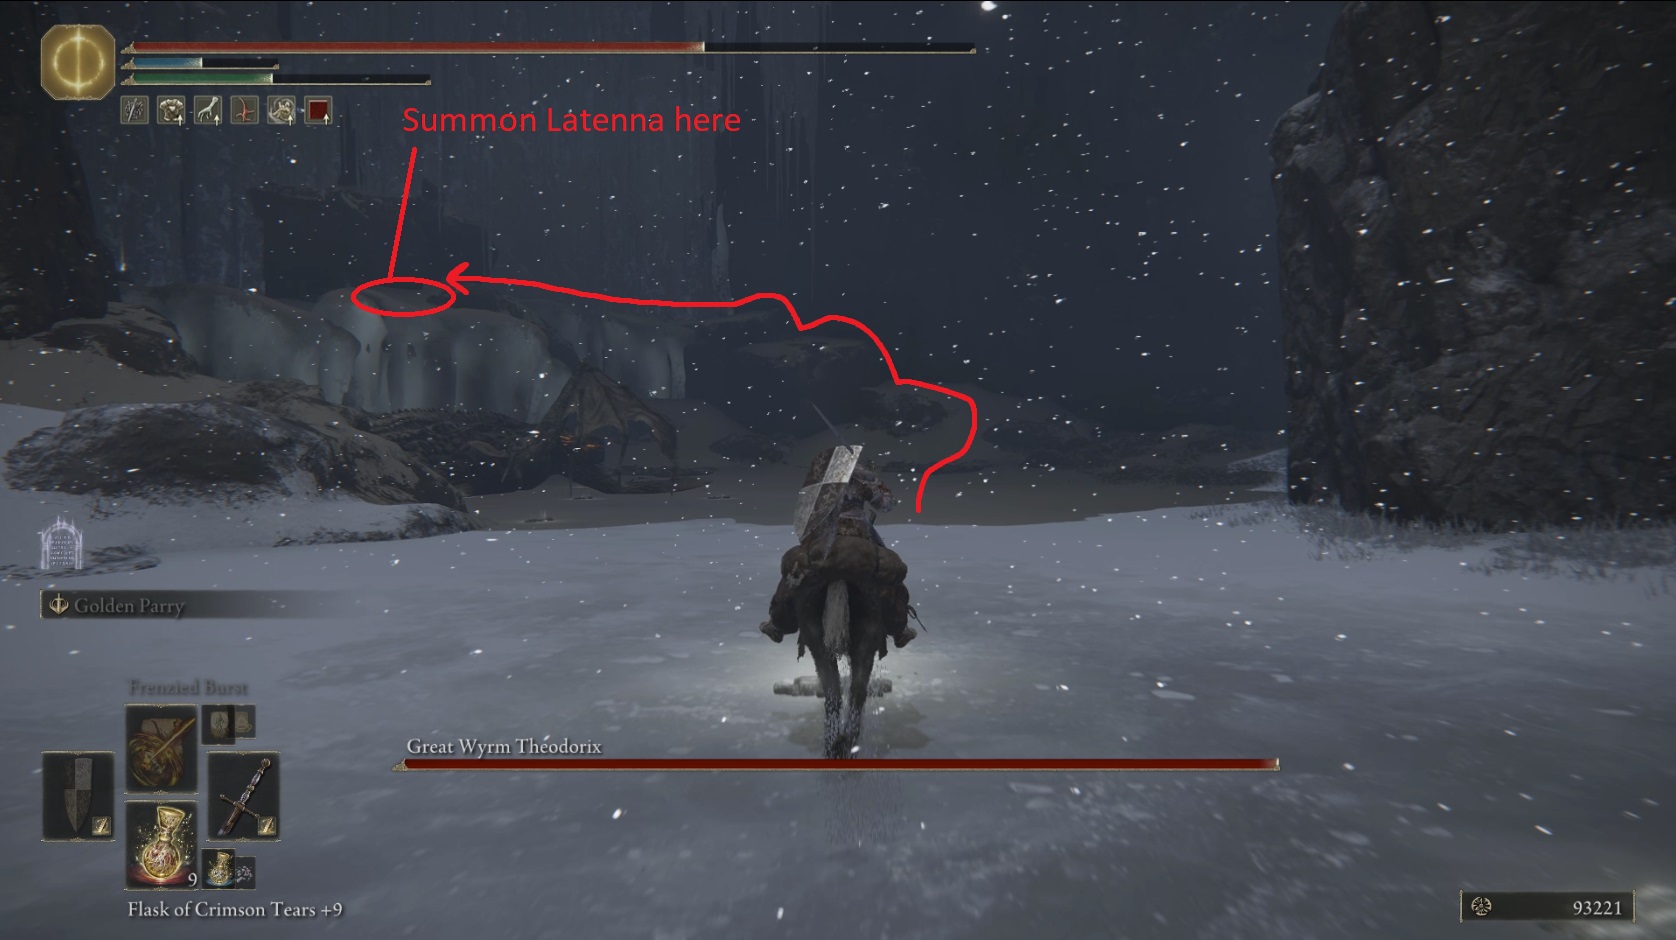
From the entrance to the Cave of the Forlorn, head east on the frozen river. You’ll eventually come to the end of the river and find Great Wyrm Theodorix. If you’ve been upgrading Latenna, this guy’s a very easy kill (and a slow, but still easy kill if you haven’t). Make your way up onto the high ground above Theodorix and summon Latenna. If you’re lucky and she spawns on the edge of the cliff, you can just wait while she kills the boss, otherwise you’ll need to go back down to the river and pull the boss west so Latenna has the proper angle to hit Theodorix. You can also pull the great wyrm to the giant land octopus near the Cave of the Forlorn entrance — they’ll fight each other and save you the trouble of holding aggro.
Up near where you summon Latenna, you can find a corpse with an Ancient Dragon Smithing Stone. Once Theodorix goes down, you’ll receive a hefty 180,000 plus x3 Dragon Heart. With the wyrm taken care of, we’re all done with the southern half of the Consecrated Snowfield!
This guide continues in the other tab, Northern Snowfield!
The snow clears out significantly in the northern region of the map, so we’ll once again be able to navigate with just compass directions and landmarks much of the time.
From the Inner Consecrated Snowfield site of grace, ride north to the bank of the frozen river, then ride west towards the spot indicated below:
About halfway to your destination, you should be automatically dismounted, and soon Anastasia, Tarnished-Eater will spawn to the northwest and start running towards you. (There is a bug where she doesn’t spawn — this usually occurs if you’ve killed the Putrid Avatar in this area before reaching her spawn point.) This is probably the third time you’ve faced her; as before, using jumping heavy attacks and/or rolling backwards is a safe bet. She’ll drop a Somber Ancient Dragon Smithing Stone upon death, which is pretty excellent loot if you’re using a weapon that requires somber smithing stones.
Next, continue to the ridge (indicated previously). You’ll see a couple of the glowing blue balls up there — just ride horizontally past them while dashing and their attacks will miss. Once they dissipate, you can grab the Stonesword Key from the corpse they were guarding. From the high ground here, look to the northeast, and you should see a pack of wolves chasing an invisible loot beetle.
This beetle is tricky to catch, because it will often stop and change directions, and its path is long and complex. Head over there and kill all the wolves, then watch the loot beetle and wait for it to do one of its pauses+direction changes, then go stand at that spot and wait — these are the best places to catch it. When you finally manage to hit it, you’ll receive the Ash of War: White Shadow’s Lure.
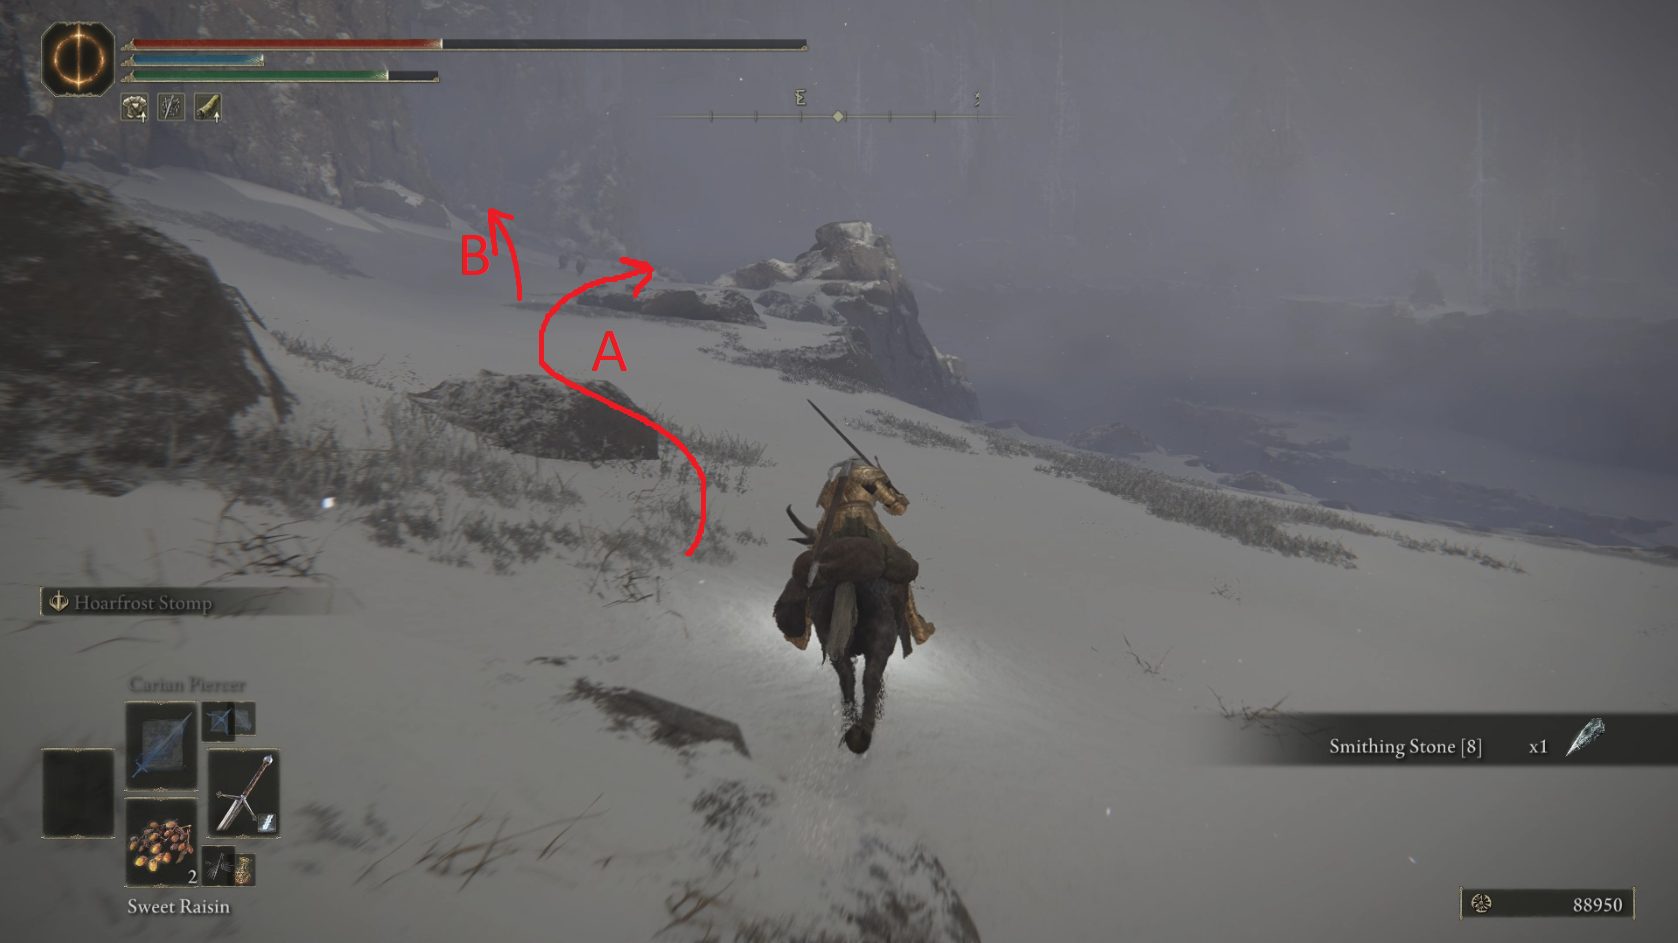
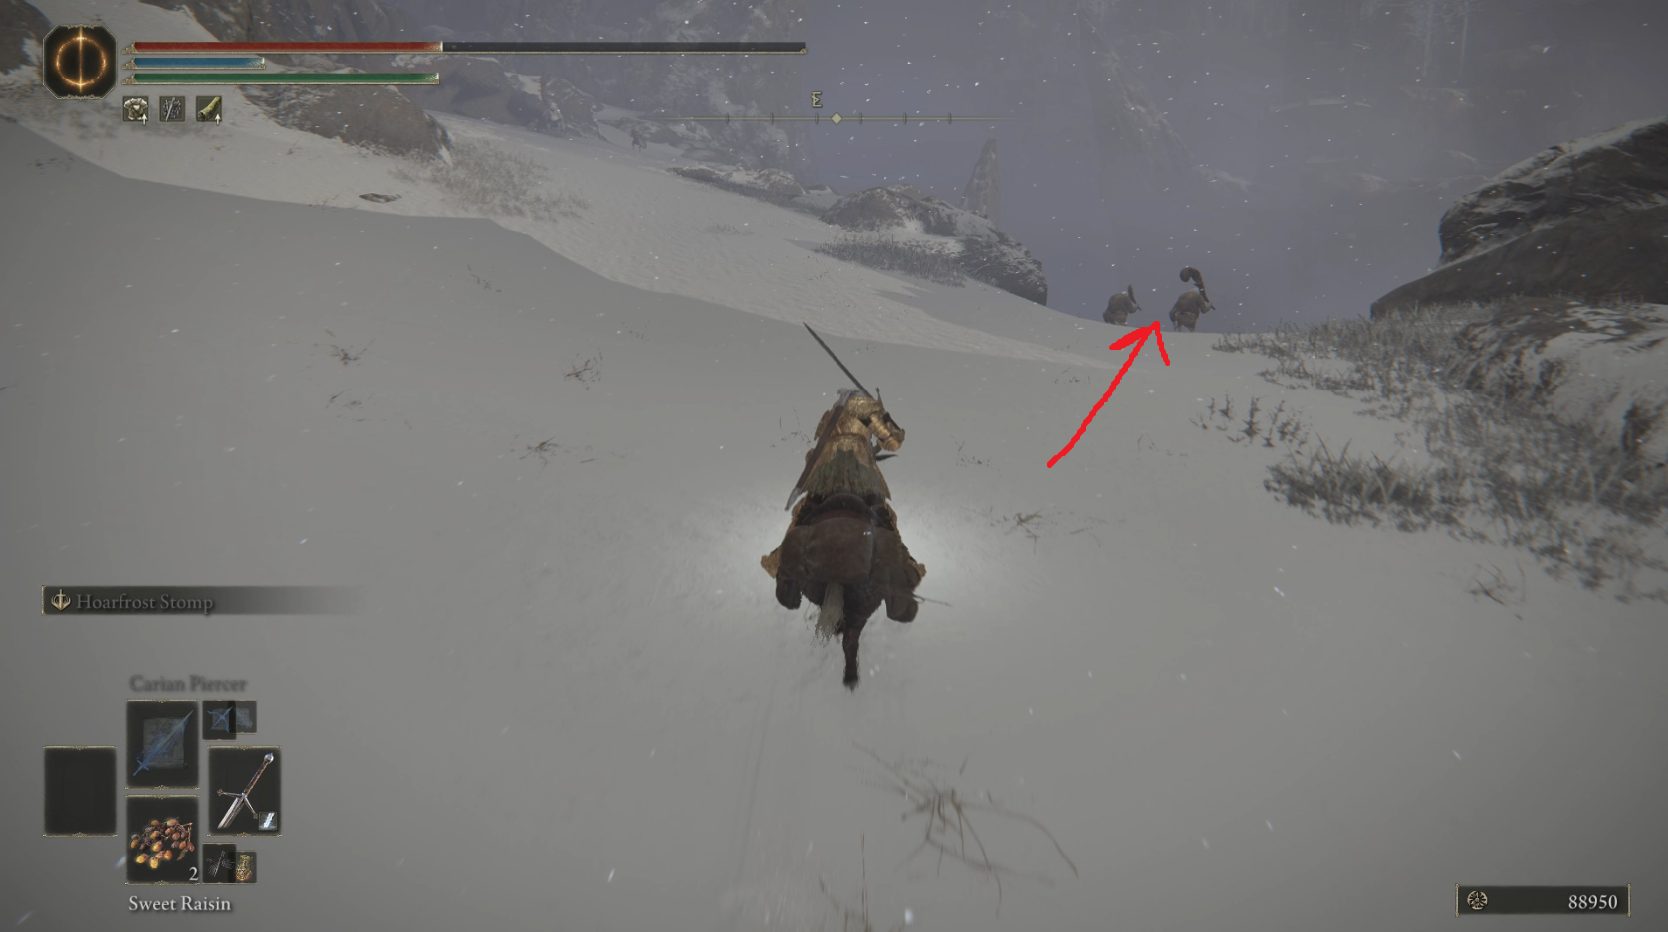
Next, ride east to the large tree (where you picked up this area’s map, actually). Continue around the right (south) side of the tree — all the way on the other side you’ll find a corpse with a Smithing Stone [8]. Pick it up and continue east — you’ll need to swing a bit south around the rocks ahead — to make your way uphill. You’ll be able to go left or right up ahead — go right to take Path A (southeast), the direction the patrolling Albinaurics are going. Continue east past them and you’ll find a corpse in a dead end. Snag the x2 Albinauric Bloodclot and then go back the way you came (to where you turned southeast).
Path A
This time, go due east uphill (Path B). You’ll soon see a corpse hanging off of a small ledge, surrounded by albinaurics. Loot the x3 Nascent Butterfly and then continue uphill, northeast and then northwest. When the ground levels off, you’ll see a lone albinauric hanging out near a bunch of loot beetles. Most are flask beetles, but the ones on top of the rocks have items. You’ll need to use Torrent to get up to them, but you’ll be rewarded with a Somber Smithing Stone [7] and [8] for your trouble.
From the northernmost of the two loot beetles, look east-southeast, and you’ll see an even larger version of the rock formation you’re on. Head up the hill and make your way up to the top, where an invisible loot beetle holds a Somber Smithing Stone [9].
Jump down — back on the ground, east-northeast of the loot beetle, is a small tent with x2 Dragonwound Grease in front of it. Pick it up and then ride northwest/north, keeping the rock wall on your right. When you come to a summoning pool (as well as a summoning monument), turn right (east) and ride through the tree guardians. Continue following the path as it winds uphill, southeast towards the Minor Erdtree. As the path turns south, you’ll see a corpse slumped over a tree branch on the left — it’s got x4 Warming Stone, perfect for this climate. There’s another corpse on the right of the path just ahead, but it’s only got x3 Tarnished Sunflower.
Make your way counterclockwise around the Minor Erdtree — once you come around the other side and start heading north, you’ll see a Putrid Avatar hanging out in a small clearing. Fighting this one is no different than any other, except that the space you have is somewhat limited; you’ll have to mind your surroundings or risk falling off a cliff. Stay away from the northern side of the area and you should be fine. This avatar drops the Thorny Cracked Tear and a Ruptured Crystal Tear, plus 160,000.
With the guardian of the tree defeated, you can ride west back down the hill, all the way to the front of Ordina, Liturgical Town. For now, all we’re going to do is grab the site of grace, since this will be the last area we clear before leaving the Consecrated Snowfield.
From the Ordina, Liturgical Town site of grace, ride west-northwest until you’re clear of the buildings, and then turn north — you should see a Rotten Duelist in the distance, standing at the edge of a cliff. Resist the urge to use a spell or ability to knock him off the cliff, as this can prevent you from picking up the items he drops: Rotten Duelist Greaves and the Rotten Greataxe. He can inflict rot with both a breath attack and his axe, so be patient and use hit-and-run tactics with Torrent — wait for him to finish a combo before attacking.
Next, ride south-southwest from where you found the duelist, down towards the river. On the rocks just above the riverbank, you’ll find an Illusory Tree with a Golden Seed at its base. Once you’ve secured it, ride west to cross the river, then turn northwest and ride towards the walking mausoleum.
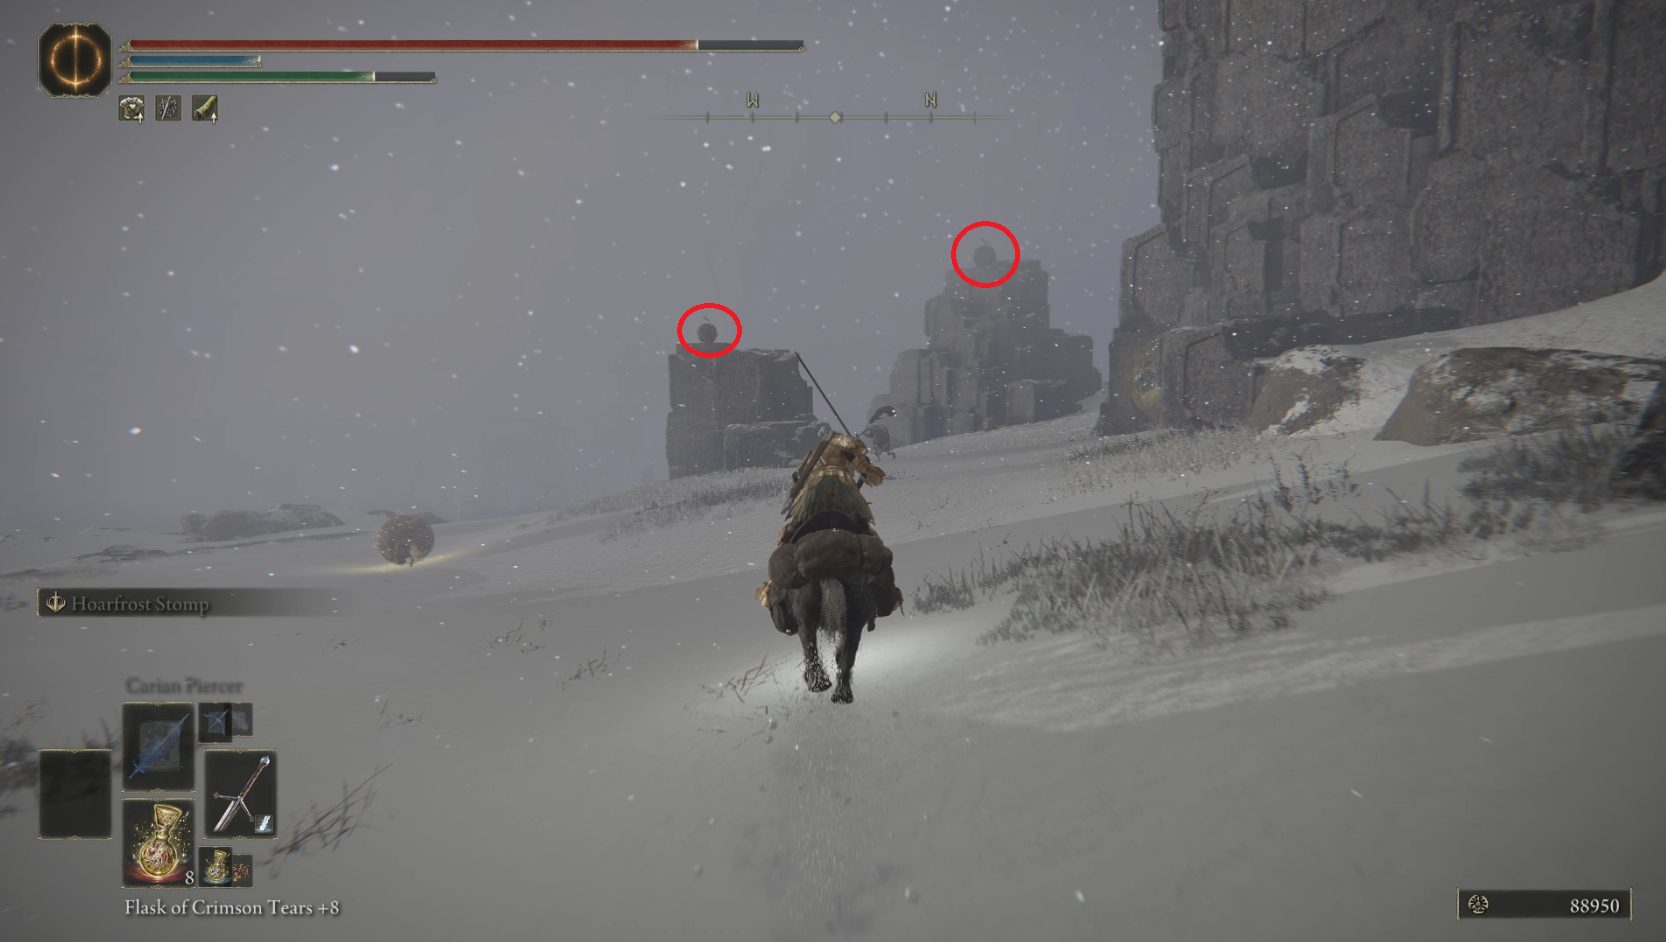
This mausoleum fires magic artillery that does massive damage, and it can feel impossible to avoid. However, if you angle your camera up, you can get some idea of where the magic shells are landing — we’re taking the approach indicated above because it offers more room to maneuver. Riding into spots that have just exploded can also help you avoid taking damage. Once you reach the mausoleum, you’re safe from its magic attacks, and you can clean the skulls off of its feet in relative safety.
From the mausoleum, it’s a short ride north to the Apostate Derelict church. Inside, activate the site of grace, pick up the Silver Mirror Shield from in front of the large Albinauric, and then summon our old friend Latenna the Albinauric. Let her do her thing, then speak with her and she’ll give you Somber Ancient Dragon Smithing Stone and promise to fight with you until the bitter end!
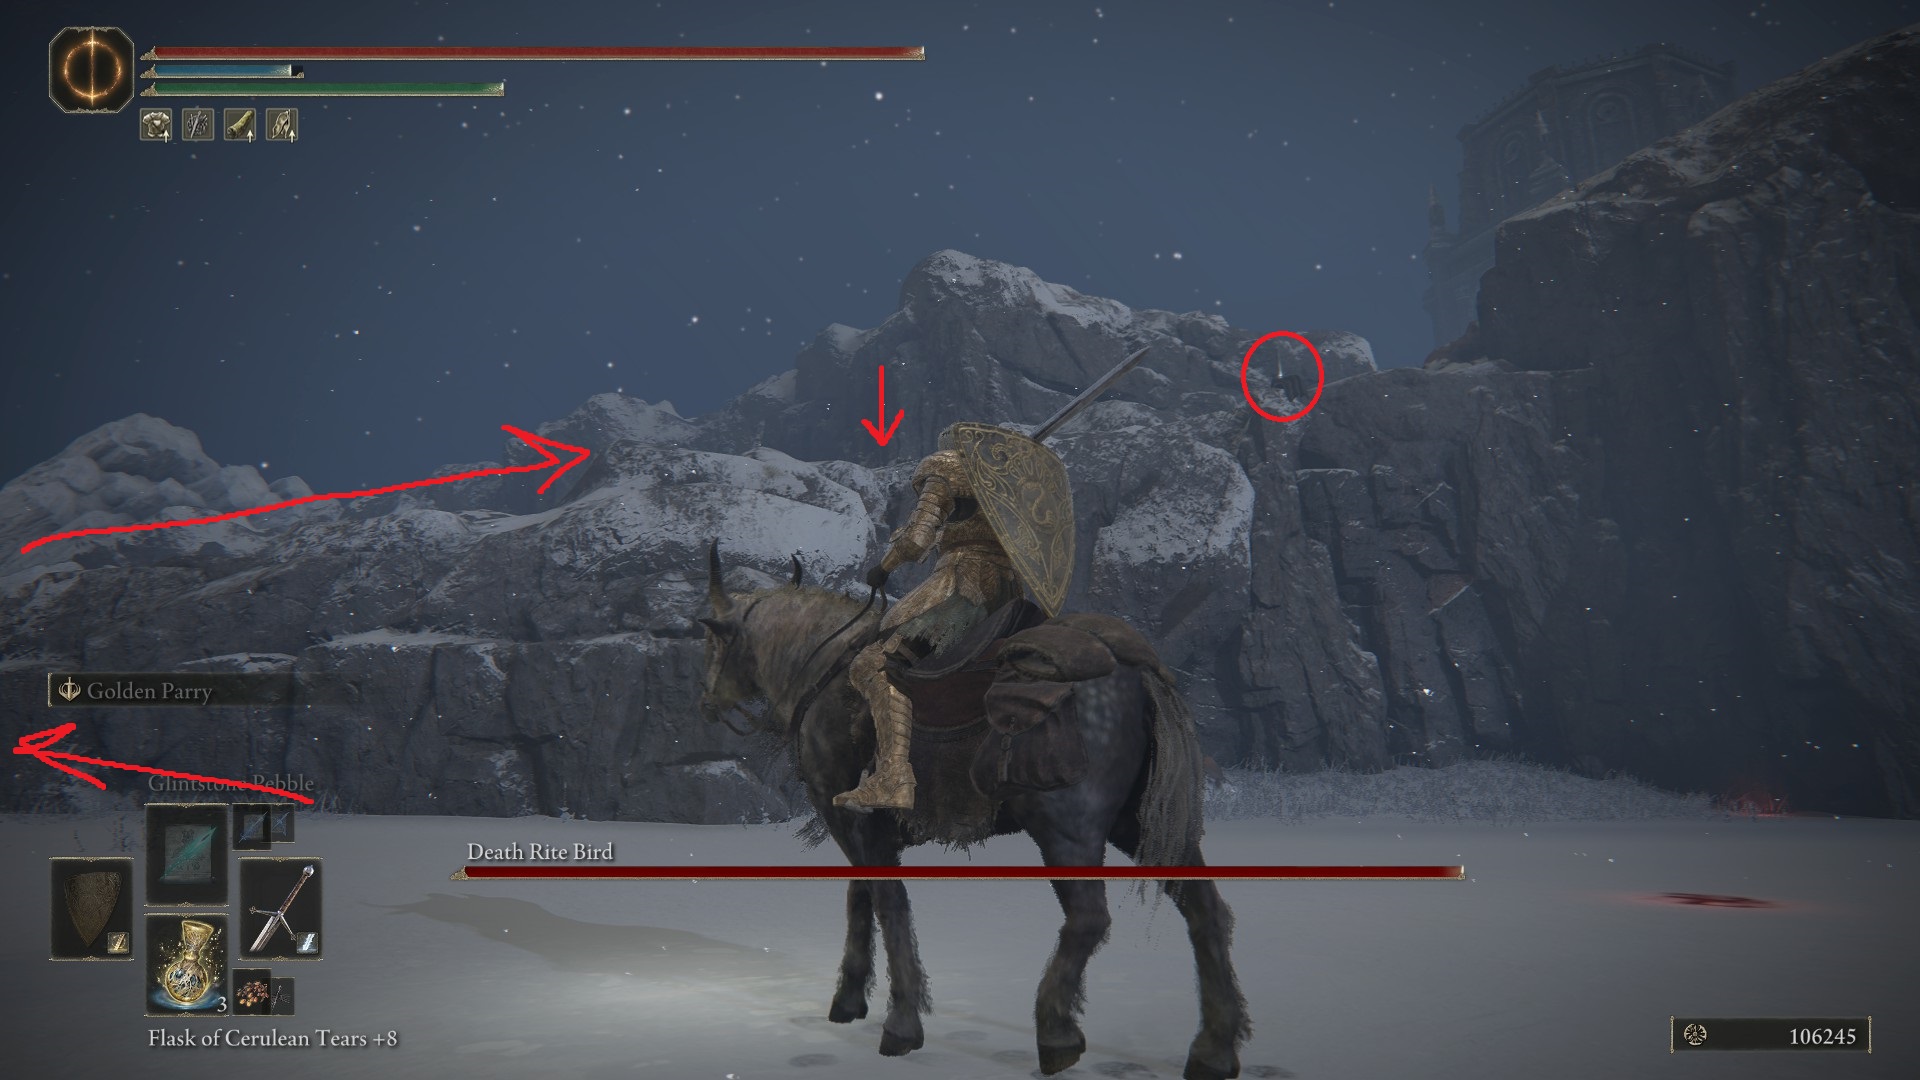
Before you leave — assuming you want to fight a Death Rite Bird — pass time until night at the site of grace. If you want, you can pick up a number of Trina’s Lilies from around the tree northeast of the church. Then ride east, and you’ll find a corpse in a chair on the edge of the cliff, keeping a Somber Smithing Stone [9] nice and safe for you. Grab it, say thank you, and then follow the cliff south for a bit, until you can drop down to a lower cliff. You should land on a corpse that’s being inspected by a couple of land octopuses.
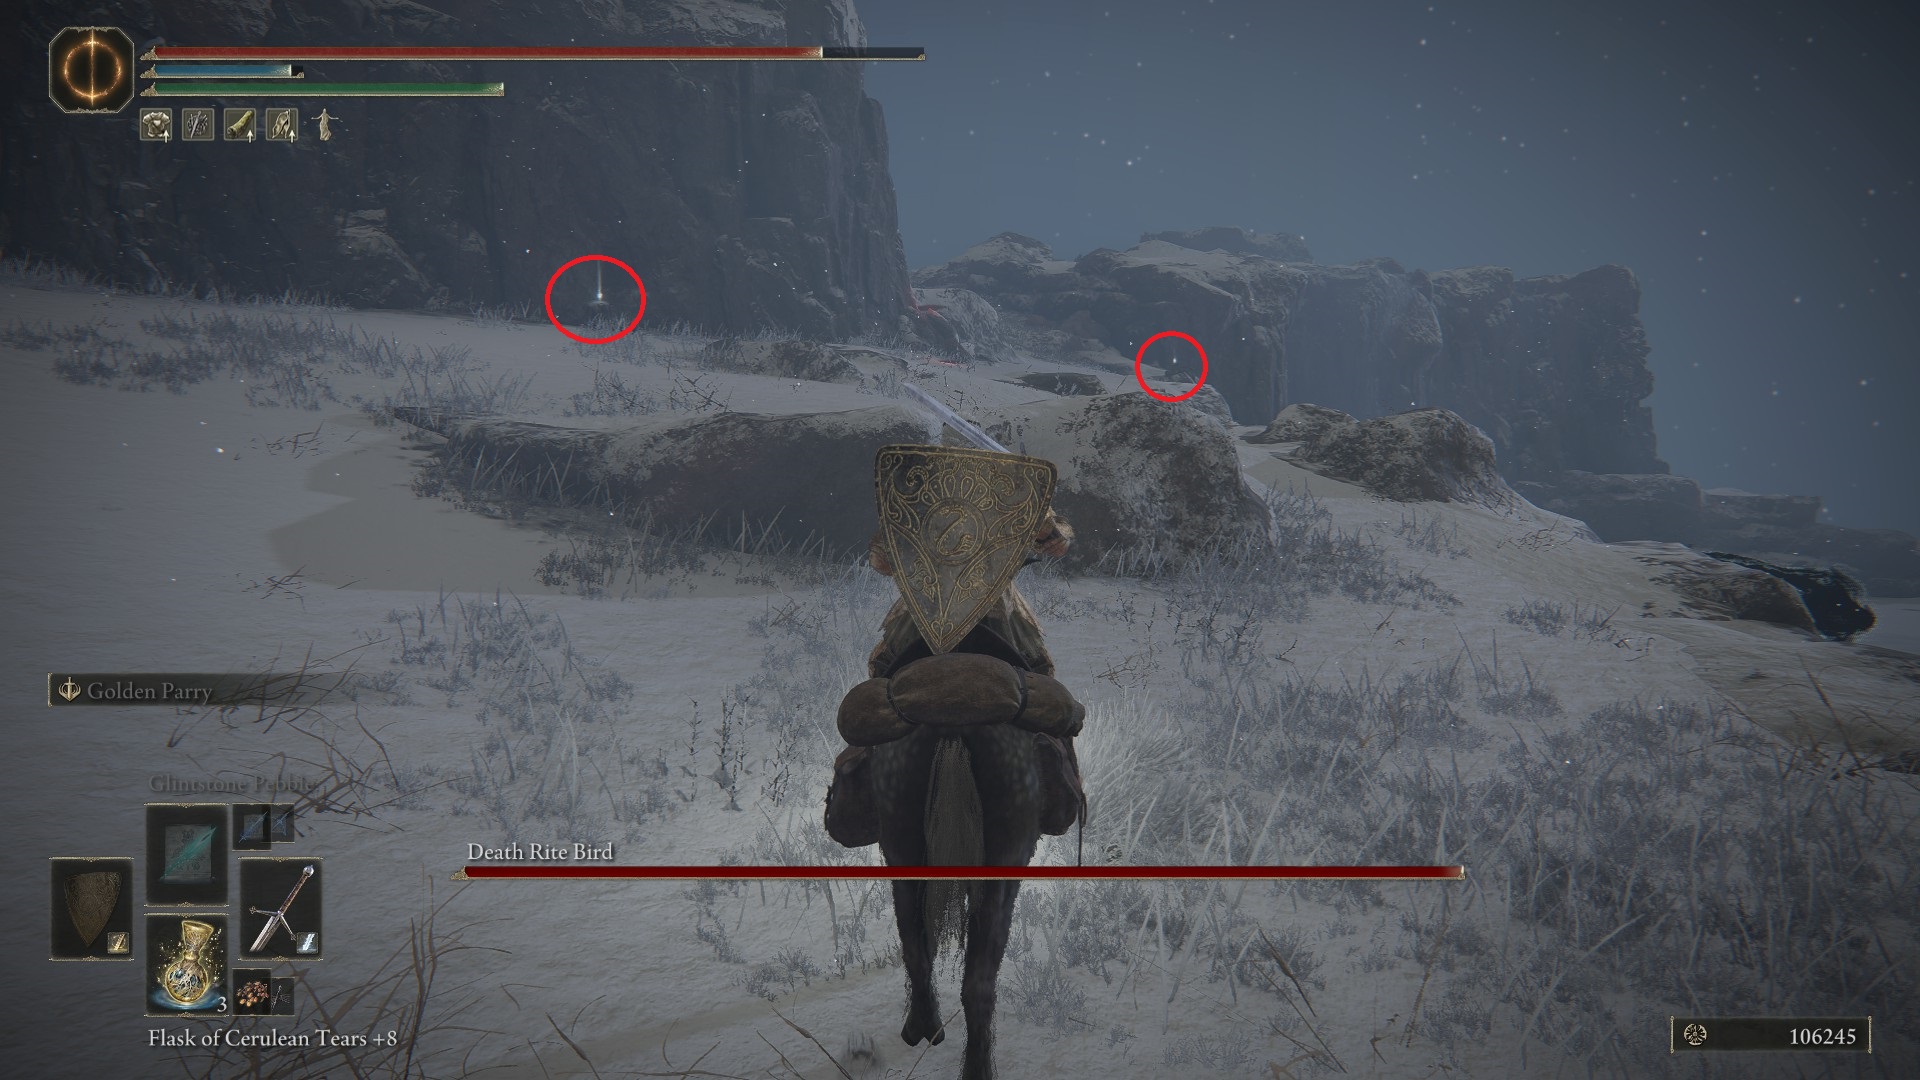
Pick up the Golden Rune [13] and then follow the narrow path south-southeast and then south. You’ll come out into an open area where the frozen river ends — once you near the ice, the Death Rite Bird will appear above the river to the southwest. The reward for defeating this spooky boid is 220,000 and the Explosive Ghostflame sorcery.
After defeating the bird, you can pick up a Golden Rune [7] and a Golden Rune [12] from two corpses on the cliff above you to the west — you’ll need to go south a bit and then head uphill, back towards the church to grab them.
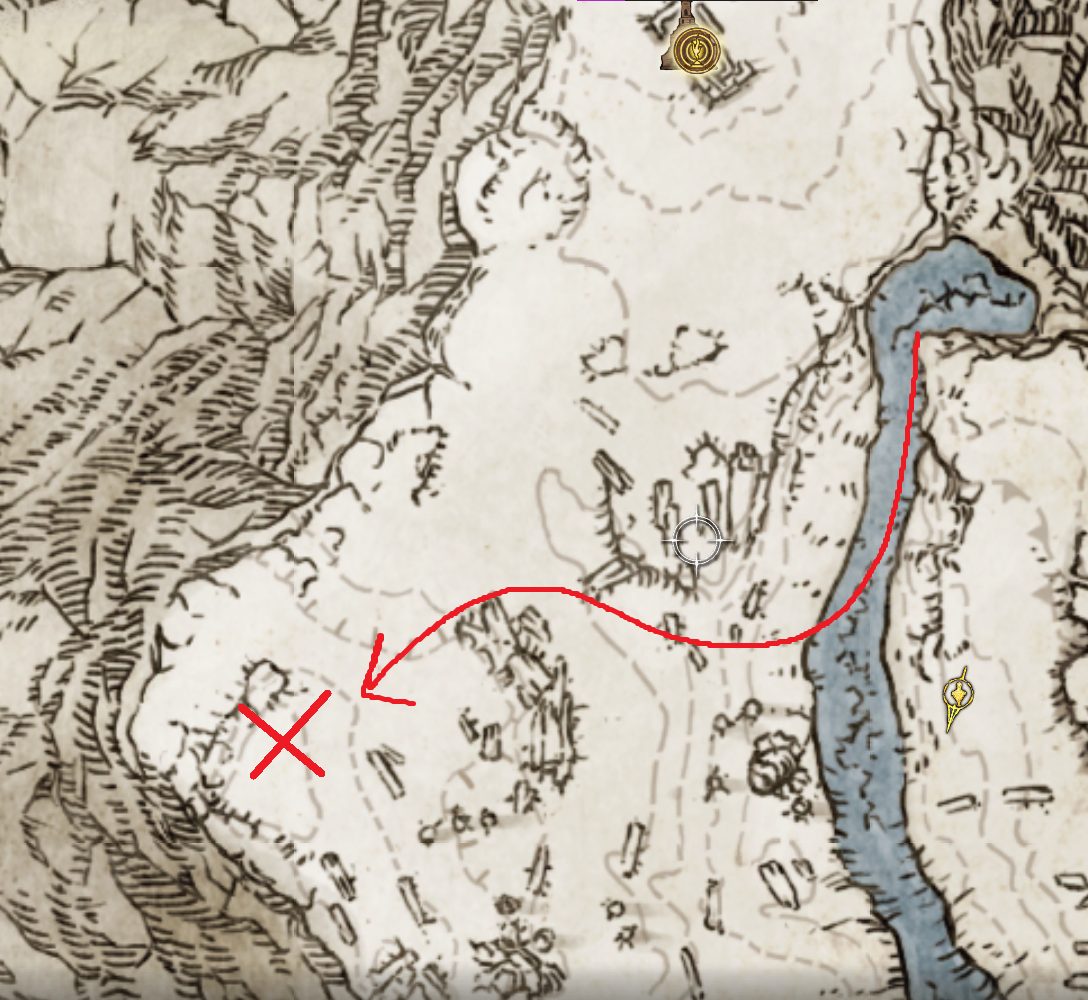
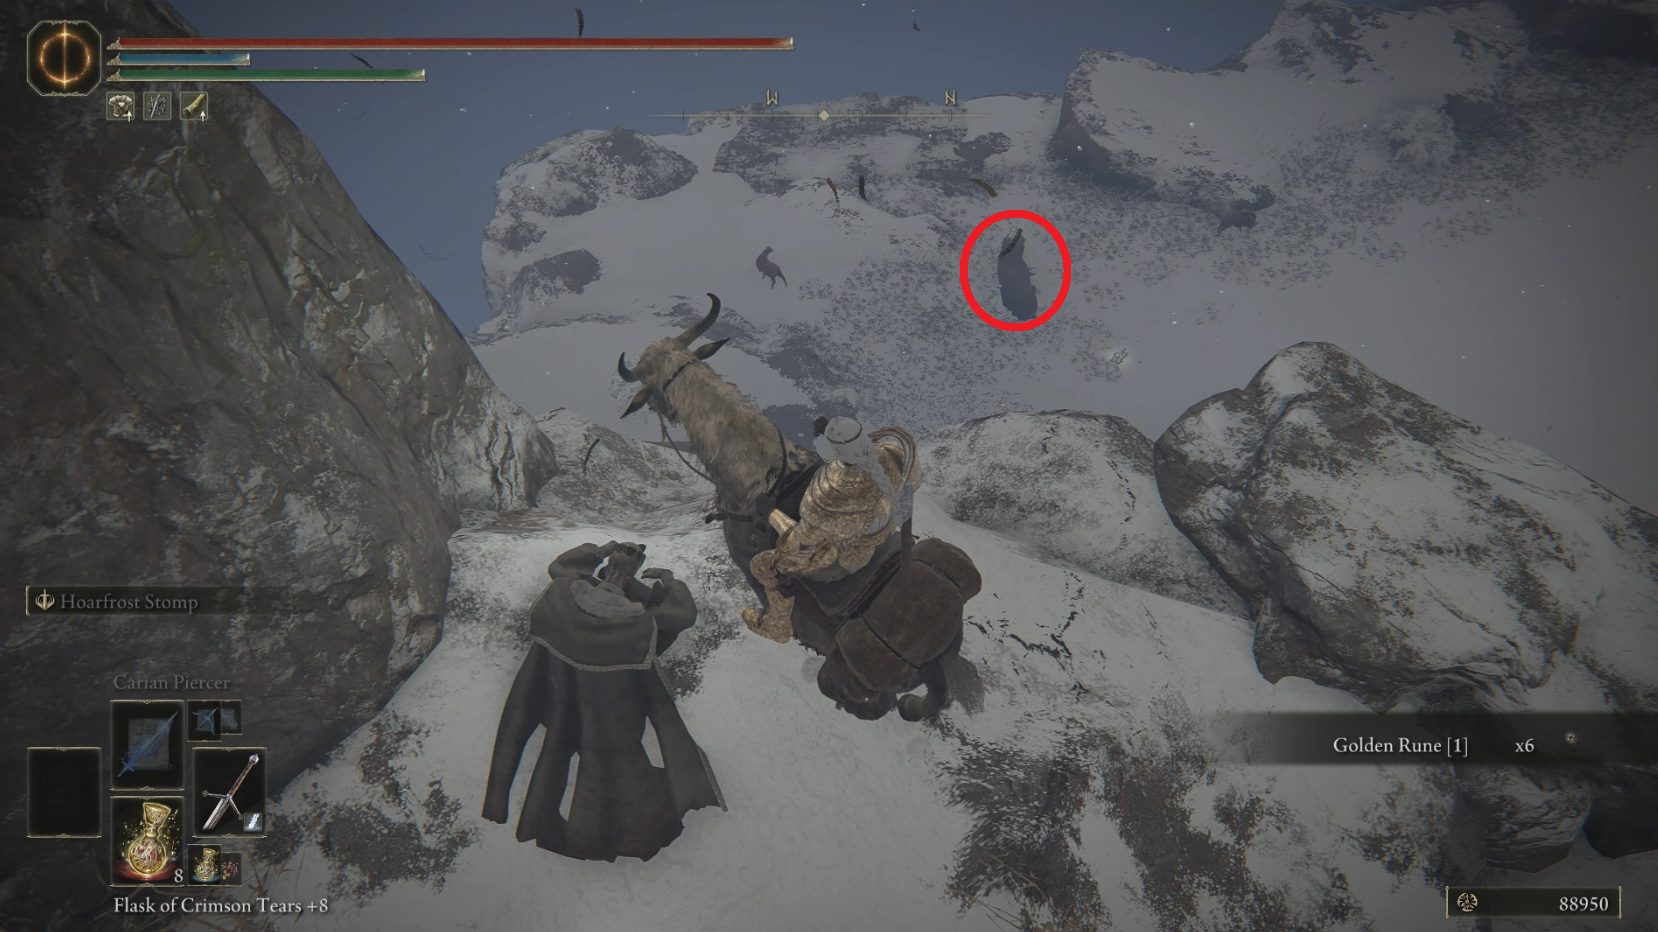
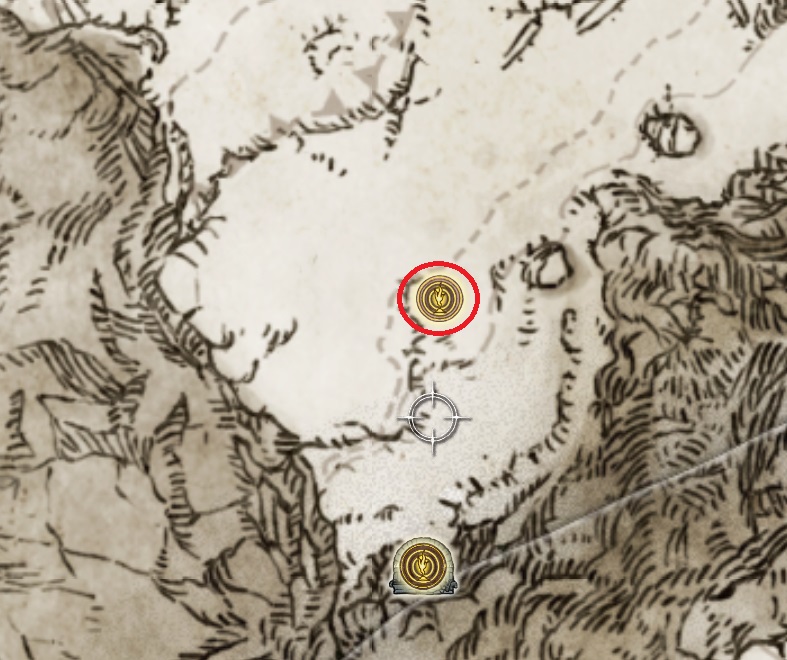
Next, open your map, set a beacon as indicated below, then head that way. You’ll find two things at the marked location: a rune bear (don’t get near it yet) and a corpse on the edge of the cliff with x6 Golden Rune [1] (could this be a fat coinpurse…?). From the corpse, look northwest over the edge of the cliff — on the ground below is a statue that the rune bear can break for you. Go aggro the rune bear, and then lead it down to the corpse by riding north, then making a leftward U-turn to go southwest to the statue.
Stand behind it and wait — if you rode fast enough, the rune bear will do a ranged roar attack (breaking the statue) and then start walking back to where it started. Otherwise, you’ll have to wait for the bear to do a melee attack near the statue, then avoid the rune bear as you collect the x3 Smithing Stone [7] and the Smithing Stone [8] from the remains of the statue.
Once you’re out of the bear’s aggro range, you can open your map. If you have the Sentry’s Torch already, you can teleport to the Ordina, Liturgical Town site of grace. Otherwise, you’ll need to purchase it from the Hermit Merchant in the Capital Outskirts (see map location). Don’t worry if you don’t have the requisite faith — it will work for what we need it for regardless. Once you have the torch, you can teleport to Ordina.
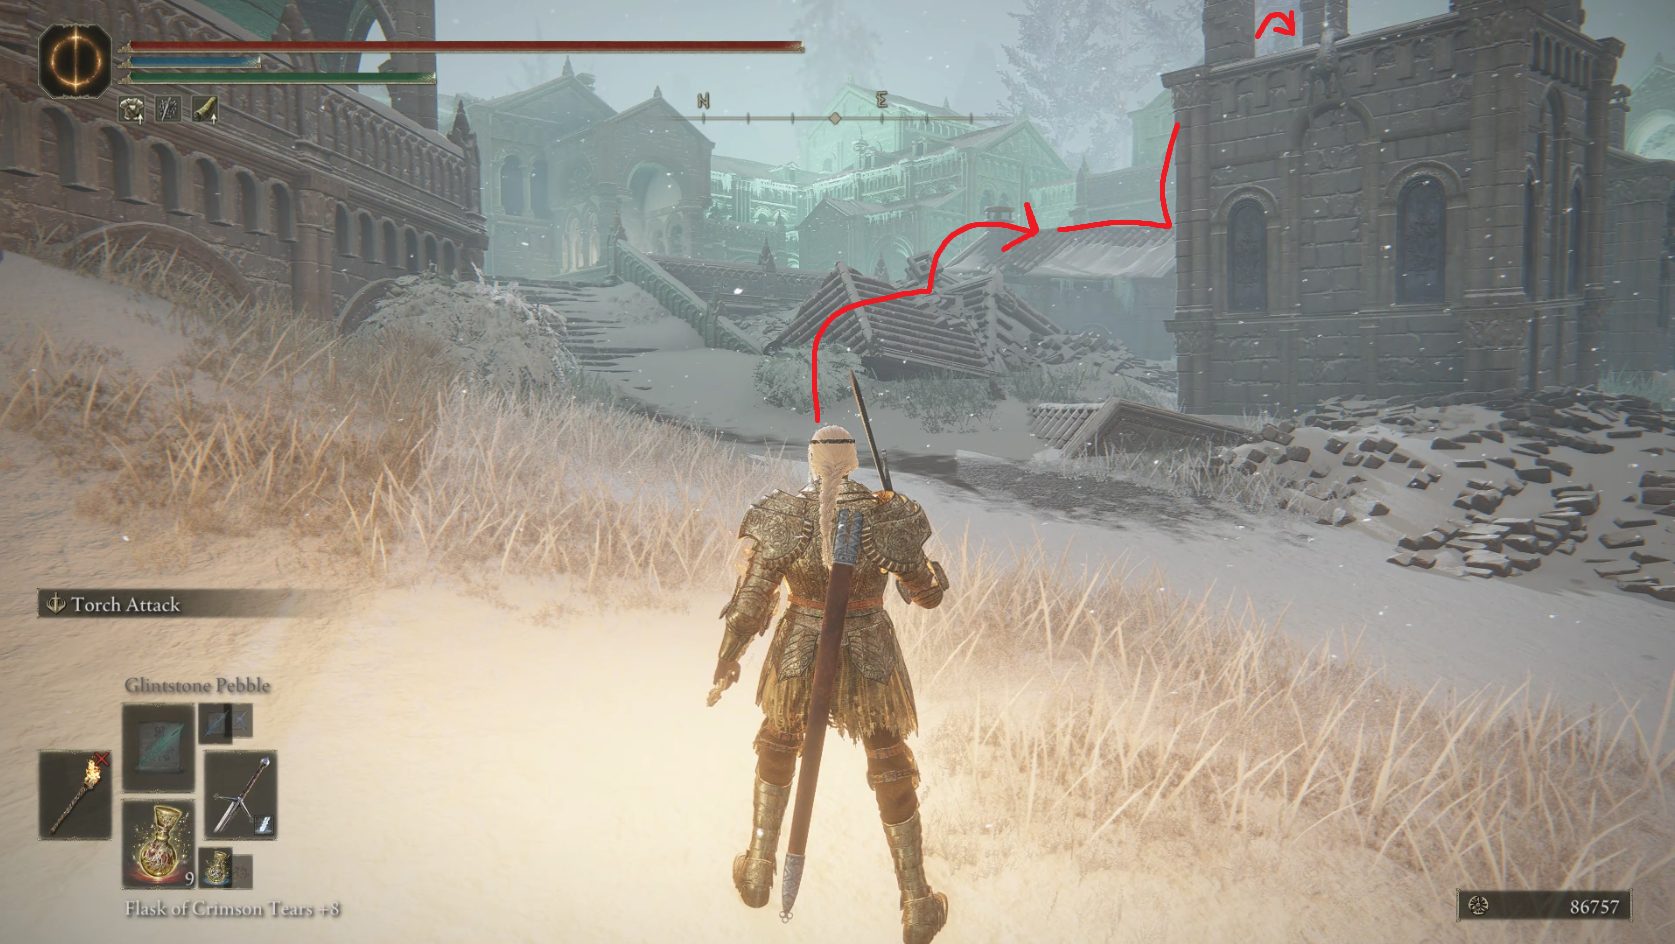
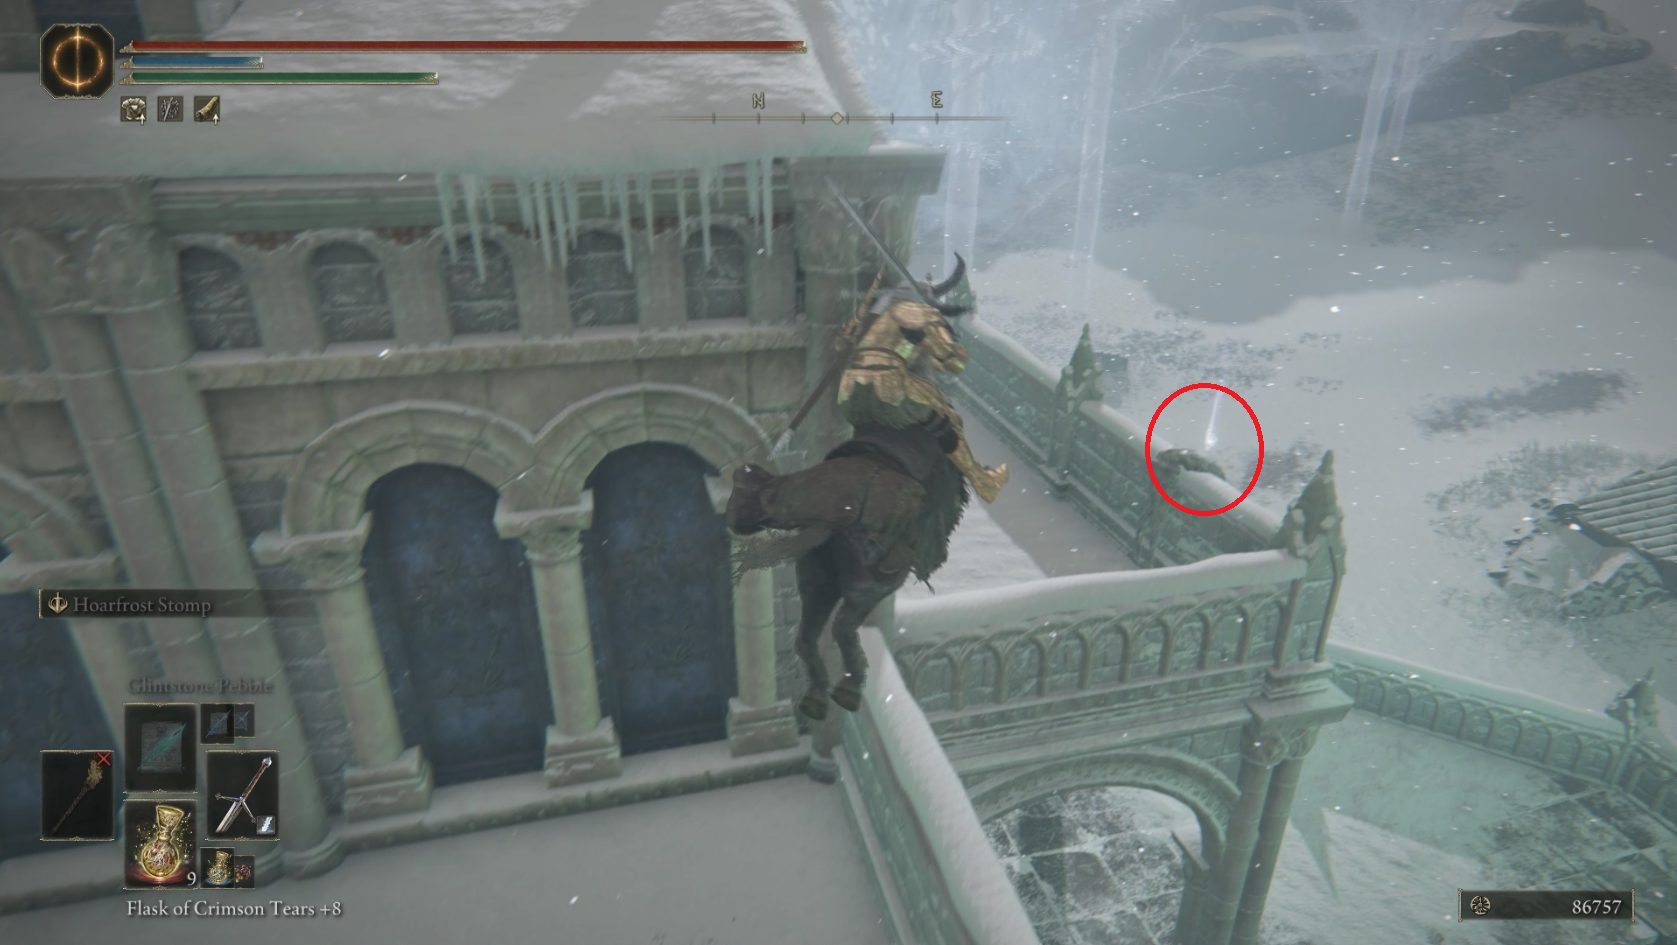
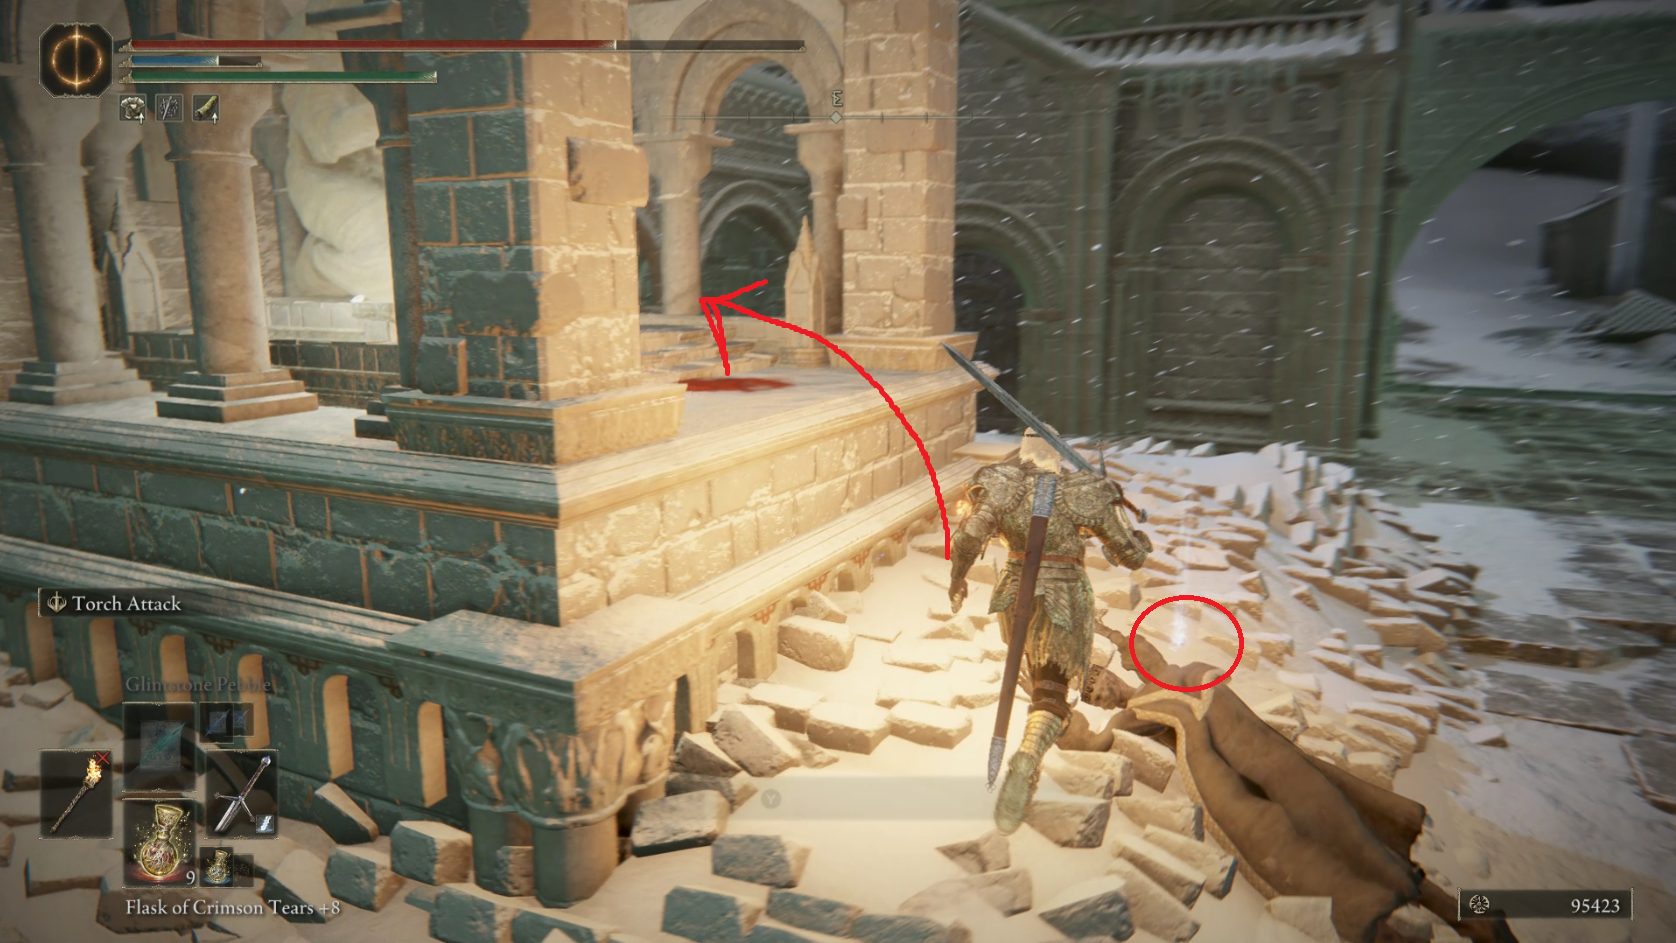
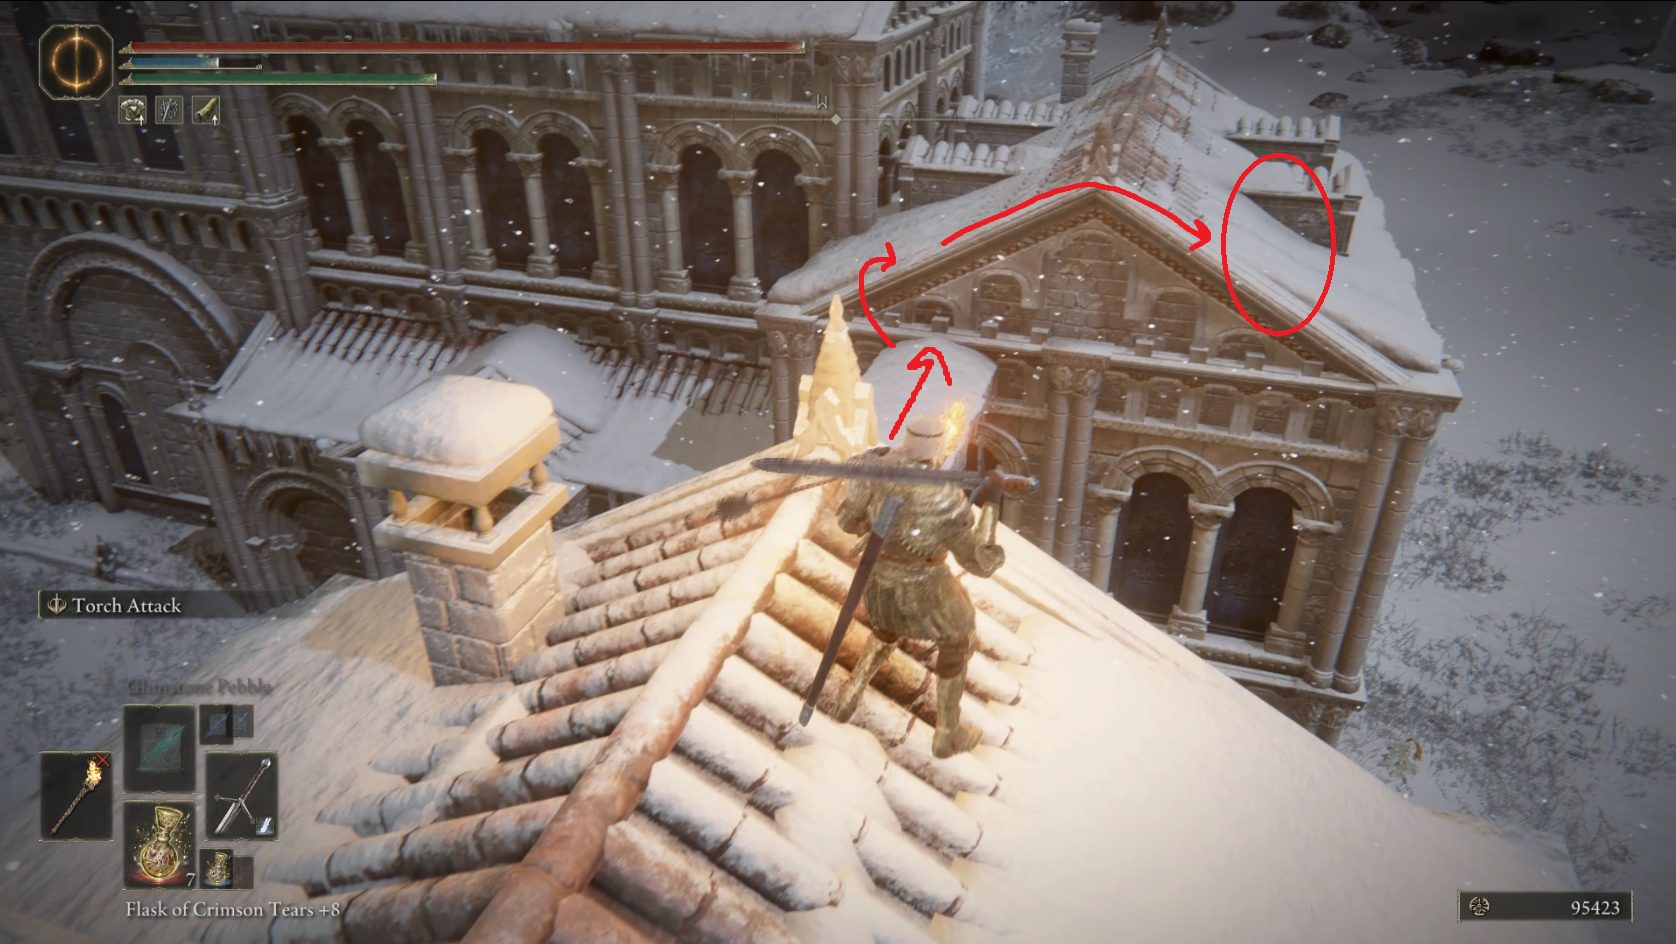
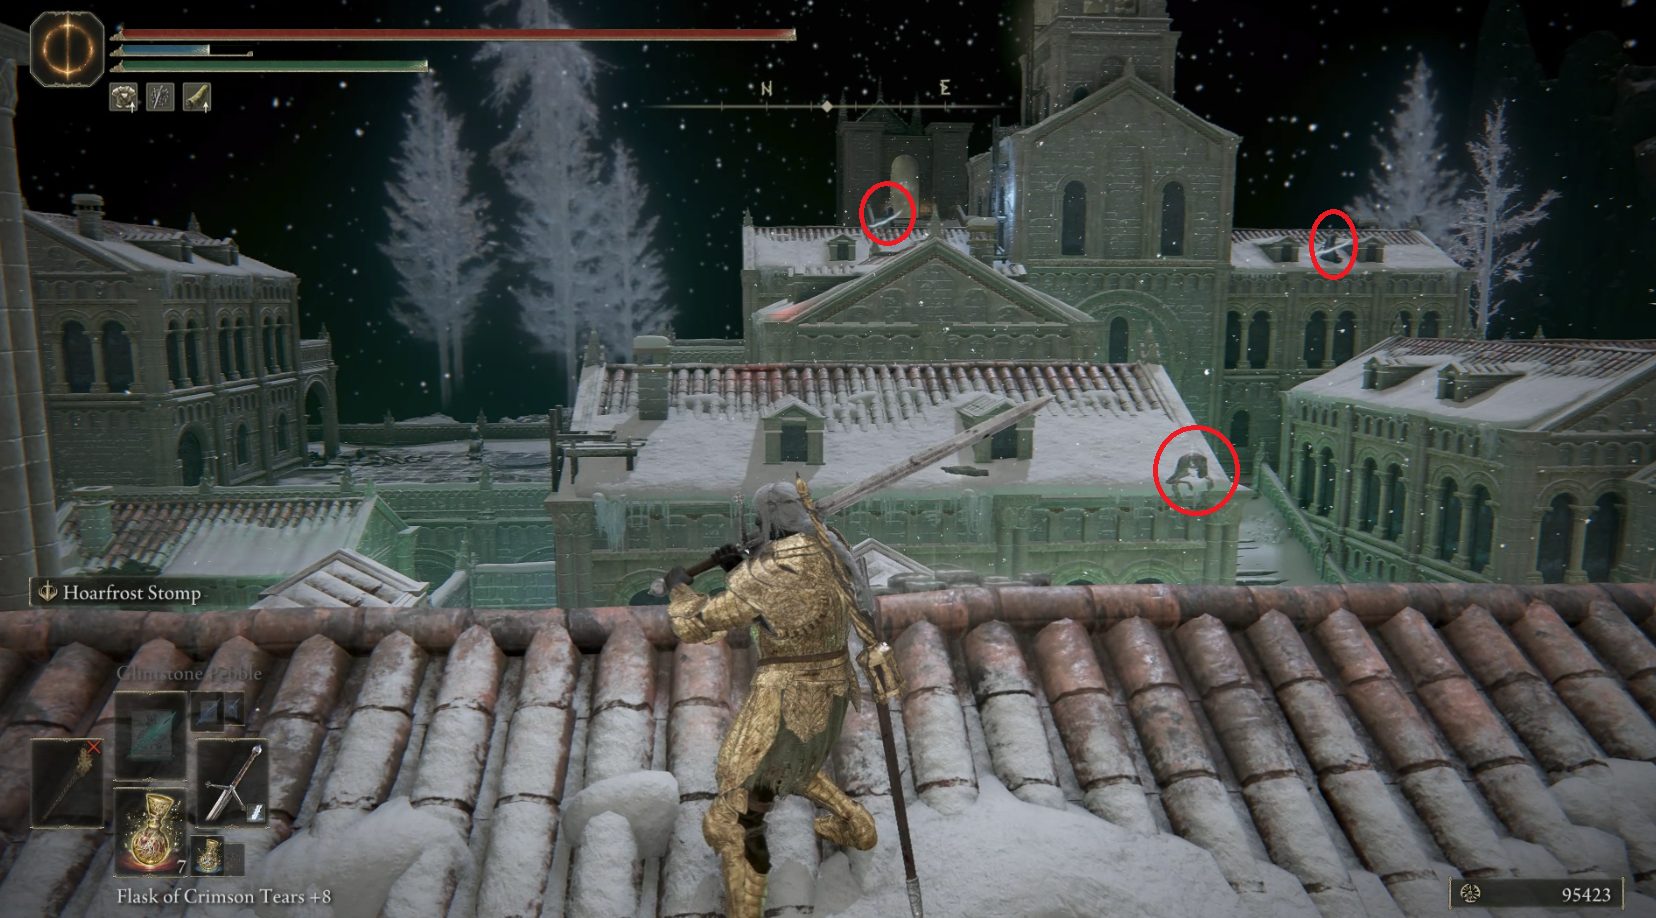
Once you’ve teleported, on your right you’ll see a corpse slumped over the edge of a rooftop — you can reach this item by using Torrent and jumping onto the nearby building, and from there double-jumping west-southwest onto the roof with the corpse. Grab the x8 Cuckoo Glintstone, then jump east-southeast onto the nearby roof. You can then jump to the balcony further east (if you have trouble reaching this balcony, you can jump to the one on the left, and from there to the target balcony). Finally, head to the eastern end of the target balcony and jump around the corner to the next balcony, where a corpse holds a Rune Arc.
The arrow indicated the balcony jump is specific — if you don’t approach from the balcony’s short side, the jump is hard to pull off
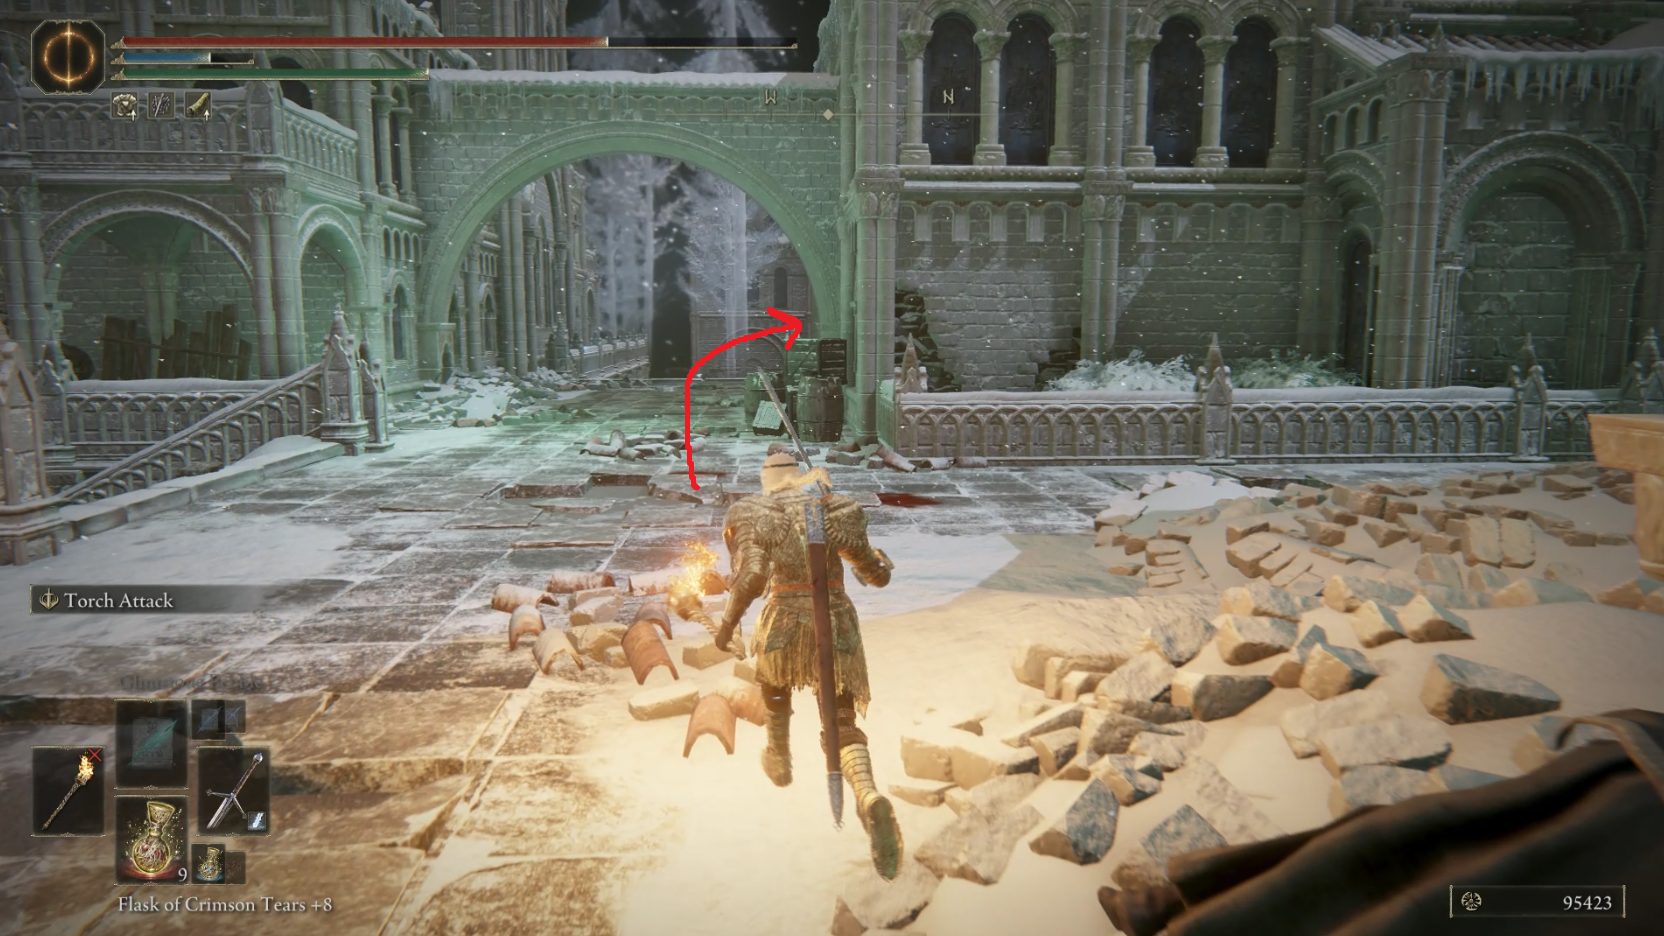
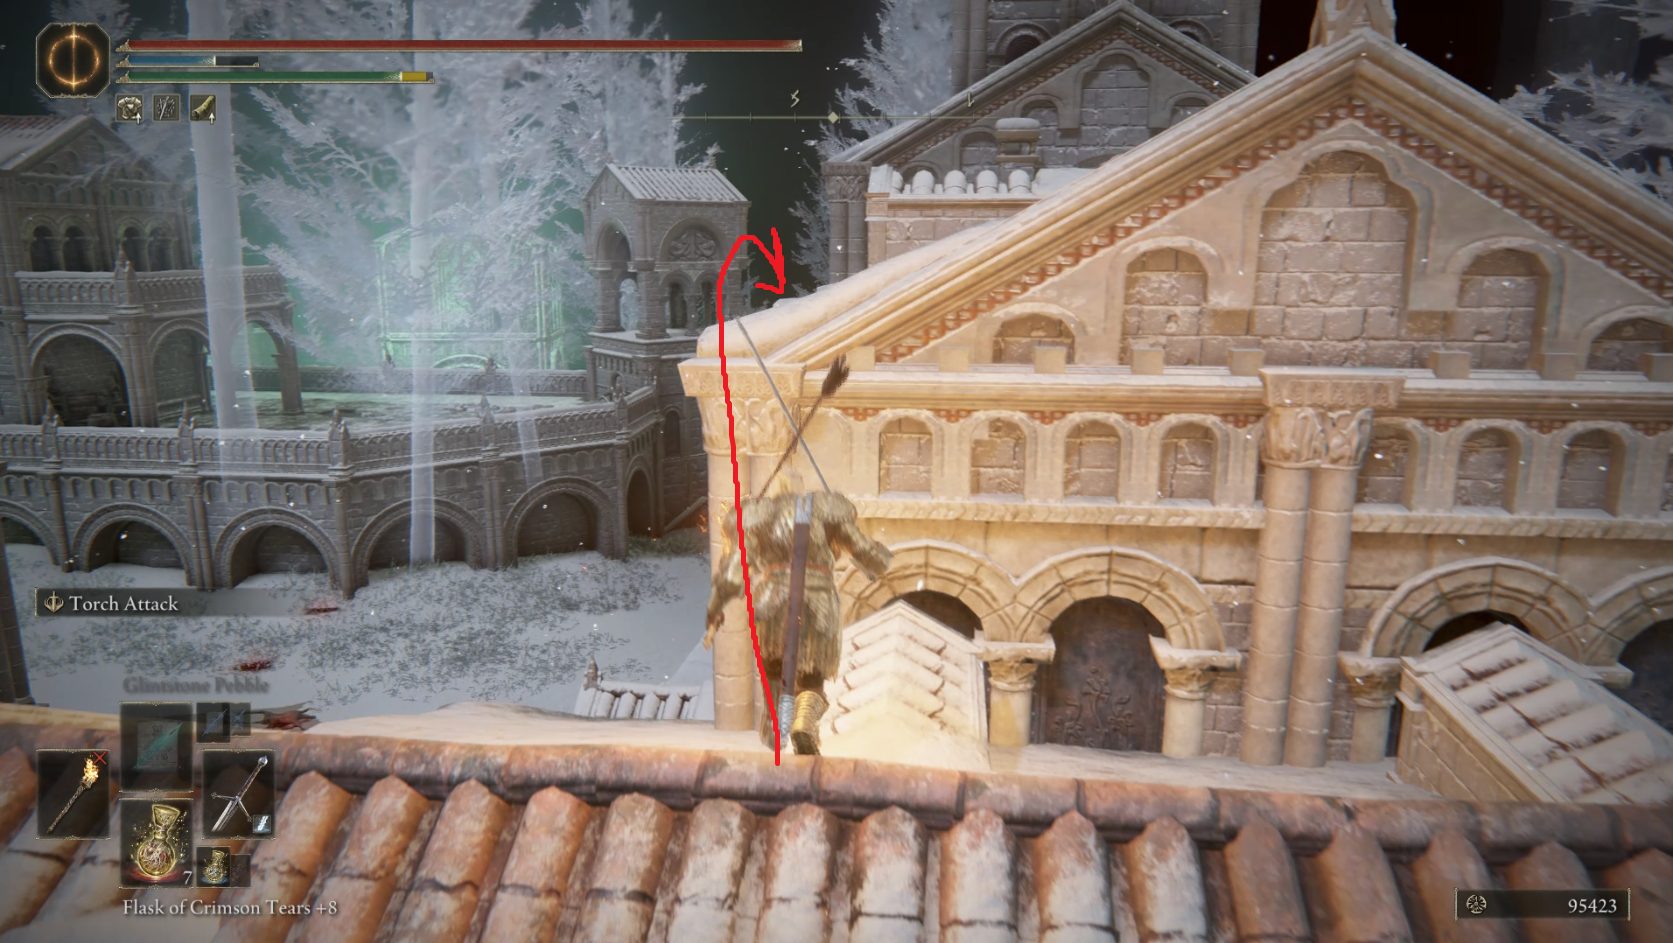
Jump off of the balcony and go beneath it, where a corpse next to some barrels has x3 Hefty Beast Bone. Next, ride northeast out of town to the edge of the cliff, then turn left and ride northwest towards the arches under the stairs. Under the smallest arch (the one on the far left) you’ll find the corpse of a Black Knife Assassin — loot it for the Black Knife Set, then continue west-northwest under the stairs. Keep going this direction until you can turn left and enter the town again.
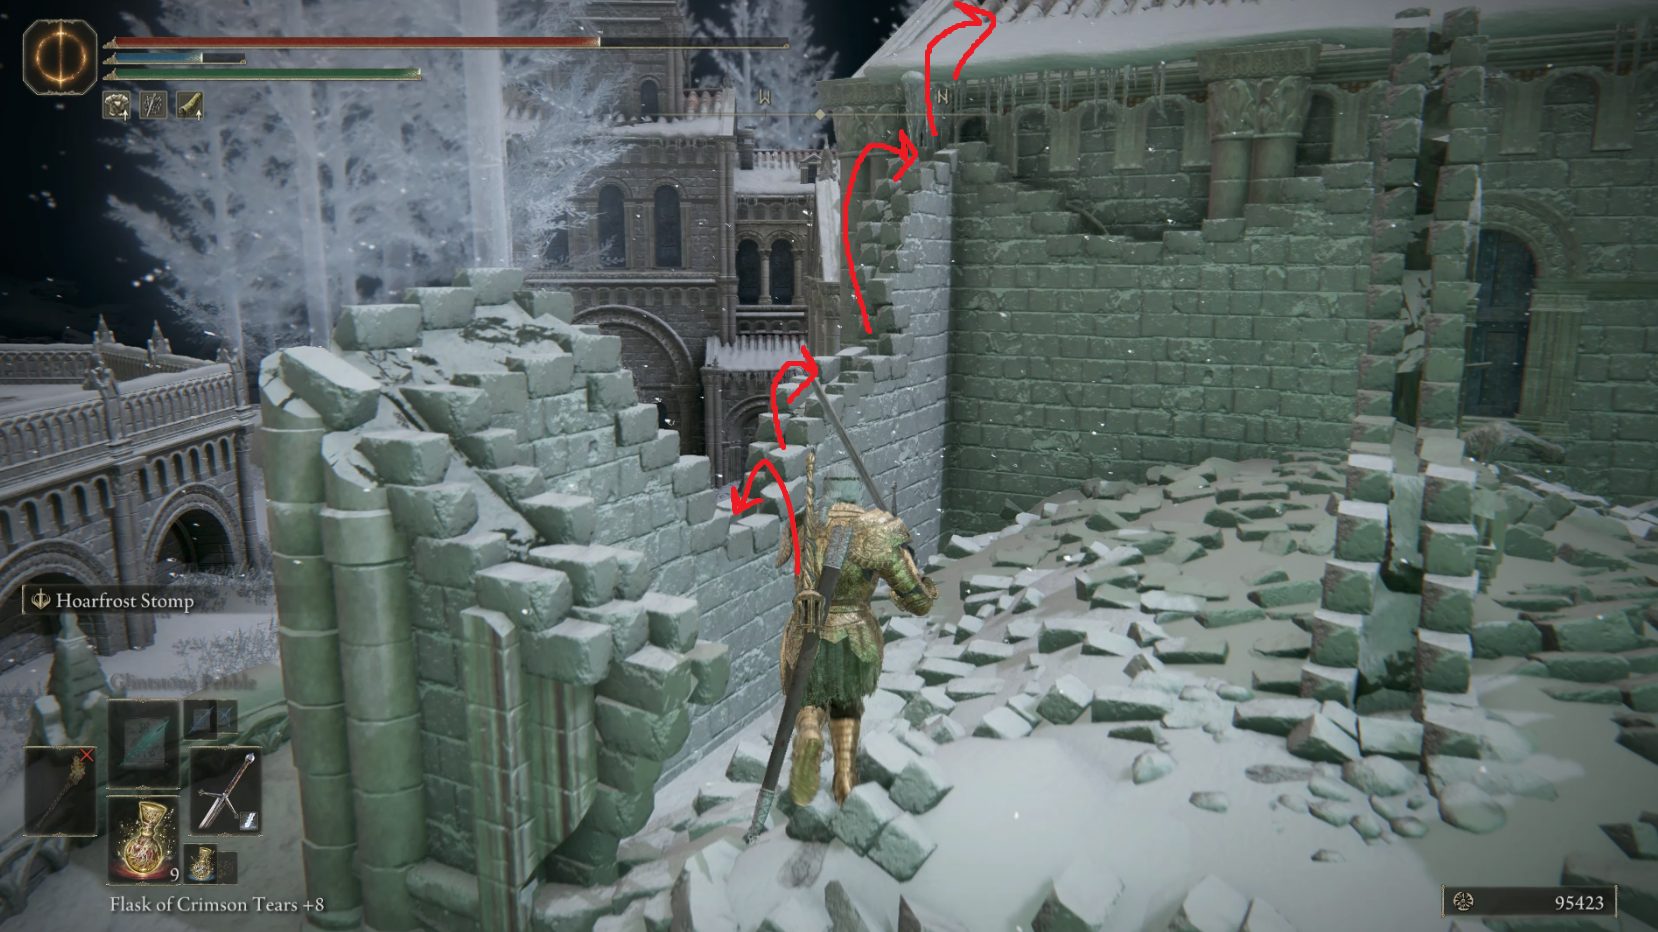
Head through the arch and you’ll find a corpse on the ground with x2 Freezing Grease. From the corpse, go east-southeast up the stairs, and then turn around and look northwest. There’s a ruined building here, and hidden in a corner (path 1 below) is a Golden Rune [13]. Then jump up onto the roof (path 2) — on the far side is a corpse with a Golden Rune [13].
Loot the corpse and then jump to the roof to the east, and from there it’s another easy jump northeast to the evergaol. Equip the Sentry’s Torch in your off-hand, and when you’re ready, go ahead and enter the evergaol — you’ll be transported to another, more dangerous version of the town.
This area is populated by invisible Black Knife Assassins, so don’t stray off the path described below, unless you want to farm Ghost Glovewort [9]. The Sentry’s Torch will reveal the assassins, but they’re still very tough enemies. Fortunately, the path we’re going to take only has one that we have to fight, and it doesn’t respawn. You may also want to equip one piece of the Briar Set (like the gauntlets or greaves) before entering the evergaol.
Make sure your torch is in your hand, then head southeast until you reach a staircase. Go down the stairs slowly, and your torch should reveal a Black Knife Assassin patrolling the path at the foot of the stairs. Once the assassin is revealed, you can two-hand your weapon if you want — as long as the torch is still selected in your off-hand weapon slot, the assassin will stay visible (if you swap to another off-hand weapon, it will disappear).
This can be a hard fight, but there are a few things you can do to make it easier. Equipping a piece of the Briar Set will make your rolls interrupt the assassin, which is very helpful. Ranged characters should fight the assassin in the narrow area at the top of the stairs, as this will allow ranged attacks to land more often. For melee users, heavy jumping attacks are (as always) effective, and you can often stun-lock the assassin by chaining them. These assassins appear to have similar movesets to Alecto, so our guide on that boss may be of some use if you struggle to kill this foe.
Once the assassin goes down, go down the stairs if you haven’t yet, then turn left (east), loot the Golden Rune [10] from the corpse, and then jump up into the shrine that contains a statue of a woman holding a candle.
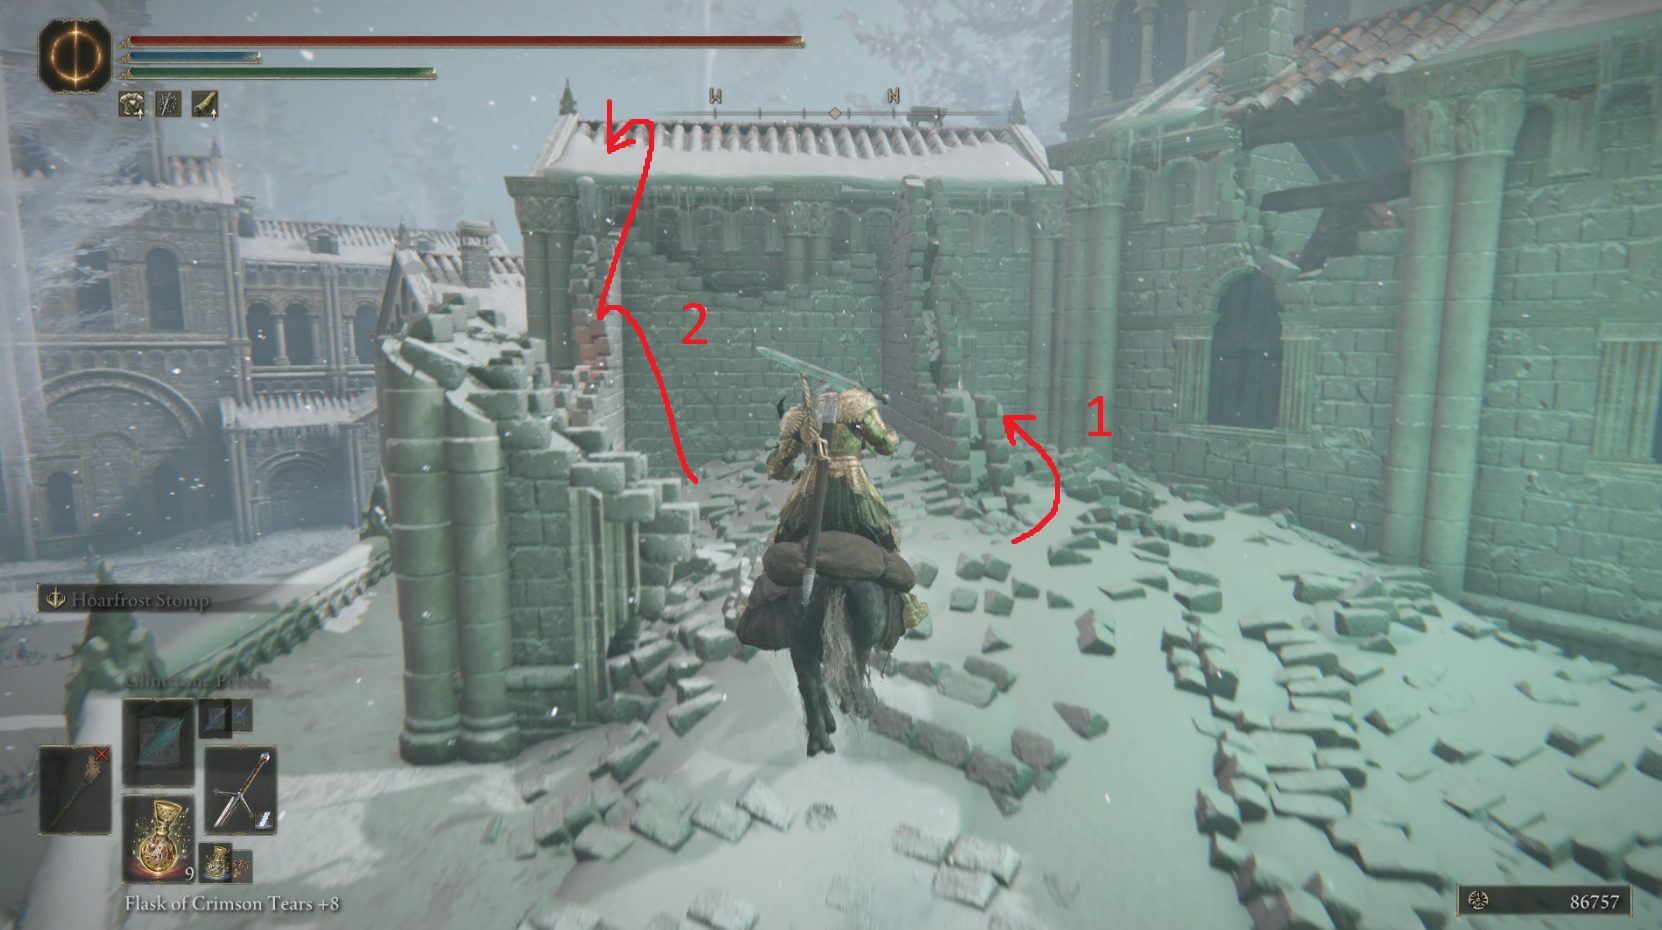
Light the flame, then hop back out of the shrine and head west-northwest through the arch, then turn slightly right and head to the ruined building to the right of the stairs(1) — we’re going to jump up on the same roof as we did to reach the evergaol. This time you won’t have torrent to help you, so you’ll need to jump onto the lowest point of the broken wall, then make your way up onto the roof (2).
(1)(2)
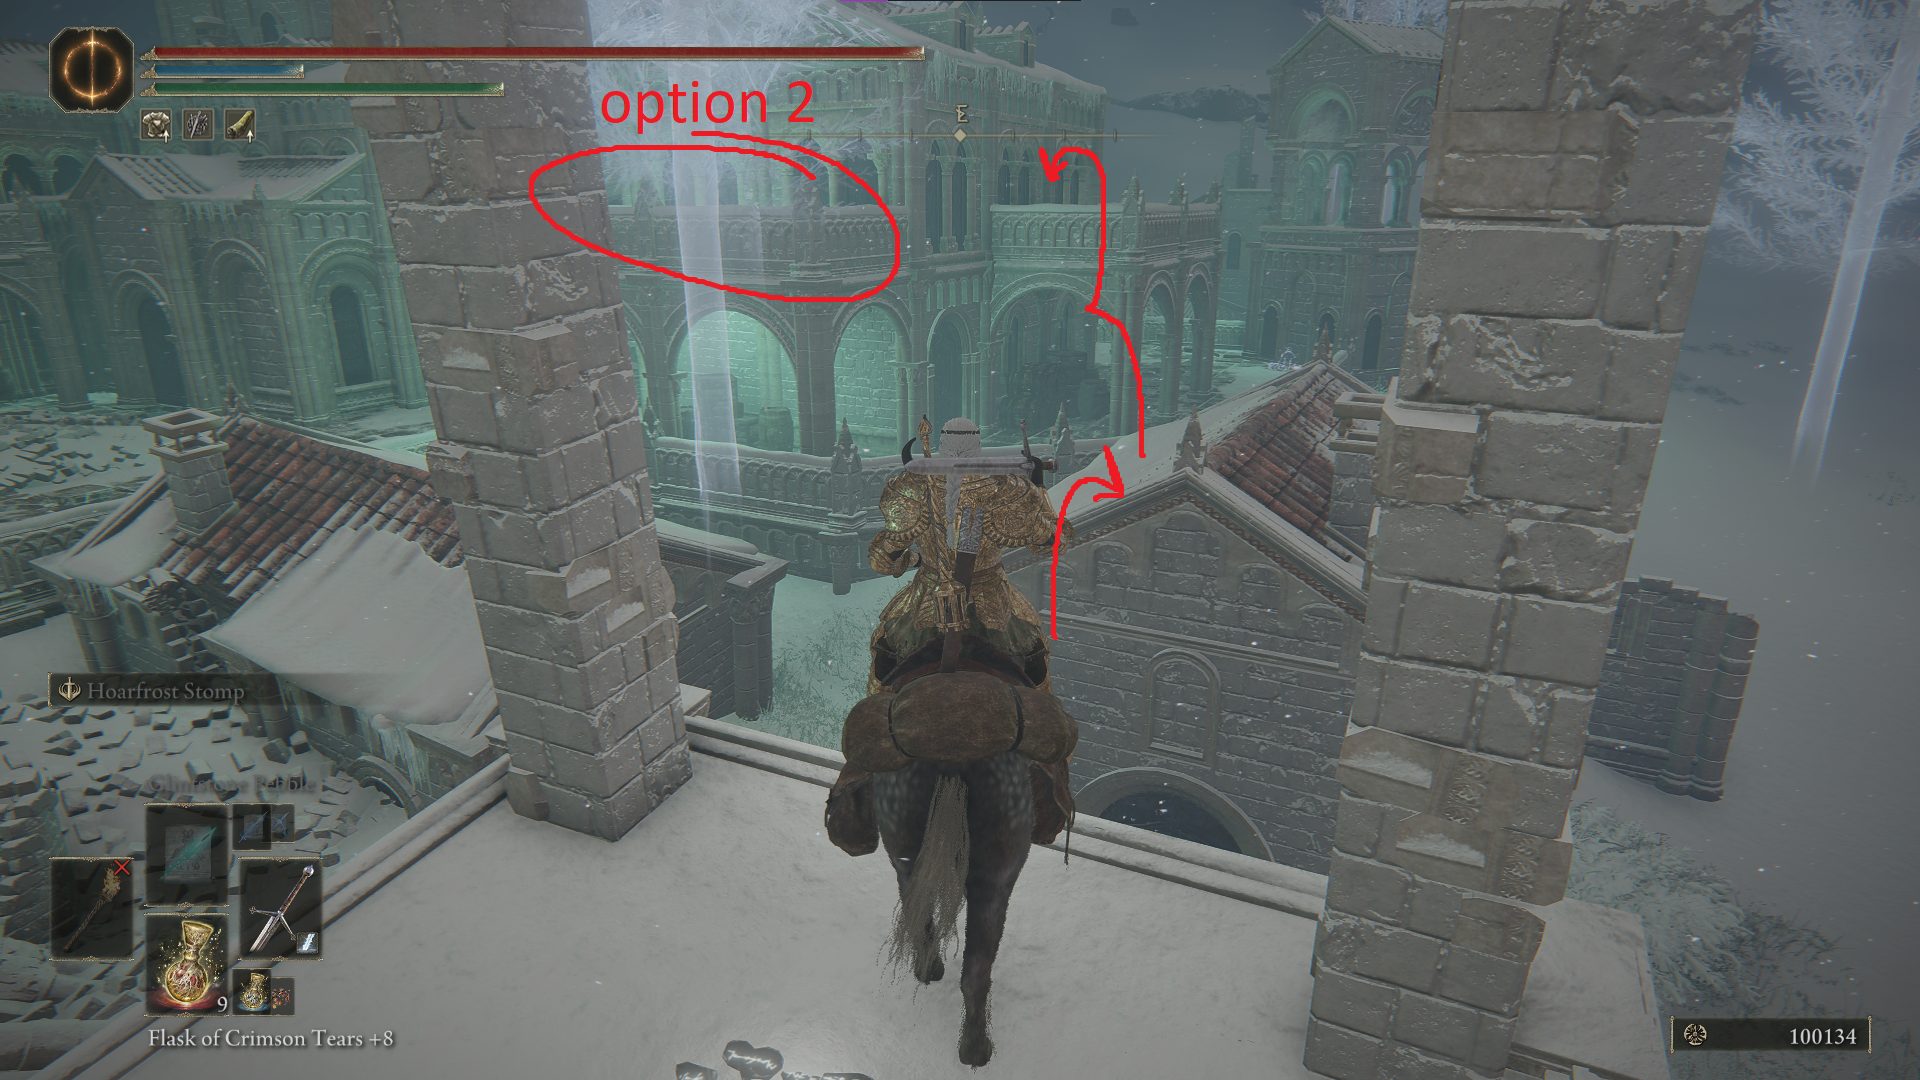
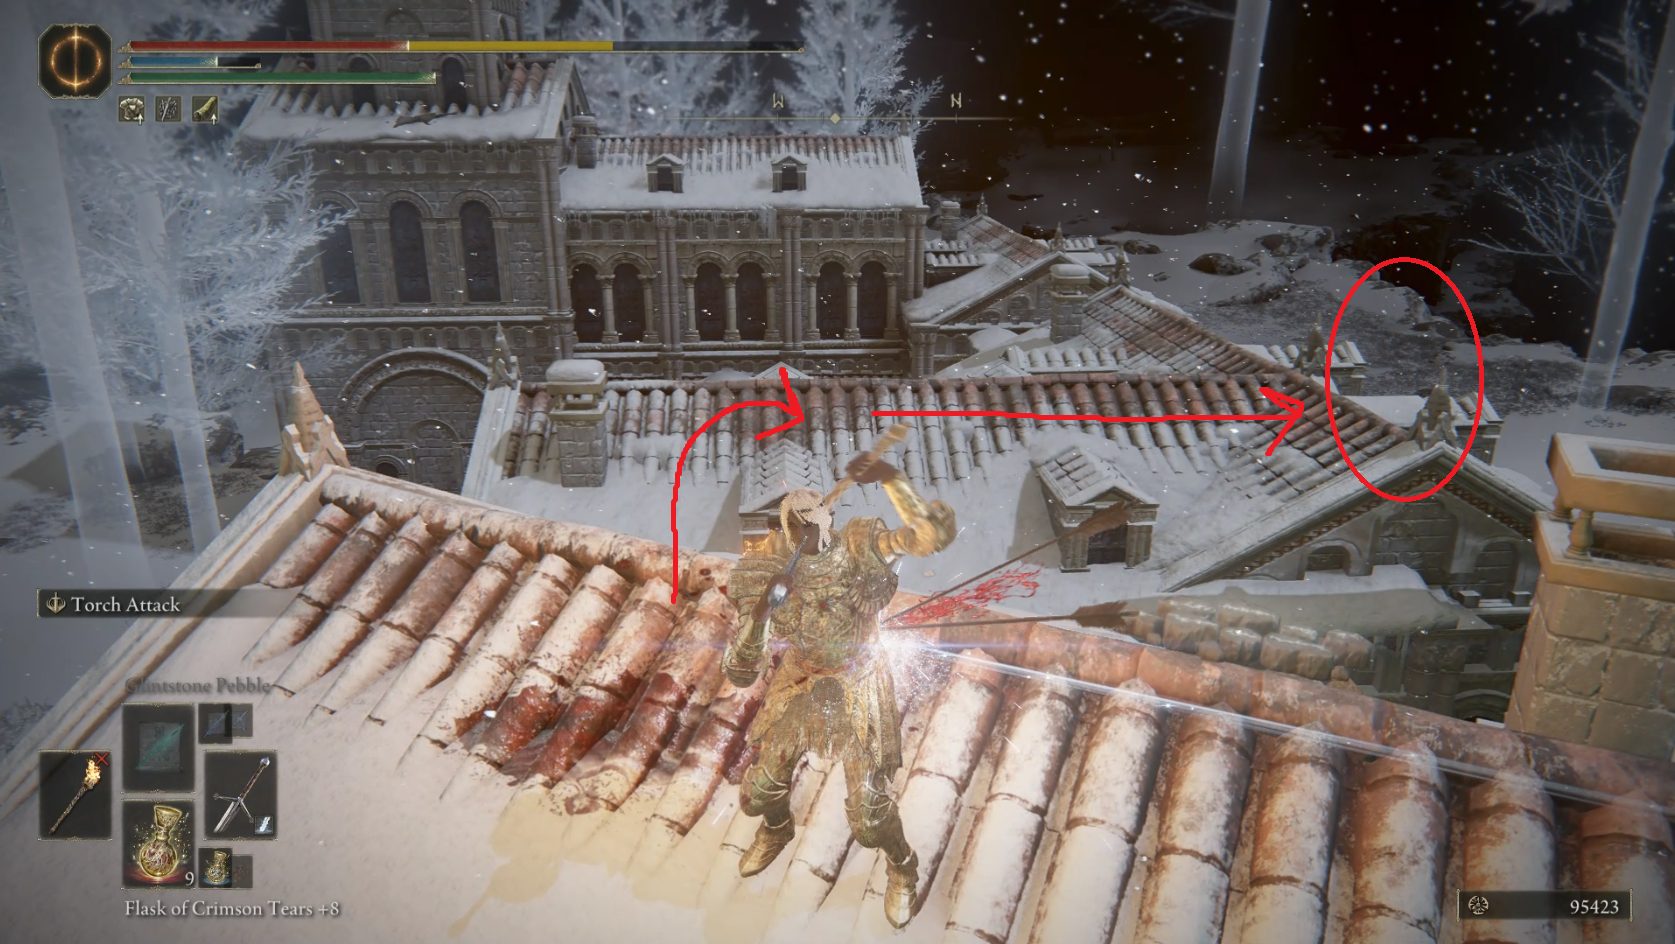
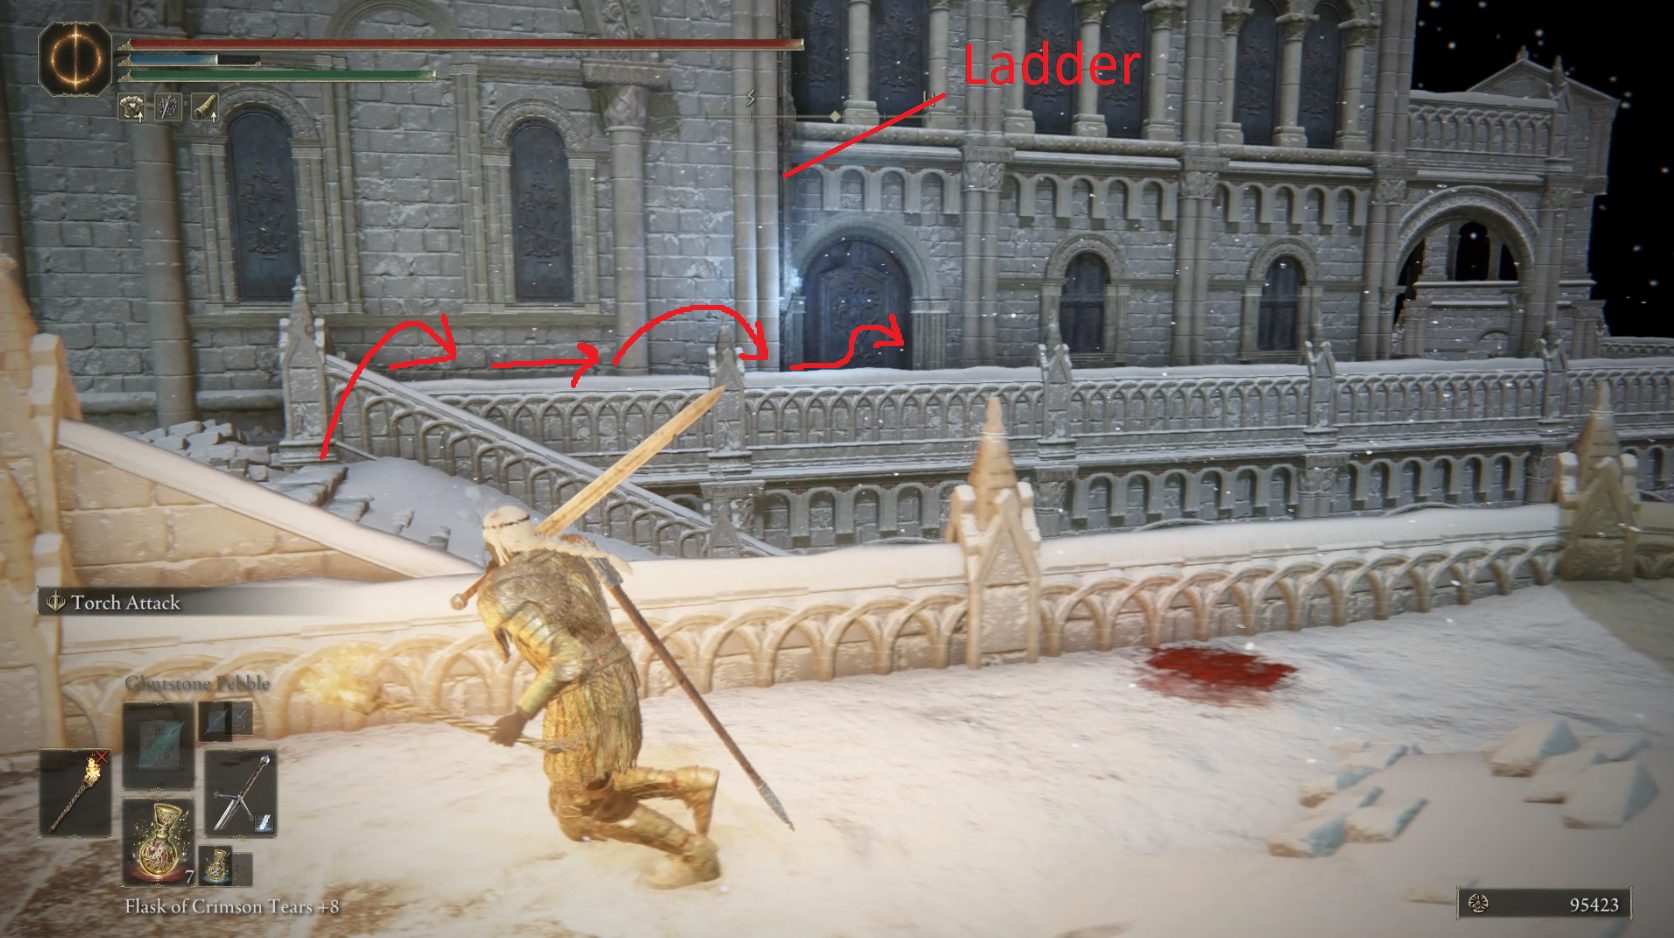
Once you’re up on the roof, you’ll need to move quickly, as you’ll come under fire from archers behind you. Kill the albinauric archer on the other side of the roof, and then get a running start and jump northwest to the next roof and make your way to the circled area (1), where you’ll be safe from the distant archer. Continue northwest and make your way to the right-hand side of the next roof (2). Then get a running start and jump south-southwest, from the highest point of the roof you’re on to the lowest point of the roof ahead (3).
(1)(2)
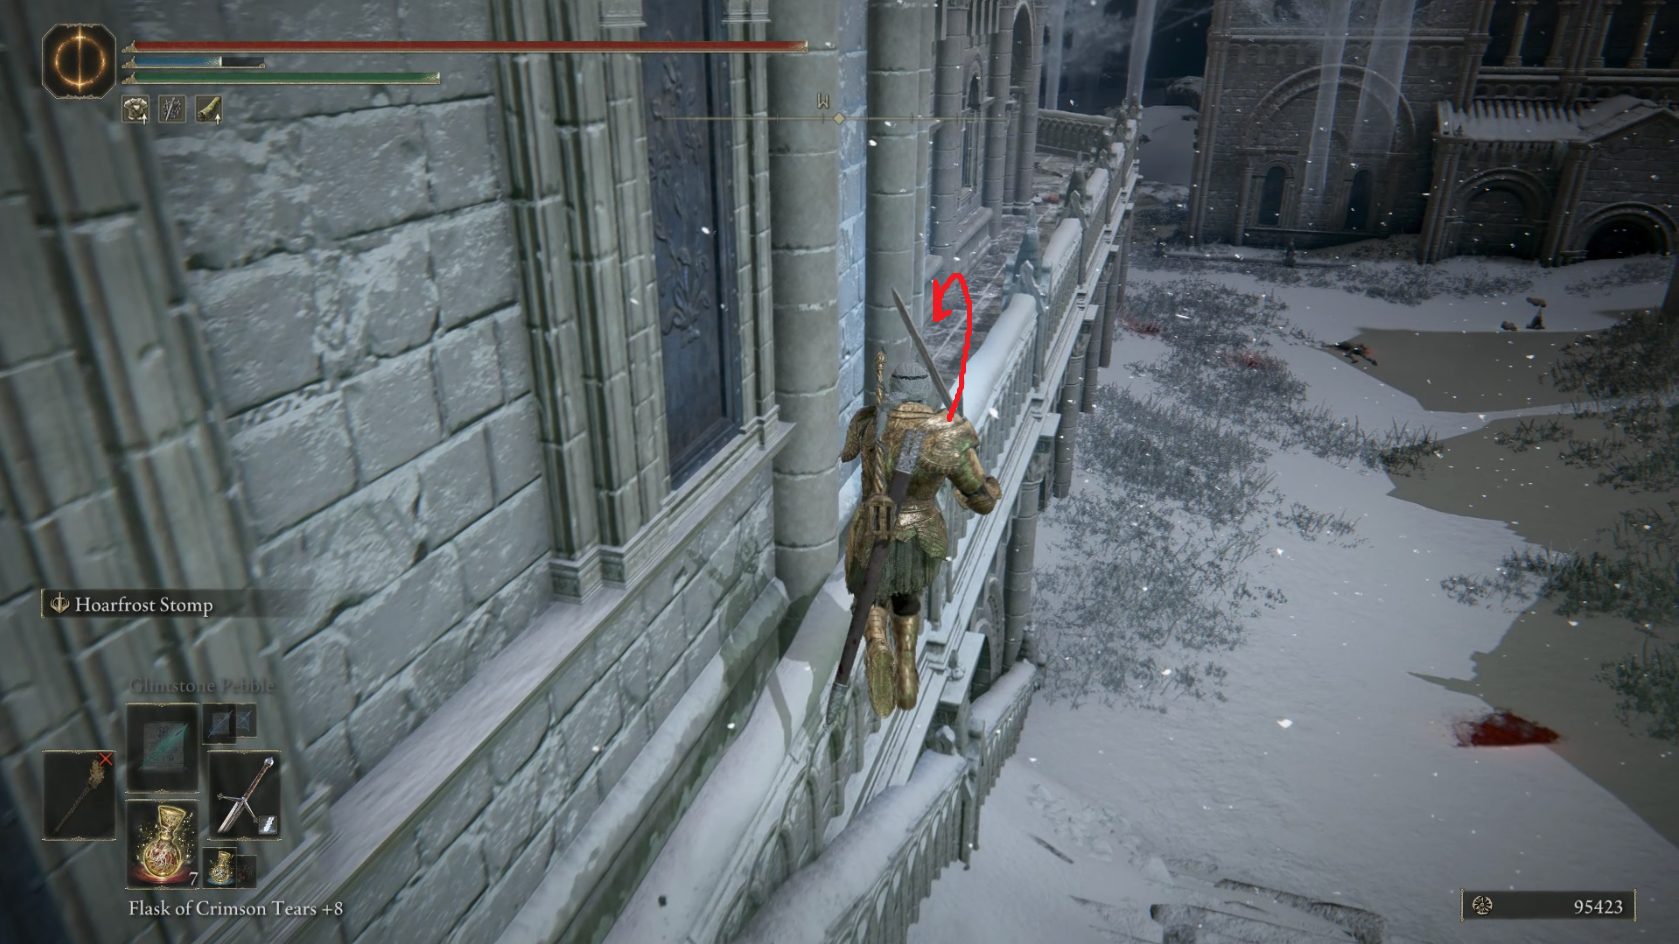
Continue southwest and jump up onto the next section of roof, then go around the left side of the tower to find a Golden Rune [12]. Circle around to the other side of the tower and you’ll find a ladder that leads to the second statue you need to light. Get that candle lit, and then head all the way back the way you came (to where you first jumped up onto the initial roof), staying on the rooftops the whole time to avoid fighting the assassin below. Once you’re back on the ground, look southwest across the stairs — there’s a ladder there, but you’ll need to jump up on the guardrail to reach it.
From another angle
Don’t go up the ladder right away, however. First, go west around the corner to find a corpse with x5 Crystal Dart. Then head back to the ladder and climb up. You’ll reach the top and be confronted with another ladder — climb this one as well, then light the statue’s candle and drop down onto the roof to the southeast. From here, look northeast and you’ll see a couple of albinaurics waiting to snipe you (there’s also a corpse with x3 Slumbering Egg).
Use the small section of roof to head northeast and cross to where the corpse is — you’ll want to crouch to avoid getting hit by the archers. Then, sprint northeast and jump onto the next roof, and zig-zag back and forth as you make your way to the left-hand archer. Alternatively, you can also try using a shield and the Barricade Shield weapon art. This may be the most challenging part of the evergaol, so don’t feel bad if you die on your first few tries! Here’s a GIF to help you get a sense of the rhythm you’ll need to move in to avoid the arrow volleys:
Once you reach the archer on the left, the other one won’t be able to hit you, so you can be patient and careful as you eliminate the one you’ve closed the distance with. Once she’s dead, climb the ladder on the east-southeast side of the roof, and then climb up the next ladder as well. At the top, you can light the final statue’s candle — the seals in the town will open, and you’ll be transported back to the “real” version of the town.
From the evergaol’s entrance, go east to the stairs and head up them. Grab the Invigorating Cured Meat from the corpse, then continue to the top — just ahead is a waygate that will take you to Miquella’s Haligtree.
This concludes our time in the Consecrated Snowfield — next step, the Haligtree!
Unabashed FromSoftware fanboy still learning to take his time with games (and everything else, really). The time he doesn't spend on games is spent on music, books, or occasionally going outside.


 84,000. If you wait until night, the two Night’s Cavalry will be escorting the cart in the next section. Either way, rest at the site of grace and then head southwest — you’ll soon see the cart and its defenders on your left, making their way north on the road. Craft/equip raisins before you engage, as the Night’s Cavalry will often hit Torrent instead of you.
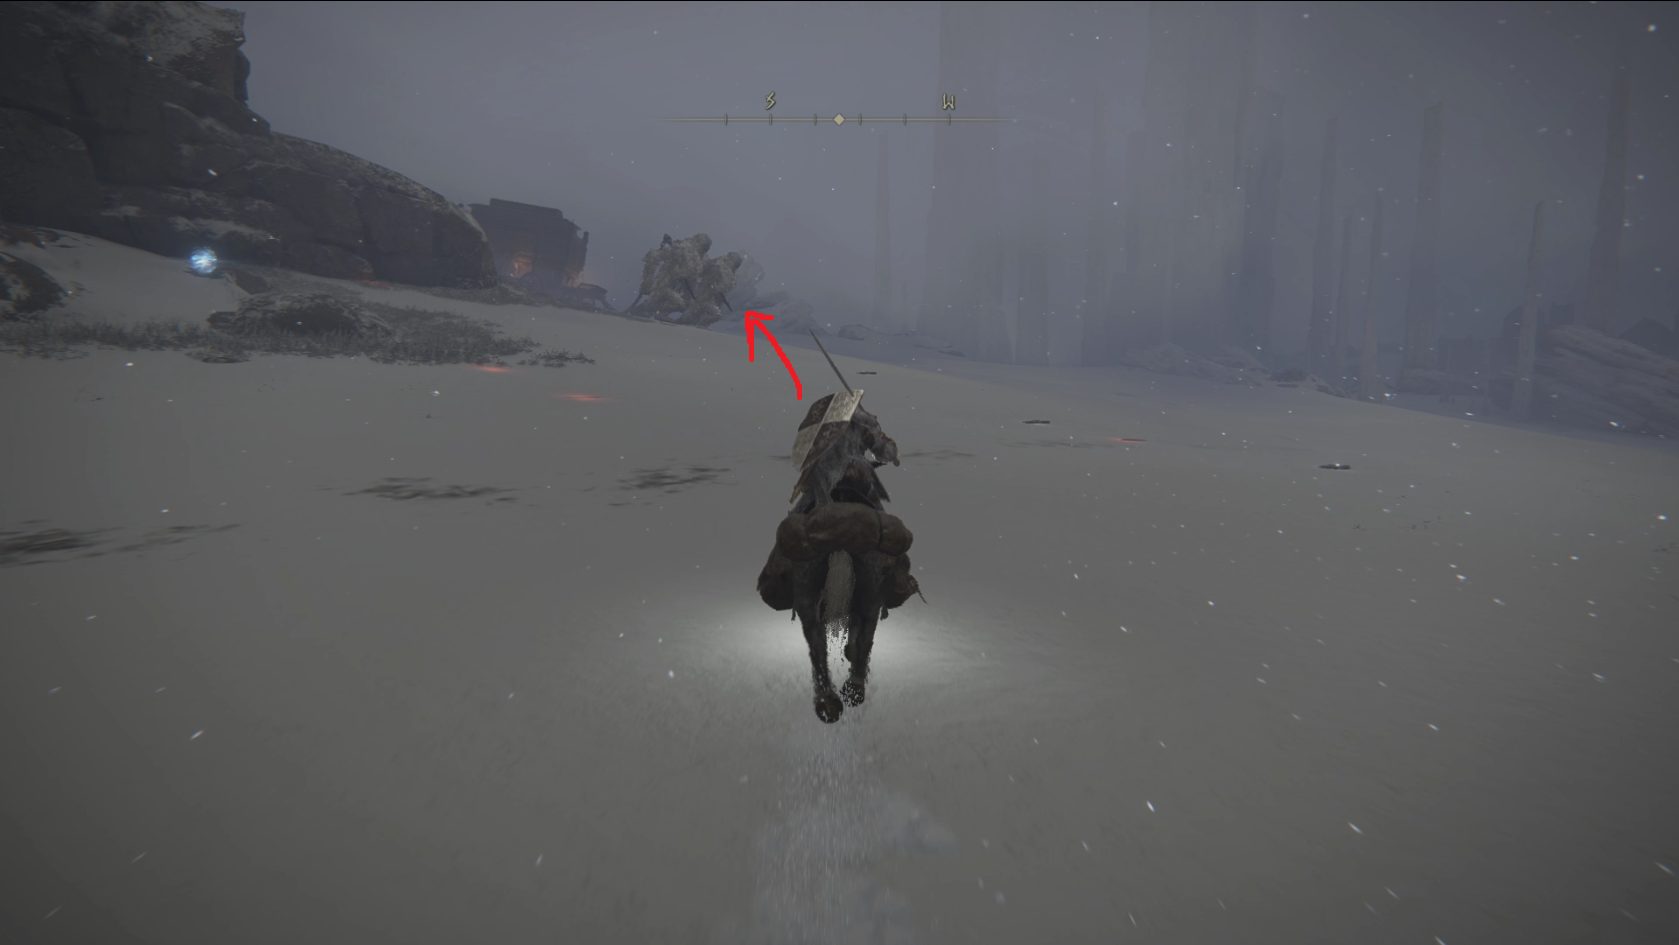


