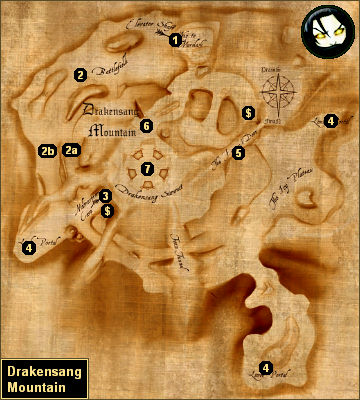
In this guide, you will find a map, legend, and walkthrough for the respective quest in Chapter 11 of Drakensang: The Dark Eye.
Background
You’ll receive this quest when you return to Murolosh after meeting with Pal’Na’Thar at the Cyclops Forge.
Overview
When you arrive in Murolosh, you’ll find the dwarves in a commotion. Xolgorax will tell you that “grisly dragonlike creatures” suddenly started appearing on Drakensang Mountain, and that King Arombolosh took his best warriors to deal with them. Then Rakorium will tell you that his  Thesis Crystal is capable of waking up souls contained in dragon carbuncles, and he’ll lend the
  Thesis Crystal to you so you can use it on the Adamantine Heart. Finally, Prince Arom will offer to take you to Drakensang Mountain, but be wary. When you get there you won’t be able to return, so be sure that you’ve completed all of the shopping and training that you want to do first.
Note: Before leaving Murolosh, if you travel to the temple and talk to Devotee Lugosh, then you’ll earn 50 experience points, and Lugosh might give you a second  Thesis Crystal. At least part of this is probably a bug.
When you arrive on Drakensang Mountain (#1), you’ll gain 100 experience points, and you’ll trigger the quest “The Battle on Drakensang Mountain.” You’ll find the dwarves in the area fighting dragonlings and dragon cultists, and you’ll have to do a lot of fighting yourself, but you’ll have Prince Arom following along with you, and so you should be able to deal with whatever comes your way.
Shortly you’ll come to King Arombolosh (#2), and he’ll ask you to help him defend Hammer Cave (#3). This will trigger the quest “Help the Dwarven Priest.” Arombolosh will give you two options for the attack — to provide ranged support, or to join in with the melee fighters. If you select the former, then you should take the left path (#2a), which will lead you to an outcropping overlooking the cave. If you select the latter, then you should take the right path (#2b), which will lead you right to the cave itself.
When you reach your position for the battle, you’ll receive 100 experience points. The battle shouldn’t prove too difficult — you’ll just have to kill a handful of cultists and dragonlings — and afterwards you’ll receive 100 experience points. A dwarf will then destroy the limbus portal (#4) to the south, which will prevent enemy reinforcements from arriving in that direction, and its destruction will conclude the quest “Help the Dwarven Priest.”
You’ll now be able to use Hammer Cave (#3) as a safe spot on the map. The dwarves — including King Arombolosh, Prince Arom, and Angraxa of Stone — will stay to defend it, and you’ll also meet a field merchant there who will sell you some basic supplies. As a bonus, if you talk to Angraxa, then she’ll heal your party (including curing wounds) and she’ll cast Move as Lightning on your main character.
To reach the peak, you’ll first have to destroy the remaining two limbus portals (#4). The portals will spawn enemies every so often, and if you take the time to kill them (especially the stone golems), then you’ll probably never make it to the portals. So what you’ll need to do is charge at the portals, damage them or destroy them, and then retreat back to Hammer Cave (#3) where the dwarves will help you kill your pursuers. As long as you damage the portals each time, then you’ll eventually destroy them, but if you’re efficient you should be able to destroy them in one try. Each time you destroy a portal you’ll receive 100 experience points.
When the portals go down, a passage (#5) will open, giving you access to the peak. However, at the same time, dragonlings will start spawning near the peak, and they’ll keep charging at you and attacking. To make the dragonlings stop spawning, you’ll just need to climb high enough into the mountains
Near the peak, you’ll encounter Malgorra’s four lieutenants: Chazs, Kssa, Tersach and Tzichazz (#6). Your best bet with them is to kill a group of dragonlings, then heal up as quickly as possible (using potions), and then attack the lieutenants before the next wave of dragonlings appears. The lieutenants can be wounded, so if you have wounding talents and weapons, then the fight shouldn’t be too bad. The lieutenants are also high enough in the mountains so that dragonlings won’t appear while you’re fighting them. When you kill the lieutenants, you’ll receive 100 experience points.
Past the lieutenants, you’ll finally encounter Malgorra and the Adamantine Heart (#7). Nothing will attack you between the lieutenants and Malgorra, so you should take the opportunity to heal up your party and cast some buffs before continuing.
When you approach Malgorra, she won’t taunt you or brag or say anything; she and the four dragon cultists with her will simply attack. Malgorra will cast a few spells, but the battle with her shouldn’t be at all difficult, and when Malgorra dies you’ll earn 200 experience points.
However, the battle won’t be over yet. When you click on the Adamantine Heart, Malgorra will reappear as a giant, purple, three-headed hydra-type monster, and she’ll attack you again. You’ll also receive 300 experience points.
Malgorra in hydra form can be tough. She’ll have a ton of hit points, she’ll be immune to wounds, and she’ll cast a variety of spells and summon skeletons and other (random) creatures to assist her. So you’ll need to hang in there as well as possible and quaff potions as necessary.
At various times during the battle, Malgorra will teleport herself and simultaneously cast a fireball. Everybody but your main character will take damage and get knocked down, so you might want your main character to focus on Malgorra while the rest of your party spreads out and deals with the summoned creatures. Twice during the battle Malgorra will also lose one of her heads. At these times all of your characters will gain consciousness, so take advantage of this to get everybody healed and fighting again.
When Malgorra finally dies, the quest (and the game) will come to an end. “Know this — YOU will be remembered in the legends of Aventuria forever….”
1 – Starting Point
2 – King Arombolosh
When you talk to King Arombolosh here (#2), he’ll give you the quest “Help the Dwarven Priest.” If you decide to assist him by making ranged attacks in the battle, then you should take the left path (#2a). Otherwise you should take the right path (#2b).
3 – Hammer Cave
4 – Limbus Portals
You’ll need to destroy these three portals to prevent enemy reinforcements from arriving on the mountain. Destroying the portals will also open a passage to the peak (#5).
5 – Blocked Passage
You’ll need to destroy the three limbus portals (#4) before you’ll be able to go through this passage. When you approach the passage, you’ll be ambushed by dragon cultists, who will suddenly rise up out of the snow. You’ll also have to deal with dragonlings who will spawn at the peak and then charge down at you. They’ll keep spawning until you reach Malgorra’s lieutenants (#6).
6 – Lieutenants
You’ll encounter Malgorra’s four lieutenants here: Dragonling Chazs, Dragonling Kssa, Dragonling Tersach, and Dragonling Tzichazz.
7 – Mountain Peak
This is where you’ll finally get to confront Malgorra.


