This guide will walk you through the “Brecilian Ruins”, in Dragon Age: Origins. We will go through how to go through this area, as well as any secrets you can find.
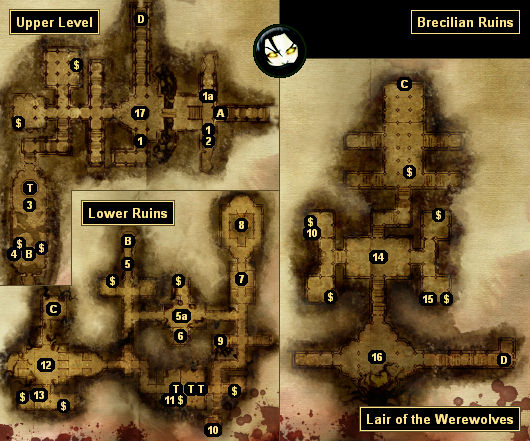
Map
Brecilian Ruins
Inside the ruins, you’ll have to battle numerous undead creatures and werewolves. Eventually, you’ll fight your way to the Lair of the Werewolves, where you’ll meet the Lady of the Forest (#16). She’ll explain the situation to you, including how Zathrian created the curse of the werewolves after his children were murdered by bandits. You’ll then have three ways to proceed:
- You can persuade the werewolves to attack the elves. This will cause you to move to the Brecilian Outskirts, where, after a bit of dialogue, the battle will begin. You’ll have several werewolves on your side, including Swiftrunner and Witherfang, so the battle shouldn’t prove too difficult. Afterwards, you’ll find a
 Keeper’s Ring, a
  Magister’s Staff, and more on the corpse of Zathrian, and you’ll find
  Varathorn’s Dar’Misu and
  Elfrope on the corpse of Varathorn.
- If you follow this path, then the werewolves will take over the Brecilian Outskirts (but without any shopkeepers or quest givers), and you’ll gain their assistance against the Blight.
- You can convince or force Zathrian to end the curse. For this path, you’ll need to return to the Upper Level of the ruins, where you’ll find Zathrian in the central chamber (#17). Regardless of what you say to him, he’ll agree to follow you to the Lady of the Forest (#16). Once there, you’ll either be able to convince him through dialogue or force him through combat to end the curse.
- If you have to fight Zathrian, then he’ll summon some wild sylvans and a pair of greater shades to assist him, and he’ll paralyze all of the werewolves in the lair. That means, at least at the start of the fight, that you’ll be on your own. The fight will end once you’ve done enough damage to Zathrian, so you should focus your attention on him. Also, if you have someone in your party who can dispel magic (such as
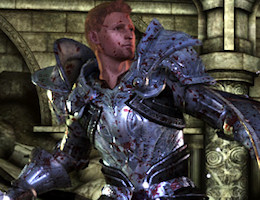 Alistair with his
  Cleanse Area talent), then you can free the werewolves from their paralysis, which will allow them to assist you (and make the battle pretty easy).
- Once Zathrian has removed the curse, he and the Lady of the Forest will disappear from the game. The werewolves will turn into humans, and if you demand a reward from them, then you’ll receive
 Swiftrunner’s Shield. You can also kill the humans for some minor loot and xp.
- If you follow this path, then the elves will remain in control of the Brecilian Outskirts, and they’ll agree to help you against the Blight.
- You can kill the werewolves, either before or after escorting Zathrian (#17) to them. You’ll have to face several werewolves in the battle, including Swiftrunner and Witherfang, but afterwards you’ll find the
 Heart of Witherfang and more on their corpses. Then when you next talk to Zathrian, you’ll be given the opportunity to attack him as well.
- If you fight Zathrian, then he’ll summon some wild sylvans and greater shadows to assist him, but he’ll only start out with the health he had left at the end of the battle with the werewolves (if he was there for it), and so you might be able to finish him off quickly. If you manage to kill Zathrian, then you’ll find a
 Keeper’s Ring, a
  Magister’s Staff, and more on his corpse.
- Back in the Brecilian Outskirts, the
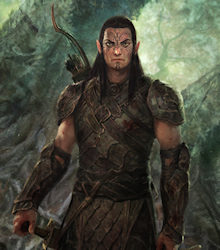 Dalish camp will remain about the same, and the remaining elves will agree to help you against the Blight.
1 – Secret Doors
To detect these doors (#1), you’ll just need to move one of your characters close to them. The character doesn’t need to be a rogue. One of the doors (#1a) won’t open until you’ve opened the secret door to the south of it.
2 – Locked Chest
Inside the locked chest you’ll find a  Love Letter. You’ll need Love Letters for the quest “Correspondence Interruptus“.
3 – Dragon
You’ll face a regular dragon here. It’ll breathe fire, and it’ll have lots of hit points, but you shouldn’t find it nearly as challenging as some of the other dragons in the game. The dragon probably won’t drop anything exciting when it dies, but past it you’ll find its hoard (#4), where you’ll be able to pick up some good loot.
4 – Dragon Hoard
Inside the hoard you’ll find  Falon’Din’s Reach (which will give you the Magic and Religion
  codex entry for
  Falon’Din: Friend of the Dead, the Guide when you pick it up), a
  Silver Medallion, some potions, some gems, and almost 19 sovereigns in cash.
5 – Ghostly Boy
When you first enter the Lower Ruins, you’ll see a ghostly boy ahead of you (#5), but he’ll run away when you get close to him. Eventually you’ll catch up to him (#5a), but you won’t understand what he’s saying, other than that he might be looking for his mother. At the end of the conversation, he’ll go running off again (and disappear from the game), and you’ll get attacked by ten skeletons.
Note: The boy might be connected to the shade in the ruins (#8), but there isn’t any way to talk to either of them (even if you’re playing an elf). Perhaps something was intended for them but didn’t make it into the final cut of the game.
6 – Sarcophagus
Inside the sarcophagus you’ll find a  Fancy Scroll (a good gift for
  Wynne) and a
  Tablet. Picking up the Tablet will give you the Notes
  codex entry for
  A Carved Elven Tablet, and it will also trigger the quest “The Elven Ritual” (see #7).
7 – Ritual Room
Inside this room you’ll find an altar and a fountain. These two items are involved in the quest “The Elven Ritual.” To learn what to do with them (and trigger the quest), you’ll need to loot the  Tablet from a nearby sarcophagus (#6). Then to complete the ritual, you’ll need to:
- Take the earthen jug (at the fountain).
- Fill the earthen jug with water (at the fountain).
- Place the filled earthen jug on top of the altar (at the altar).
- Kneel before the altar and pray (at the altar).
- Examine the earthen jug on the altar (at the altar).
- Take a single sip from the water in the jug (at the altar).
- Take the earthen jug (at the altar).
- Dump the water in the jug back into the pool (at the fountain).
When you perform the ritual correctly, you’ll complete the quest, which will cause the door to the north to open, and also award you 500 xp.
8 – Shade
The shade will speak to you when you approach it, but you won’t understand what it’s saying, and eventually it and two greater shades will attack you. After the battle, inside the coffin next to the shade, you’ll find  Juggernaut Plate Armor. Looting the armor will complete the quest “The Mage’s Treasure” (assuming that you picked up the other three pieces of the set from the Brecilian Forest), and it will also give you the Culture and History
  codex entry for
  Uthenera.
9 – Phylactery / Altar
In this room you’ll find a phylactery and a broken stone altar. If you click on the phylactery and “touch the gem,” then the presence trapped inside will make you an offer: if you agree to destroy the phylactery and grant the presence oblivion, then it will teach you the  Arcane Warrior specialization.
To destroy the phylactery, you’ll just need to “approach the stone altar with the gem.” The presence will then offer you the  Arcane Warrior specialization. If you tell the presence that no reward is necessary, then you’ll receive 250 xp. Otherwise, if you accept the presence’s memories, then you’ll learn the specialization. It doesn’t appear to make any difference if you keep your end of the bargain or not.
10 – Glass Phylactery
If you try to take either of these two glass phylacteries, then they’ll break open, releasing “red” revenants. The revenants will drop scraps of paper and more when they die. When you pick up the scraps, you’ll receive or update the Notes  codex entry for
  The Black Vials.
11 – Adventurer’s Corpse
On the corpse here you’ll find a journal that will give your or update the Quest-Related  codex entry for
  Unbound. You’ll need to find three such codex entries to trigger the quest “Unbound“.
12 – Arcane Horror
In this room you’ll encounter a “red” arcane horror. If you approach it, then it will teleport around the room, leaving lightning storms in its wake. If you chase it, then the skeletons in the room will rise up and attack you. So the easiest way to deal with the arcane horror is to switch all of your characters to ranged attacks and pelt it from a distance. That way you’ll avoid the lightning storms and the skeletons, and you’ll only have to worry about fireballs and hexes. When the arcane horror dies, it will drop  Ashen Gloves, several gems, and more.
13 – Sarcophagus
Inside the sarcophagus you’ll find  Ancient Elven Armor and
  Legacy White Shear. Picking up the armor will give you the Items
  codex entry for
  Ancient Elven Armor.
14 – Gatekeeper
The Gatekeeper will ask you to parley with the Lady of the Forest (#16). If you accept, then he’ll immediately escort you to her. If you refuse, then all of the werewolves in the northern part of the lair (including the Gatekeeper) will turn hostile, and you’ll be able to kill them for extra xp. Either way, when you finally reach the Lady of the Forest, she’ll start out by talking to you.
15 – Ancient Text
Among the ancient texts, you’ll find a  Scroll of Banastor, which will give you or update the Quest-Related
  codex entry for
  The Scrolls of Banastor. You’ll need to find five Scrolls of Banastor for the quest “The Scrolls of Banastor“.
17 – Zathrian
After meeting with the Lady of the Forest (#16), this is where you’ll find Zathrian.
