This is a guide for Hostile Natives, Chapter 3 of the Order of the Flame campaign in Dungeons & Dragons: Dragonshard. It includes a detailed walkthrough, a handy map, and a table listing all the points you can earn throughout the mission.
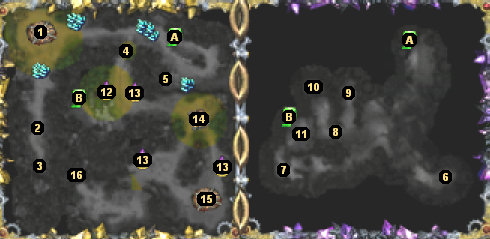
Hostile Natives Map
Nexus
Archeologist
Experience Scroll
Drawbridge
Silver Flame Temple
Beholder
Archeologist’s Assistant
Qabalrin Spirit
Cloak of Invisibility
Lord Ratak’h’s Treasury
Medusa’s Lair
Silver Flame Oratory
Lizard War Totems
Lizardfolk Outpost
Lizardfolk Nexus
Seal of Light
Exits:
A: Tunnel.
B: Tunnel.
Description
Emerging from the depths of the ancient city, the Order now searches the jungle for the first of three Seals of Light that protect the Heart of Siberys from those who would seek to claim it.
Lady Marryn won’t be available at the start of this chapter, and so you’ll have to select Kael, Amathor, or Bastion. Eventually, this chapter will involve a lot of combat, including a fight against an enemy nexus (#15), so if you haven’t tried Bastion yet, this might be the best chapter for it.
You’ll start the chapter next to a nexus (#1). The elderly wizard will explain a little bit about how the nexus works, but he’ll make it sound like you can only upgrade your units by adding training buildings or by adding monuments, when you can actually do both.
The best thing to do with the nexus is to pick out 2-3 units and then make those units as powerful as possible. If you selected Bastion as your champion, then go with artificers, warforged titans, and clerics. Otherwise, go with barbarians (or paladins, once you’ve unlocked them), clerics, and maybe rangers. You should also train at least one level 2 rogue, just to take advantage of the chests in the underworld.
The chapter starts out easily. No enemies will come charging at your base, and so you’ll have time to familiarize yourself with the nexus and train a few units. Once you’ve put together a small fighting force, start exploring. You’ll find some enemies in pairs that you should be able to defeat without taking any losses, and you’ll also find a couple of sub-quests: to help the archeologist to the south (#2) and to lower the drawbridge to the east (#4).
Note: You’ll find some dragonshards in a couple of spots near your nexus, but you won’t find any more than that until after you’ve explored the underworld, so try to build and train efficiently, and try not to lose any units.
Once you’ve made your army as powerful as possible, head east to the tunnel leading to the underworld (Exit A). In that area, you’ll find a couple of sub-quests to complete (see #6-8), but your main goal is to defeat the medusa (#11). The medusa can be nasty since she has an attack that will temporarily turn your units to stone, but with roughly ten upgraded units, you should be able to persevere. Once the medusa is dead, you’ll be able to use the tunnel leading up to the remainder of the surface part of the map (Exit B).
This is where the chapter gets dicey. If you lower the drawbridge to the north (#4), or get too close to the Lizardfolk outpost (#14), or just wait for too long, then the Lizardfolk will send a huge attack force your way. Since the Lizardfolk will be in control of at least two places of power (#13), and since their captains will have a full complement of soldiers, their attack will probably be devastating to your army, and so your best course of action is to retreat to your home nexus (#1). If you’ve upgraded the walls of your nexus, then you might be able to get the Lizardfolk to chase you around while your towers kill them. But regardless, the attack will be massive enough that you’ll need all the help you can get, and by retreating to your nexus you should be able to save the majority of your army.
Note: It’s a good idea to hang out in the area near Exit B for a little while. You should be able to harvest dragonshards there, meet up with some flame archons to help you out, and activate the silver flame oratory (#12). Completing those tasks will make your army more powerful, giving you a better chance to defend against the upcoming Lizardfolk attacks.
After the initial barrage, the Lizardfolk will continue to train units and send attacks your way, but those subsequent attacks will be smaller and easier to defeat. That means you’ll need to take the opportunity to max out your army and advance on the Lizardfolk lands.
Your first objective should be the outpost to the east (#14). There you’ll find an expansion well and Lady Marryn. Lady Marryn will be in a cage guarded by two Lizardfolk fighters. When you kill the fighters, one will drop a Lizardfolk prison key, which you can pick up and use on the door to Lady Marryn’s cage, thus releasing her. From that point on, you’ll get to use both Lady Marryn and the champion you selected at the start of the chapter.
The rest of the chapter is straightforward. You’ll just need to fight your way to the Seal of Light (#16), perhaps stopping by the enemy nexus (#15) and destroying it along the way. You’ll have to defeat a lot of Lizardfolk units (including a champion and a juggernaut), plus destroy a few tribal defenders (towers) to get to the seal, but claiming the Lizardfolk outpost and freeing Lady Marryn should have turned the tide of the battle to your favor, making this final drive a forgone conclusion if not exactly trivial to accomplish. Once you’ve destroyed the Lizardfolk army and reached the Seal of Light, the mission will end.
1 – Nexus
2 – Archeologist
The archeologist will tell you that he ran into a medusa (#11) in the underworld, and that he lost his assistant (#7) to it. He’ll then ask you to kill the medusa, and he’ll offer you a “powerful artifact” if you succeed. After killing the medusa, bring the medusa’s head to the archeologist as proof of your deed, and he’ll reward you with a champion’s artifact: the relic of the lizard tomb.
3 – Experience Scroll
4 – Drawbridge
You’ll receive a quest to lower the drawbridge when you get close to it, but the only way to lower the drawbridge is to right-click on the winch on its southern side. That is, you’ll have to navigate through the underworld before you can complete the quest.
Note: Fair warning. When you lower the bridge, the Lizardfolk will attack you in force, so be prepared.
5 – Silver Flame Temple
If you read from the holy tome here, a pair of knights will join your cause, and you’ll gain the ability to build Orders of the Flame at your nexus (#1).
6 – Beholder
In this spot you’ll find a beholder and a mummy named Lord Ratak’h. Both will attack you, but Lord Ratak’h is enthralled to the beholder, and if you can keep him alive, then you’ll gain a new sub-quest. So focus your attention on the beholder. If the beholder charms any of your party, just keep telling your party to attack the beholder, to ensure that they don’t attack and kill the charmed unit instead.
After the battle, if Lord Ratak’h is still alive, he’ll call you master and come under your control, and he’ll mumble something about his treasury. If you can take Lord Ratak’h to his treasury (#10), then the door to it will open, and you’ll find an idol of blinding (plus some other odds and ends) inside. Lord Ratak’h will attack you when you loot any of the items in his treasury, but he should be a pushover to kill.
7 – Archeologist’s Assistant
You’ll discover the archeologist’s assistant here. He’ll be in stone form (thanks to the medusa, #11), but he’ll still be able to talk to you and ask you to help. At his feet you’ll find a potion of stone to flesh. If you use the potion on the assistant, then he’ll thank you and run off to rejoin the archeologist. Enemies can apparently attack the assistant, so you might want to escort him through the underworld, but we’ve never seen him get into any sort of danger. Provided the assistant survives his trip, he’ll drop a couple of artifacts for you when you talk to him next.
8 – Qabalrin Spirit
The spirit will tell you about the medusa (#11), and, just like the archeologist (#2), she’ll ask you to kill it. But she’ll be more helpful than the archeologist was. She’ll tell you about an artifact called the idol of blinding that you can pick up in Lord Ratak’h’s treasury (#10), provided that you can get the door open. See #6 for how to do that.
Note: The spirit can be buggy. She should move to the treasury and give you the “idol of binding” quest, but sometimes she gets stuck. If that happens, you’ll have to load your game and talk to her again.
9 – Cloak of Invisibility
10 – Lord Ratak’h’s Treasury
You’ll need to have Lord Ratak’h with you to enter the treasury. See #6 for more information. Inside the treasury, you’ll find an idol of blinding, which can be an effective weapon against the medusa (#11).
11 – Medusa’s Lair
The entrance to the medusa’s lair will start out blocked by a forcefield, thanks to the Qabalrin spirit (#8). Oddly, or perhaps buggily, the forcefield will never disappear, but eventually you’ll be able to walk through it.
Inside the lair, you’ll find the medusa, plus three dire giant cobras. Every so often, the medusa will turn your party (temporarily) to stone, and she and the cobras will get some free shots at your units. So try to kill the enemies as quickly as possible, and save up your abilities for the fight. When the medusa dies, she’ll drop a medusa’s head.
12 – Silver Flame Oratory
On the oratory you’ll find statues of a wounded human soldier, a wounded warforged soldier, and a horned devil. If you use a cleric to heal the human soldier, an artificer to heal the warforged soldier, and a paladin to smite the devil, then the oratory will convert to a place of power and go under your control. However, the description will only state that the oratory “radiates with holy energy” so it’s not clear what sort of bonus it gives.
13 – Lizard War Totems
Each totem you control will add 2 points of damage to your units’ attacks.
14 – Lizardfolk Outpost
15 – Lizardfolk Nexus
16 – Seal of Light
Points Chart
Mission Points
Value
Description
The Search for Lady Marryn
500
Found Lady Marryn.
Silver Flame Temple
250
Read the book at the silver flame temple.
Slay the Medusa
1000
Killed the medusa.
The Archeologist
250
Delivered the medusa’s head to the archeologist.
Escort the Archeologist Assistant
100
Helped the assistant make it back to his master.
Idol of Binding
100
Acquired the idol of binding.
Claim the Seal of Light
1500
Claimed the Seal of Light.
Destroy Lizardfolk Outpost
250
Destroyed the Lizardfolk outpost.
Destroy Main Lizardfolk Village
500
Destroyed the Lizardfolk nexus.
Bonus: Honorable Combatant
250
Did not use the idol of blinding on the medusa, or the medusa’s head on Blackclaw.
Bonus: Field Rescue
100
Freed Lady Marryn from her cage while battling the Lizardfolk.
Bonus: Holy Crusader
750
Defeated all of the Lizardfolk units and structures in the area.
Lower the Drawbridge
100
Lowered the drawbridge.
Solve the Mystery of Lord Ratak’h
0
Rescued Lord Ratak’h and led him to his treasury.
Silver Flame Oratory
500
Activated the silver flame oratory.
Bonus Points
Value
Description
Great Commander Bonus
500
Allowed fewer than 25% of your units to die.
Against All Odds Bonus
500
Created less than nine captains.
Miser Bonus
1000
Used less than 1500 gold and 1500 shards.
Meticulous Bonus
2000
Completed every possible quest.
Time Bonus
0
Beat the mission in under 10 minutes. (You can actually score up to 1500 points here, but this bonus will never count against you.)
Difficulty
Varies
Easy is worth 0 points, Normal is worth 500 points, and Hard is worth 2000 points.
Share this article:
Val Hull
Resident role-playing RPG game expert. Knows where trolls and paladins come from. You must fight for your right to gather your party before venturing forth.