This is a guide for Harnessing the Beasts of War, Chapter 4 of the Lizardfolk campaign in Dungeons & Dragons: Dragonshard. It includes a detailed walkthrough, a handy map, and a table listing all the points you can earn throughout the mission.
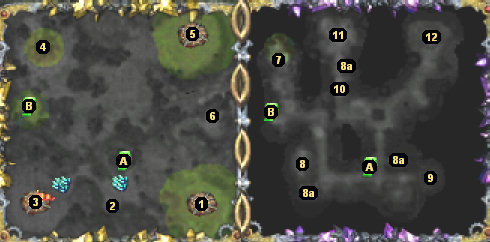
Harnessing the Beasts of War Map
Nexus
Plaque
Order of the Flame Nexus
Corrupted Tree
Umbragen Nexus
Nature Shrine
Blood Queen Ceremony
Restless Spirit
Treasure Room
Spirit of Greathawk
Marilith
Drider
Exits:
A: Tunnel.
B: Tunnel.
Description
Now that the time for war has come again, the Lizardfolk must bring the War Felldrakes back into the fold to defend their lands once more. To their horror, they find that their new enemies are already threatening the sacred grove of these great beasts.
You’ll get to use Darroc for this chapter, as well as one of the four regular champions. Darroc is a melee champion, so you might want to choose a support champion like Wowen to assist him rather than another melee champion like Redfang.
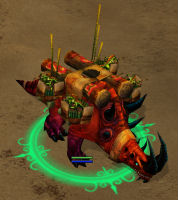
The clock will be ticking right from the start in the chapter. Until you stop the ceremony that is sapping the strength of the war felldrakes (#7), a war felldrake will die once every five minutes. There are five war felldrakes in all, and if you can’t save at least one of them, then you’ll lose the mission.
To save the war felldrakes, you’ll have to defeat all of the Umbragen units at the ceremony beneath the corrupted tree (#4). Since you won’t find very many Umbragen units there, and since they won’t be replenished if you kill some, beating the group eventually shouldn’t be a problem. The trick is to kill them within the first five minutes of the chapter, especially since you’ll have to build up your starting nexus (#1) from scratch, which will require a good chunk of those minutes.
So if you want to save all of the war felldrakes, what you’ll have to do is immediately start building your nexus, and then run your two champions right to the ceremony. Conveniently, the exit closest to the ceremony (Exit B) and the surface area over the ceremony will both be exposed, and so you can center the view on the surface area, then switch to the underworld view, and then click to tell your champions where to go. Various enemies will attack your champions along the way, but they won’t pursue them all the way to the ceremony.
Note: It’s probably a good idea to read the plaque at #2 before heading to the ceremony. If you have Wowen as your champion, then you can do it on the way. Otherwise, you’ll have to wait for a tribal shaman to be produced to read it. You might also want to fight some of the spiders in the underworld first, to charge up the power-up ability of your non-Darroc champion.
When you approach the ceremony site, a blood queen will be resurrected, and a few Umbragen units will attack you. Make good use to Darroc’s “dragon leap” ability to damage and knock down the Umbragen, and have your other champion help out as much as possible. When you defeat the Umbragen units, you’ll gain control of all of the war felldrakes.
Note: If you can’t win the battle with just two champions (we’ve done it on the hard difficulty setting using Wowen and Darroc, so it is possible), don’t worry about it too much. War felldrakes are the Lizardfolk juggernaut unit, and you won’t need all five of them to beat the chapter.
Once you’ve saved the war felldrakes, the rest of the chapter should be pretty easy. You’ll just need to defeat the two enemy nexuses in the region (#3 and #5). But since the Order of the Flame and the Umbragen will be fighting each other as well as you, they won’t put too much pressure on you, and so you should be able to explore the underworld and build up your nexus and army in peace. Once you’ve decided that it’s time to take on your enemies, defeating their nexuses should be straightforward. If you saved all of the war felldrakes, then they might be able to defeat the nexuses all by themselves, and if you support them with your army, then it should be a total slaughter. Once the two enemy nexuses are history, the chapter will end.
1 – Nexus
2 – Plaque
You’ll need to have Wowen or a tribal shaman selected to read the plaque. Once you can decipher the words, you’ll find that the message is from a shaman named Greathawk, and that reading it will boost your spell resistance.
3 – Order of the Flame Nexus
4 – Corrupted Tree
5 – Umbragen Nexus
6 – Nature Shrine
When you use the nature totem (from #10) on the shrine, you’ll gain at least one spirit of nature, and you’ll be allowed to build Verdant Cairns at your nexus (#1).
7 – Blood Queen Ceremony
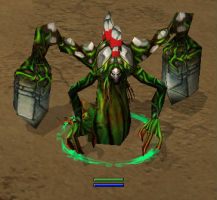
A blood queen will be resurrected when you approach the ceremony. You’ll have to defeat all of the Umbragen units here to cleanse the corrupted tree (#4) and bring all of the war felldrakes on the surface to your side. After the battle, you’ll find a talisman of vitality on the ground.
8 – Restless Spirit
The restless spirit (#8) will tell you about some other spirits who have “hidden away” in new bodies, and he’ll ask you to release the spirits so that they might find their final resting place. The spirits are inhabiting the bodies of iron golems. The golems can be found at #8a, although the one to the south will make its way to attack you once you’ve accepted the quest. Once you’ve defeated all three iron golems, the restless spirit will drop four scrolls onto the ground and allow you to take two of them.
9 – Treasure Room
The only way to enter this treasure room is to have Darroc use his “dragon leap” ability to jump over the wall. Inside, you’ll find a cloak of invisibility plus some gold.
10 – Spirit of Greathawk
The spirit of Greathawk will ask you to kill the marilith to the north (#11). Once you’ve done so, he’ll reward you with a nature totem, which you can use at the nature shrine on the surface (#6).
Sadly, the drider won’t drop anything particularly useful when it dies, and killing it won’t stop the random spider battles in the underworld.
Points Chart
Mission Points
Value
Description
Avenge Greathawk’s Death
250
Killed the marilith.
Restore the Nature Shrine
250
Used the nature totem to restore the nature shrine.
Destroy the Order of the Flame’s Encampment
1000
Destroyed the Order of the Flame nexus.
Destroy the Dark One’s Encampment
1000
Destroyed the Umbragen nexus.
Save the War Felldrakes
1000
Saved at least one war felldrake.
Cleanse the Sacred Grove
1000
Defeated all enemies in the region.
Restless Spirit
1000
Defeated the iron golems in the underworld.
Bonus: Felldrake Keeper
1000
Saved all of the war felldrakes.
Bonus: Brief Revival
500
Killed the blood queen within one minute of her resurrection.
Bonus Points
Value
Description
Great Commander Bonus
500
Allowed fewer than 25% of your units to die.
Against All Odds Bonus
500
Created less than nine captains.
Miser Bonus
1000
Used less than 2000 gold and 2000 shards.
Meticulous Bonus
2000
Completed every possible quest.
Time Bonus
0
Beat the mission in under 10 minutes. (You can actually score up to 1500 points here, but this bonus will never count against you.)
Difficulty
Varies
Easy is worth 0 points, Normal is worth 500 points, and Hard is worth 2000 points.
Share this article:
Val Hull
Resident role-playing RPG game expert. Knows where trolls and paladins come from. You must fight for your right to gather your party before venturing forth.